Thursday, September 28, 2006

Cooking School: Dutch Crunch Bread


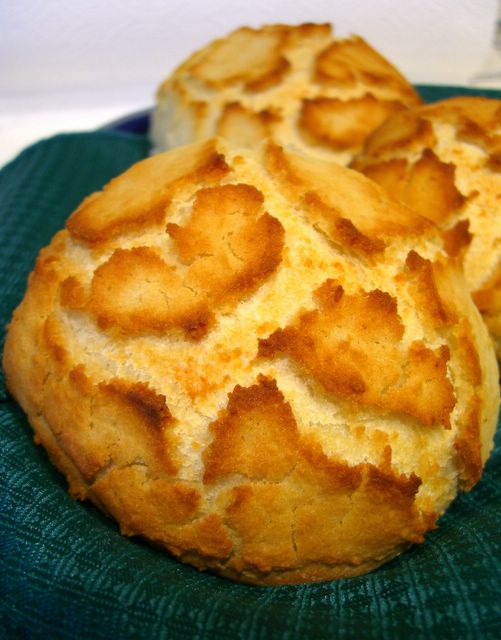
I mentioned Dutch Crunch Bread on my list of five things to eat before you die. The name comes from the distinct and unusual topping on the bread, which is made with rice flour, yeast and a little bit of oil, salt and sugar. On its own, the topping is pleasant, but when paired with some good bread, the contrast is amazing.
Thanks to some of my commenters, we know that this bread is called Tijgerbrood, or "tigerbread" in Holland, named after its striped and textured appearence. I didn't stripe mine, which I suppose you could do by running a fork through the mixture before baking, but appearace doesn't take anything away from the fantastically crunchy texture and the ever so slightly yeasty taste that complements so many sandwich fillings. It also makes excellent toast.
Sandwiches are my favorite things to make with this type of bread and if I'm at a deli (only in the SF Bay area, the only places I've seen them) that sells them, I will always get it. So, when I make the rolls at home, I like to make them big so that they make hearty, filling sandwiches. The size also provides enough bread to not make the topping overwhelming. The topping can be used on other types of bread, including as a topping for regular sandwich loaves, if you only want a little bit of the "crunch" per serving.
By the way, if you have leftover rice flour at the end of this, just go ahead and make another batch. I usually do. Alternatively, you could use it to make some gluten-free crepes instead.


Dutch Crunch Bread
Bread
2 1/2 tsp active dry yeast (1 packet or 1/4 ounce)
1/4 cup warm water (105-110F)
1 cup warm milk (105-110F) (nonfat is fine)
1 tbsp sugar
2 tsp vegetable oil
1 1/2 tsp salt
2 1/2 - 3 1/2 cups all purpose flour

Topping
(from The Bread Bible)
1 tbsp active dry yeast
1/2 cup warm water (105-110F)
1 tbsp sugar
1 tbsp vegetable oil
1/4 tsp salt
3/4 cup white rice flour (not sweet rice flour)

In the bowl of an electric mixer*, combine yeast, water, milk and sugar. Stir to dissolve and let sit for about 5 minutes. Add in vegetable oil, salt and about 2 cups of flour. Using the dough hook attachment, mix at medium speed unti the dough comes together. Add remainging flour a tablespoon or two t a time until the dough pulls away from the sides of the bowl.
Turn out onto a lightly floured surface and knead for about 4 minutes, until smooth and elastic. Place in a lightly greased by and cover with plastic wrap. Let rise for 1 hour, or until doubled in size.

Once the dough has risen, turn it out onto a lightly floured surface and divide it into 6 equal portions. Shape each into a ball (demonstrated here) and place on a parchment-lined baking sheet. Let rise for 15 minutes while you prepare the topping.
Combine all topping ingredients in a medium bowl and mix very well. Let stand for 15 minutes.

Once the rolls have risen a bit and the topping is ready, spread a generous layer on the rolls, trying to use all the topping in a thick coat on the top and sides. Let rise for another 20 minutes.
Bake at 375F for 25-30 minutes, until well browned. Let cool completely on a wire rack before eating. Store in an airtight container, if necessary.

*You can mix this by hand, too.

Monday, September 25, 2006

German Chocolate Cake

I hesitated about running the same picture twice in a row, but I promised to deliver the recipe, so there's not much I can do about it. Besides, at the risk of sounding terribly immodest, I really like this picture.
As many of you guessed, this is indeed a German Chocolate Cake. Despite the name, the cake is thoroughly American and was invented in Texas, or at least, that is where the recipe was first published. The name comes from the fact that the chocolate cake made with a type of chocolate sold by Baker's Chocolate Company called German's Sweet Chocolate, named after an employee named Sam German in 1852. The cake recipe didn't appear in print until 1957, but it has been a favorite ever since.
Eventually, the "'s" was dropped and the cake simple became German Chocolate Cake. There is pretty much just one standard recipe for it, with slight variations. All produce a relatively mild chocolate-buttermilk cake with a really gooey, rich frosting that is thick with coconuts and pecans. The frosting is really too rich to eat on its own, so even though it seems like there is only just enough to fill and top the cake, as you eat you'll discover that the amount is just right.
The cake is quite easy to make and very impressive to look at. The only tricky part is dividing the batter evenly into 3 pans. Instead of pouring directly into one pan, use a spoon of some kind to ladle out the batter until they are even, ensuring an even baking time. In my experience, no serious damage will be done to the third layer if it has to wait for the first two to be baked, if you have a small oven and cannot fit them all at once.

German Chocolate Cake
4 oz. Bakers'S German'S Sweet Chocolate (or semisweet chocolate)
1/2 cup water
2 cups flour
1 tsp. baking soda
1/4 tsp. salt
1 cup butter, room temperature
2 cups sugar
4 large eggs, room temperature
1 tsp. vanilla
1 cup buttermilk

Preheat oven to 350°F. Grease three 9-in. round cake pans and line the bottoms using parchment paper.
Melt chocolate and water together in a large bowl, in the microwave or on top of a double boiler. Stir well and set aside to cool.
Sift together the flour, baking soda, and salt in a medium bowl. Set aside.
In a large bowl, cream butter and sugar together until light and fluffy. Add in eggs one at a time and then stir in the vanilla.
Add the flour mixture alternately with the chocolate mixture and buttermilk, working in three or four additions. Mix only until just combined.
Divide the batter evenly into the prepared pans and bake for 25-30 minutes, until a toothpick inserted into the center comes out clean and the cake springs back when lightly pressed. Cool in pans for 15 min., then turn out onto wire racks to cool completely, removing the parchment paper.

Coconut Pecan Frosting
(from AllRecipes)

1 (14 ounce) can sweetened condensed milk
3 egg yolks
1/2 cup butter, room temperature
1 1/3 cups flaked coconut
1 cup chopped pecans
1 teaspoon vanilla extract

In a large saucepan over medium heat, stir together the condensed milk, egg yolks, and butter. Cook, stirring constantly, for about 10 minutes, or until thick and bubbly. Remove from heat and stir in the coconut, pecans, and vanilla.
Cool to room temperature (stirring to loosen, if necessary) and spread between cake layers and onto top of cake.

Friday, September 15, 2006

A few days off


Hi everyone. I'm taking a couple of days off, so I'll leave you with this picture to hold you over until I get back. I'll update with the recipe soon. Promise.

Wednesday, September 13, 2006

Nectarine Scones


Normally, I'm not a huge fan of fresh fruit in a scone. Dried fruits are easier to control and produce consistent, flavorful results. I feel like the fresh fruits release too much moisture and have a negative effect on the texture of the final product. This is especially true of berries, but the firmer the fruits get, the better the scone. Apples work fairly well and, as far as stone fruits go, nectarines aren't too bad, either.
Nectarines are sweet without getting as soft as most other stone fruits as they ripen. I prefer to cut the fruit into medium-sized chunks, but a finer dice could easily be used and still produce good results. Thrown into a scone, they maintain their shape as they soften and still leave the crumb of the scone fluffy and light, not soggy. You could use peaches or plums, but I think that nectarines will give you the best result.
There is a lot of vanilla relative to the size of this recipe, but it really brings out the flavor of the nectarines. These are a light, lovely change from a plainer scone and a great way to use up a nectarine. The scone tastes very like a cobbler, and if you really go for the slightly crispy top of the cobber (like I do) you'll probably love these.


Nectarine Scones
1 cup all-purpose flour
1 tsp baking powder
1/4 tsp salt
1 tbsp sugar
1/4 cup butter, chilled, cut into small pieces
5-6 tbsp milk (any kind)
1 tsp vanilla extract
1/4 - 1/3 cup nectarine, peeled and diced


Preheat oven to 400F. Line a baking sheet with parchment paper.
In a medium bowl, whisk together flour, baking powder, salt and sugar. Add butter and toss to coat. Using your finger tips, rub the butter into the flour mixture until it resembles very coarse sand. A few large bits are ok, but try not to have any pieces larger than an average pea.
Add 5 tablespoons of milk and the vanilla and stir. Mix in nectarines. The small amount of juice given off the the fruit should moisten the mixture as much as it needs to form a ball, but if it doesn't, add remaining tablespoon of milk.
Divide dough in four pieces and place on baking sheet. Sprinkle with a bit of sugar, if desired.
Bake for 16-19 minutes, until scones are a light golden color. A toothpick should come out clean, but color is a reliable indicator for these.
Makes 4.

Monday, September 11, 2006

Crispy Whole Wheat Peanut Butter Cookies


It has been a while since I made peanut butter cookies. They're a great cookie to have in a basic baker's repertoire because they are almost universally popular (except to those with peanut allergies), even if you're not a fan of the nuts themselves. Basic peanut butter cookies have a slight chew to them, but you can really do a lot of different things with cookies that use it.
This variation on the classic peanut butter cookies comes from Maida Heatter's Cookies and makes a light, crispy cookie. They use whole wheat pastry flour, which is a finely ground whole wheat flour that can usually be used interchangeably with regular all-purpose flour, unlike the coarser regular whole wheat flour. If you cannot find whole wheat pastry flour, you can substitute 3/4 cup all purpose and 1/2 cup regular whole wheat to make up the total 1 1/4 cups needed. The cookies also use raw sugar, which is much coarser than regular sugar and, according to Maida, contributes to the texture.
Because they taste so light, these cookies are very addictive and definitely need a glass of milk to go with them. They have a good peanut butter flavor and you can't really taste anything "healthy" (they're not really all that healthy) about them, despite the use of whole wheat flour.
Judging from the differences between my batch and Cathy's batch, I would say that using a mainstream peanut butter (like Jif or Skippy) is better than using a natural one. I didn't have any problems handling or slicing the dough once it was cold, though the dough does have to be sliced quickly before it thaws. I completely agree with Cathy's comment that the cookies end up in perfect circles even if you slice them imperfectly. They spread a lot, and the spread covers up any flaws.


Whole Wheat Peanut Butter Cookies
(from Maida Heatter's Cookies)
1 1/4 cups whole wheat pastry flour
1 tsp baking soda
1/4 tsp salt
1/2 cup (1 stick) butter
1/2 cup peanut butter
1 cup raw sugar
1 large egg


In a small bowl, combine flour, baking soda and salt.
In a large bowl, cream together butter, peanut butter and sugar until light. Beat in egg, then gradually incorporate the flour mixture.
Spoon cookie dough into a 12-inch log on a large piece of wax paper, then roll it up and freeze it for at least 3-4 hours, until firm.
Preheat oven to 350F.
Slice roll of dough into 1/4 inch thick slices and arrange on parchment-lined baking sheets, leaving about 1 1/2 inches between cookies. If you don't have enough sheet pans to hold all the dough at once, store the unsliced dough in the freezer until ready to use.
Bake for about 15 minutes, until cookies are golden and slightly firm to the touch at the edges.
Cool completely on a wire rack.

Makes about 48 cookies.

Saturday, September 09, 2006

Individual Lime Pudding Cakes


This isn't the first time I've worked with this recipe. I've made lemon and orange pudding cakes before, and limes falling off the tree from over-ripeness seemed like the perfect excuse to trot out one of my favorite easy recipes again. I usually make one large pudding, but this time I decided to divide it up and make individual puddings.
The method is exactly the same: wet ingredients plus dry ingredients, then fold in egg whites. At this point, it is divided into five greased ramekins. Since the pudding does not really rise, but separates to create a pudding and a cake, it is not necessary to coat the ramekins with sugar or flour, as you might with a souffle.
You could divide this in to six ramekins, rather than just filling five all the way to the top, but the puddings don't really puff up, so it isn't necessary. And I don't know about you, but I'd rather have a slightly larger dessert.
If you find that you only need four desserts, you can either have seconds or keep one overnight for breakfast. They're best hot, but good the next day, too.


Individual Lime Pudding Cakes
(adapted from All American Desserts)
2 eggs, separated and at room temperature
1/4 cup fresh lime juice
2 tsp lime zest (or from 1 lime)
2/3 cup milk (I used nonfat)
1 tsp vanilla extract
1 cup sugar
1/2 cup ap flour
1/4 tsp salt

Preheat oven to 350F.
Grease five 6-ounce ramekins. Find a roasting pan, or other large pan at least 2-3 inches deep, that can accomodate all your ramekins and set aside.
In a large bowl, whisk together sugar, flour and salt. Add in egg yolks, lime juice, lime zest, milk and vanilla, and whisk thoroughly.
In a medium bowl, beat egg whites to soft peaks. Stir or fold egg whites gently into lime mixture, until well combined. Divide pudding mixture into prepared ramekins and place in the roasting pan. Place the pan in the oven and fill it with water until the water comes halfway up the sides of the ramekins.
Bake for 30-35 mintues, or until lightly browned.
Serve warm.

Makes 5 six-ounce ramekins.

Thursday, September 07, 2006

Cooking School: Extra Creamy Cheesecake


Even though there are many kinds of cheesecake in the world - ricotta cheesecake, vegan cheesecake, marbled cheesecake - the one that springs to mind at the first mention of the word is not the light, airy version that is a delight on a hot summer day, but the velvety, ultra-indulgent, creamy cheesecake. This would be that kind of cheesecake.
The recipe comes from one of the cookbooks of a favorite food blogger of mine, David Lebovitz's Ripe for Dessert. The book is all about fruit and fruit desserts, with recipes from the fairly basic, like Apple and Quince Tarte Tatin, to the more unusual, such as Mango Napoleons with Lime Custard and Coconut Flatties. Of course, the cheesecake itself has no fruit in it. David meant for it to be served with mixed berrries, which I omitted out of sheer laziness. By all means, feel free to slice up some berries of your choice for serving.
The cheesecake has a secret ingredient that contributes to its texture: mascarpone. The use of mascarpone makes the cheecake a little lighter and a little silkier than one you would get if you used all cream cheese. The technique used to bake the cake is a little unusual, as well. It is cooked in a water bath and then, after the appropriate amount of time, the oven is turned off and the cheesecake continues to "cook" for another 30 minutes. This slow cooking means that the cheesecake stays smoother than most and seems just barely done when it comes out of the oven. It sets up more as it cools.
I decided that a thicker crust than originall called for would complement the creamy cake best, so I doubled the small amount David called for. You can halve the crust recipe below, but since I love crust, I can't really imagine that you would want any less. Use the best graham crackers or cookies you can find. Gingersnaps would work well here, but cookies with too much cinnamon might be overpowering.
This is really a fantastic cheesecake, especially if you like your cheesecakes to be rich. It has a fairly mild flavor and a slightly yellow color due to the number of eggs used. This cheesecake must be served cold or it might just melt itself right off your fork. It does seem a bit lighter once it has warmed up, however, so the very best option might be to slice the cake cold and let the individual slices warm up for a few minutes before serving.


Creamy Mascarpone Cheesecake
(from Ripe for Dessert)
16-oz cream cheese, room temperature
1 1/4 cups sugar
1 tsp vanilla extract
5 large eggs, room temperature
16-oz mascarpone, room temperature

Crust:
2 cups graham cracker crumbs
1/4 cup butter, melted
2 tbsp sugar (optional, if your cookies need it)


Make the crust:
Preheat oven to 375F. Combine crumbs, butter and sugar and stir together. Press mixture into the bottom of a 9-inch round springform pan and bake for about 10 minutes. Cool completely before filling.

Make the cheesecake:
Heat oven to 325 F and get out a large roasting pan that will fit the springform pan. Cover the sides and bottom of the springform pan very, very well with aluminum foil.
In a food processor, blend sugar and cream cheese until smooth. Add in vanilla extract and the eggs, one at a time, until blended and smooth. Add in mascarpone and process again. Pour into the crust and place in roasting pan. Place the pan in the oven and fill halfway up the sides of the springform with warm water.
Bake for 55 minutes at 325. Turn off the oven and leave the cake inside for 20-30 minutes, until the center just seems set but will still ripple when the pan is jiggled (I left mine in for a bit longer, about 35 minutes, since it seemed a bit loose).
Remove from water bath and cool compeletely on a wire rack. When it has cooled, refrigerate overnight or until cold, before serving.

Serves 12, but it could be more or less depending on how much you like cheesecake.

Tuesday, September 05, 2006

Buttermilk Cupcakes with Praline Icing


Praline is a Southern candy made with brown sugar and pecans. The confection has the unusual property that it melts in your mouth almost instantly after you bite into it. The icing on these cupcakes has the same flavor as praline. I didn't include any nuts, but the icing really does melt in your mouth.
I first used this recipe, which comes from Cooking Light, a few weeks ago to make a layer cake and I enjoyed it so much that I decided to make it again. This time, however, I made cupcakes. The cake is delicious - moist and fluffy, with a lovely taste of vanilla and buttermilk. It is best with frosting and rather plain without it but it would probably be quite tasty with fruits if you are inclined to experiment a bit.
It is the icing that really makes this cake work, though. I added a smidge more salt than the original recipe called for, so it is incredibly addictive, with just enough salt to take the edge off the sweetness. It is a wonderful icing and, when paired with the cake, the combination is sure to please anyone eating it. I think it went particularly well with a cup of coffee, which helped to blend the flavors even more and cleanse the palate of excess sugar. I know that I will be using this recipe often in the future.
Oh, and try not to eat too much of the icing before you get all your cupcakes frosted. If you have some left over, I highly recommend dipping pretzels or potato chips in it.


Buttermilk Cake with Praline Icing
from Cooking Light)
Cake:
1 1/4 cups sugar
1/2 cup butter, room temperature
2 large eggs
1 egg white
2 tsp vanilla extract
2 cups all purpose flour
1/2 tsp baking soda
1/2 tsp salt
1 cup low-fat buttermilk


Preheat oven to 350F. Line 18 muffin cups (you'll probably need two trays) with cupcake wrappers.
Combine the sugar and butter in a large bowl, and cream together with an elextric mixer until light and fluffy, about 4-5 minutes. Beat in the eggs and egg white, one at a time, followed by the vanilla.
Combine flour, baking soda, and salt in a medium bowl and whisk to combine. Add the 1/3 of the flour mixture to the sugar mixture and stir well, followed by 1/2 of the buttermilk. Add in another third of the flour mixture, followed by the rest of the buttermilk and the last of the flour. Stir only until no streaks of flour remain.
Divide the batter evenly into the prepared pans, smoothing the surface with a spatula. Bake at 350° for 18-22 minutes or until a wooden toothpick inserted in center comes out clean and the top springs back when lightly pressed.
Cool completely on wire rack before frosting.


Praline Icing:
1 cup brown sugar, packed (light, dark or golden)
6 tbsp low-fat milk
1 tbsp corn syrup (light or dark)
1 tsp butter
dash of salt (1/8 tsp or so)
2 cups powdered sugar
2 tsp vanilla extract


Combine the brown sugar, milk, corn syrup, butter and salt in a medium saucepan. Bring to a boil over medium-high heat, stirring to dissolve sugar. Reduce heat, and simmer for 5-6 minutes. Pour syrup mixture into a large bowl and let stand for about one minute. Add powdered sugar and the vanilla, then beat with a mixer at medium/high speed until smooth. Cool for 2-3 minutes (icing will be thin but thickens as it cools) before frosting, mixing for a few more seconds with the mixer to smooth it out.

Frost cupcakes and let them stand at room temperature until ready to serve so the frosting can set.

Makes 18 cupcakes.

Sunday, September 03, 2006

Lime Loaf Cake


I find that if I am looking for a recipe with nothing already in mind, one of two things happens: everything sounds good, or nothing sounds good. Because of this, I don't often stumble upon recipes competely by accident and I almost always have something in mind before I start to look for a recipe, let alone start to cook or bake.
This lime cake was not a recipe I was searching for, but once I saw it, I knew I had to try it. Perhaps it was meant to be, since I happened to have a lime just asking to be used on my counter...
The cake was incredibly easy to put together and I only made a few changes to it to boost the flavors. I added a little bit of salt, along with some vanilla extract and the zest of one lime, in addition to the juice. Once it was baked and cooled, the cake had a slight lime scent and a wonderful lime flavor, which was mellowed by the vanilla extract from being too sharp. It had a texture that was similar to pound cake, so it was slightly dense, but tender and not heavy at all.
The finished cake was a small loaf, but provided slices just the right size for serving with a cup of coffee or tea. In fact, it makes a lovely cake to serve with berries at breakfast, but it could also work with a scoop of ice cream for dessert.


Easy Lime Loaf Cake
1 cup sugar
2 1/2 tbsp butter, soft
2 large eggs
juice and zest of one lime*
1 tsp vanilla extract
1 1/2 cups all purpose flour
2 tsp baking powder
1/4 tsp salt

Preheat the oven to 350F and grease an 8"x4" loaf pan.
In a large bowl, cream the sugar and butter until light and crumbly, then beat in the eggs one at a time, followed by the lime juice, lime zest and vanilla extract.
In a small bowl, stir together the flour, baking powder and salt, then stir the flour mixture into the lime mixture. Stir only until just combined.
Pour into the prepared pan and bake for 35-40 minutes, or until a toothpick comes out clean when inserted into the center of the cake and the top is golden brown.
Turn cake out onto a rack to cool completely before slicing.
Serve plain, or with berries and whipped cream.


Makes one loaf.

*Note: This should be about 2 tablespoons of juice and 1-2 tsp zest, but just use as much as your one lime provides.

Friday, September 01, 2006

Five Things to Eat Before You Die

While the title of this post has a bit of a macabre sound to it, there is nothing ominous about the Foodblogger's Guide to the Globe. FBGttG* is a meme (short for "internet phenomenon") that was started by The Traveler's Lunchbox and is traveling around the world via various food blogs. I was tagged to come up with my own list of five things to eat before you die by my friends Helen, of Grab Your Fork, and Kalyn, of Kalyn's Kitchen. The rules are that the five things you select have to be things that you have eaten. The problem with this is that I have eaten far more than five things, making it difficult to narrow down the list.

1. Kona coffee in Kona, Hawaii - You'll have to ferret out a place that brews good coffee yourself, but you won't get many closer to the source and Kona coffee is some of the best in the world. Roasting green beans is an amazing experience, too, but you have to be a dedicated coffee drinker to go that far.
2. Breakfast at bills in Sydney, Australia - I recommend the ricotta hotcakes, scrambled eggs and the wonderful coconut bread, but everything is fantastic. Dinner at bills2 is excellent, as well.
3. Dinner at the French Laundry - This is probably the best restaurant experience you'll ever have.
4. Pizza at the Cheeseboard in Berkeley, California - The Cheeseboard only makes one type of pizza each day and is open for lunch and dinner. The pizza is always vegetarian and it is always exceptional. The bread, pastries and cheeses at the Cheeseboard are worth a trip, too.
5. Dutch Crunch Bread - While there is a lot of good bread to be had in the San Francisco Bay area, it seems to be the only place in the world where Dutch Crunch Bread is sold. The bread is a type of white bread with a very unusual and crispy crust made with yeast, rice flour and a bit of vegetable oil. It makes fantastic sandwich rolls and I have a recipe for it, so you can give it a try at home and cross it off the list.


*I decided to abbreviate the name in the same way I abbreviate the Hitchhiker's Guide to the Galaxy, HHGttG.