Cooking School: How to Beat Egg Whites
I realised this week that I will have to use sources besides Baking with Julia for my Thursday posts. I do like do include recipes, but I certainly can't post half of the recipes in one book. Maybe I can. But I won't.
So today I have decided to talk about egg whites. Their chief purpose, in baking, is to lend structure to baked goods. They also add liquid to a recipe, but I'm not going to deal with that right now. Because of the unique properties of egg whites, they alone can be used to leaven things like cakes without the aid of yeast or chemical leaveners.
When recipes call for egg whites, they typically call for them to be beaten. This causes a lot of confusion for people because recipes ask you to beat the whites "until foamy", "until the batter falls from the beaters in ribbons", "until glossy" or "until soft/stiff peaks form".
Here is a mini tutorial, based on making meringue (which involves beating sugar into the whites as you whip them). The texture of the whites will be similar (though perhaps slightly less glossy) when whipping egg whites alone, so the illustrations can be used as a reference in multiple situations.
Start with room temperature egg whites. I don't use copper bowls. Though it is harder to overbeat your egg whites in one, this is because copper ions migrate into the egg whites. Egg whites beaten in a copper bowl will be slightly yellowish and more stable than ones beaten in other bowls, but I still don't like the idea that copper ions are now in my cake/food. To give extra stabilization to the egg whites in non copper bowls, you can add cream of tartar when you are beating them, if you wish.
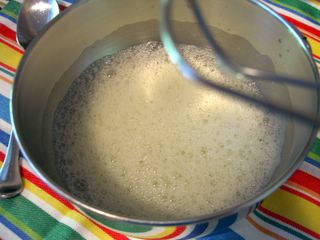
This is the "frothy" stage. It takes 30 seconds to 1 minutes to reach this point. You can add your salt or cream of tartar now.
Once the cream of tartar is fully incorporated, shown below, begin to add your sugar. Add it slowly, either pouring it in a small, steady stream or adding it a tablespoon or two at a time.
Once all your sugar is fully incorporated, the batter will look somewhat thick and creamy. If you lift the beaters, the batter will stream down off of them, but it will not rest on the surface of the batter. Yet. These are the top two photos below.
Do not be afraid to lift the beaters and examine the batter. After a little more beating, it will fall in ribbons.This basically means that a ribbon-like strip will rest on top of the batter. You can clearly see the ribboning in the bottom two photos, which is not evident in the top photos.
After the ribboning stage, you will be able to see ripples on the surface of the egg whites as you beat them. You could probably see them before, but now they will remain on the surface. You are getting close to the infamous "soft peaks".
"Soft Peaks" and "Glossy" are the same. There is a window from very soft to fairly stiff peaks that all qualify as "soft". This is the softest I would consider using. The batter did not stream down from the beaters as it did before. The peaks fell immediately, but were clearly peaks - which is not entirely evident in the photo. The batter is very thick. I might beat this just a bit longer when aiming for soft peaks.
I have always been taught that even if a recipe calls for "stiff peaks" not to beat the egg whites all the way to stiffness. By stiffness, I mean that peaks in the batter do not fall at all. It is too easy to overbeat egg whites. You know you have when they lose their glossiness as the proteins break down. I would advise you to err on the side of caution. Soft peak egg whites should stick to the sides of the bowl and not look liquidy. Peaks will form and the tips will curl over. I will use this consistency when a recipe calls for "stiff peaks".
There you have it. Now try angel food cake, meringues, pavlova, chiffon cake, souffles or mousses without fear! Actually, I still fear pavlova. But that doesn't mean anyone else has to.


<< Home