Cooking School: Challah and Yeasted Breads
Ah, bread! The class I've been looking forward to all session! True - I have been looking forward to all the classes, but I am always looking to improve my bread baking skills.
We started off by talking about yeast. Freeze dried yeast and cake yeast are the two types of yeast most commonly available to home bakers. Cake yeast is preferred by bakers because it is much easier to weigh it out when they're scaling recipes. If you work at a specialty bakery, or bake a lot of bread, you are probably familiar with the third yeast type: wild/organic yeast. Wild yeast is a rather stupid beast and, though it's sort of a pain to feed it all the time, you will only need water, sugar and flour to catch some. You also need a relatively warm - above 50F - climate, or all the wild yeast will be hibernating. You cannot catch yeast outside in winter in New York. If you're interested in natural starters, Adam has an extensive set of posts about it, so I won't go into that right now. Let's just say that your best bet, in terms of freshness and shelflife (since it'll last almost forever) is freeze dried yeast. To discern a flavor difference between two otherwise perfectly made loves of bread, one with cake yeast and one with dried, you would have to be a real expert.
Since we had to make three loaves of bread during class, we used active dry yeast for all our recipes. For once, we appreciated how hot is gets in the kitchen because our bread proofed quickly! We made a rustic country loaf, that required a sponge, an olive-rosemary loaf, which I froze to bake at a later date, and challah.
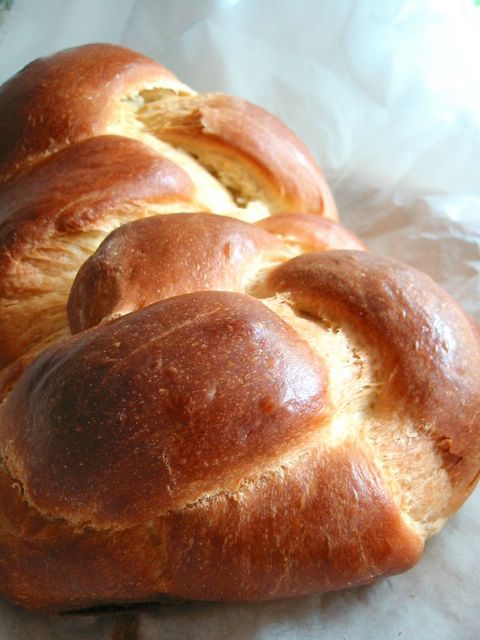
This challah recipe is our instructor's favorite. It has oil, eggs and sugar without going over the top into brioche-level richness. I had never made challah before and found it to be a very easy dough to work with. A woman who was auditing our class for the day told me that she is currently working as a private chef for a Jewish family and that her challah secret is to sprinkle the baking sheet with cinnamon before you place the braided loaf on it. This gives the challah a particularly wonderful aroma without making it taste like cinnamon. Be sure to grease the baking sheet well if you're using the cinnamon trick, as it will cause the loaf to stick slightly.
Challah
1 tsp sugar
1/2 cup warm (110F) water
1 tbsp active dry yeast
1/2 cup oil
1/2 cup warm water
1/4 cup sugar
2 tsp salt
2 eggs
3 3/4 cups flour (and up to 1/4 cup extra for kneading)
1 egg yolk, beaten with 1 tsp water
2 tsp cinnamon (optional)
Dissolve sugar and yeast in 1/2 cup warm water in a large mixing bowl. Let stand 10 minutes.
Add oil, water sugar, salt , eggs and 2 cups of flour to the yeast mixture. Mix unitl smooth, then gradually add remainin flour until dough comes together into a ball and no longer sticks to the sides of the bowl. Let dough rest for 10 minutes. Sprinkle reserved flour onto a smooth surface and knead for 8-10 minutes, incorporating any of the reserved flour as needed.
Place dough into a lightly oiled bowl, cover it with plastic wrap and let rise until doubled, 1-1 1/2 hours.
Oil a baking sheet and sprinkle with cinnamon, if desired.
When doubled, flour your hands and gently remove dough from bowl onto a lightly floured countertop. Cut dough into three even sections and gently stretch them out. Starting in the middle, braid them together. Tuck the ends underneath the dough. Set loaf on baking sheet. Brush very lightly with egg wash, you won't need all of it. Preheat oven to 400F and let dough rise, covered loosely, for an additional hour, until almost doubled.
Bake at 400F for 30 minutes, until deep golden brown.
posted by Nic at
3:52 PM
![]()
![]()


<< Home