Wednesday, May 31, 2006

Does my blog look good in this?


I have the honor of hosting this month's Does My Blog Look Good in This? event. If you're not familiar with it, a quick read through the rules should clarify everything.
The event is a competition of food photography. Anyone who wishes to participate should:


  • Select their best original food/drink photo from the month of May.
  • E-mail me with a link to the blog entry containing the image.
  • The deadline is June 24th, at which point the entries will be closed and judging (a panel of highly qualified persons) will begin. The winner will be announced before then end of the month.

In your e-mail, please include your name, location, blog name and the type of camera you used. If it is not obvious as to what your photo is of, please describe the food item in question. There is only one entry per person.

Photos will be judged on originality, eatability and aesthetics.

Good luck everyone!

Update: The gallery of entries can be viewed here and it will be updated until the contest deadline.

Further Update (6/25): The entries are now closed. The list of winners will be released shortly.

Tuesday, May 30, 2006

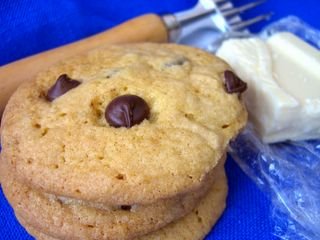
White Chocolate Cookies with Chocolate Chips


The first impression upon biting into one of these cookies is that they’re good, but nothing special. There is no dramatic spice or flavor that really sets the apart and, in fact, they have a smooth and subtle flavor to them. Once you’re finished that first cookie, I guarantee you’ll be back for more because, as it turns out, there is something very special about these cookies. They may not have the pizzazz of spices or the texture of oatmeal or even eny kind of frosting, but they have something better: white chocolate melted into the batter.
The cocoa butter lends an unusual depth of flavor to the cookies and the added fat keeps them crispier longer, though the centers still have a bit of chew to them. The white chocolate also lends sweetness without making the cookies seem overly sugary.
One of the best characteristics of these cookies is that it is difficult, if not impossible, to tell at first glance that they are different from ordinary chocolate chip/chocolate chunk cookies. It might even be hard to guess what you’re tasting unless you’re expecting it.
I hadn't made this recipe in many years, though for a while they were my favorite cookie to make. The recipe is from Mrs Fields Best Cookie Book Ever and the only change I made was to use chocolate chips instead of chocolate chunks. I can't really say that it's the best ever, but it is a great collection of cookies. It even has the recipe for Mrs Fields' Chocolate Chip Cookies, which I know that people have spent a long, long time trying to replicate since they didn't know there was a cookbook available.


White Chocolate Cookies with Chocolate Chips
(from Mrs Fields Best Cookie Book Ever)
2 1/2 cups all purpose flour
1 tsp baking soda
1/4 tsp salt
1 cup butter, very soft and divided
3-oz white chocolate, chopped
1/2 cup sugar
1/2 cup light brown sugar
2 large eggs, room temperature
2 tsp vanilla extract
8-oz chocolate chips/chunks


Preheat oven to 300F and line a baking sheet with parchment paper.
In a medium bowl, whisk together flour, baking soda and salt. Set aside.
In a small bowl, carefully melt together white chocolate and 1/4 cup butter, either in a double boiler or by heating in short intervals in the microwave. Set aside to cool slightly.
In a large bowl, cream together remaining 3/4 cup butter and sugars. Add in the eggs one at a time. Beat in vanilla and the white chocolate mixture. Gradually, by hand (or with the mixer at low speed), beat in the flour mixture. Stir in the chocolate chips.
Spoon dough onto prepared baking sheet by rounded tablespoonfuls.
Bake for 17-20 minutes, until the edges are just browned but the centers still look soft.
Cool on baking sheet for 1-2 minutes before removing to a wire rack to cool completely.
Store in an airtight container.
Makes 3 dozen.

Monday, May 29, 2006

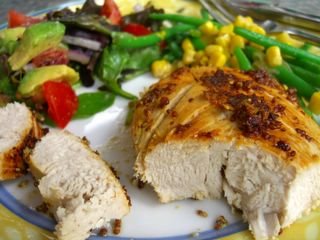
Mustard-Crusted Turkey Breast


I was flipping through one of the newer issues of Everyday Food magazine, the quicker and easier recipe collection published by Martha Stewart, and was looking for something to make for company when I spotted the recipe for Mustard Crusted Turkey Breasts. As usual, the picture really appealed to me, as did the fact that the recipe called for whole-grain mustard which I love.
The coarse, whole grain mustard has a much more interesting texture than other mustards, since the seeds are still whole. It gives sandwiches and pretzels a bolder flavor than plain mustard. Of course, I'm still going to use the bright yellow stuff on my hot dogs, but it's really a delicious thing to have around. It seemed like it would make a delicious compliment to turkey.
The problem with the recipe as it was written was that it called for a whole turkey breast, which I couldn't find. I did find nicely sized turkey breast cutlets, however, which are about the size of chicken breasts. Since I didn't have any skin to deal with, I decided to pan-fry the turkey instead of baking it. I did have some issues with oil splattering as a few of the mustard seeds popped, but by keeping the lid on most of the time, it was very minimal. I wouldn't hesistate to do it again, but I don't know that I'd attempt the recipe without a lidded pan.
The turkey was incredibly moist and the mustard paired perfectly with it. In fact, the mustard was so good that they turkey didn't really need any other seasonings. I wouldn't say that it formed a "crust," but because parts of it were crisp and it was certainly coated in mustard, I'll still give it the name. This recipe is a great twist on turkey and a good reason to eat it at times other than Thanksgiving. As you might imagine, the leftovers make great sandwiches, so consider throwing an extra cutlet into the pan if you have room.


Mustard-Crusted Turkey Breast
4 turkey breast cutlets (1 - 1.5 pounds total)
1/4 cup whole-grain mustard
1 tbsp vegetable oil


Heat oil over medium-high heat in a large skillet with a lid. While the pan is heating up, spread the turkey cutlets with mustard, using about a tablespoon per cutlet. I find that it is helpful to lay them out on a plate, scoop some mustard over the top and spread it, then flip and repeat.
Lay the cutlets into the hot pan and close the lid. Cook for about 15-20 minutes, until the bottom is browned. Filp turkey and cook on the other side, until browned. Turkey takes a bit longer to cook than chicken, so the second side might take 15 minutes. The turkey is done when the center is no longer pink and the juices run clear. Check on the turkey periodically during cooking to make sure the mustard isn't burning.
Serve immediately, with a big salad and your favorite vegetables.
Serves 4.

Saturday, May 27, 2006

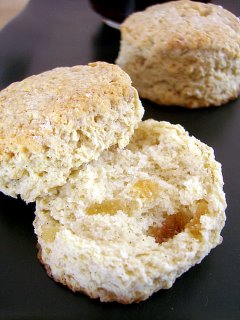
SHF #28: Vanilla and Ginger Scones


Sugar High Friday's theme this month is ginger and the event is hosted by Ruth at Once Upon a Feast. Frankly, I had a huge craving for vanilla and couldn't get it out of my head enough to focus on the ginger. After a while, I gave up on trying not to use vanilla and decided to work with it.
I went with some simple scones and added a lot of vanilla to them. Again, I used vanilla paste instead of vanilla extract, so if you look closely, you can see the vanilla beans. I added candied ginger chips to the batter not only to fit the theme of the event, but to provide a contrast with the vanilla.
It worked beautifully. The ginger was sweet and a little bit sharp, while the vanilla was wonderfully fragrant. To say that the kitchen smelled fantastic while these were baking is an understatement, as butter and vanilla wafted through the air. The scones tasted excellent, as well. The vanilla flavor was almost a surprise, since it is often included in recipes but not played up to the extent that I used it here. I think that it really had a chance to shine in these scones. They were tender and not dry in the least, with crisp, browned edges.
I ate them warm, but you can certainly serve them at room temperature. They are best the day they are made, but can be stored in a plastic bag and refreshed with a few minutes in a 350F oven if necessary. Halve the recipe if you don't need a dozen scones at once, though these are definitely on the small side. You'll probably want two per person.


Vanilla and Ginger Scones
2 cups all purpose flour
1 tbsp baking powder
1/4 tsp salt
1/4 cup sugar
1/3 cup butter, chilled and cut into 6 or 8 pieces
2 tsp good vanilla extract or vanilla paste
1/2-2/3 cup milk
3-4 tbsp chopped candied ginger


Preheat oven to 400F.
In a large bowl, combine flour, baking powder, salt and sugar.
Add the butter to the flour mixture and rub it in with your fingertips, making crumbs. Keep working the flour until the butter seems fairly evenly distributed, with a few larger bits, but none larger than a pea.
Stir in 1/2 cup milk and the candied ginger pieces. Add the remaining milk 1 tbsp at a time until the dough comes together into a ball. It should not be too sticky.
Knead dough gently into a ball on a lightly floured surface, then press it out into a 1/2-3/4 inch thick disc. Use a 2-inch round cutter to cut scones and place on a parchment-lined baking sheet. Press dough gently back together and make another pass with the cutter.
Bake for about 14-15 minutes at 400F. Until light golden brown. The bottoms should be dark brown.
Cool on a wire rack, or eat warm.
Makes 12 small scones

Thursday, May 25, 2006

Cooking School: Nostalgia and Pudding Pops


When summer hits, there is nothing better tha a cold, sweet treat to help cool you down. I wasn't picky and would take most fruit flavored popsicles (except grape), but pudding pops were always my top choice. Much to the delight of basically everyone else I can in contact with, including my family, I only ever liked the vanilla ones and no one ever had to fight me for the chocolate or the swirls.
I've heard that that quality has been nothing to write home about in more recent years, so instead of buying a box as the weather warmed up, I made some. It's easy peasy: make pudding and put it in the freezer.
I opted to go with an eggless recipe as a nod to jello pudding (If you use a boxed mix, I won't tell). The vanilla flavor was tremendous, as I used vanilla bean paste with specks of real vanilla bean in it, though you could easily use half a vanilla bean or even vanilla extract to infuse flavor into the pudding. The finished pop was lighter that ice cream and not as overly sweet as some store bought pops. In fairness, this was not as completely smooth as I remember the ones from my childhood being, but it tasted wonderful and melted easily on the tongue. I also suspect that the ones from my childhood were not even as dreamy as I remember them being. These are certainly good enough for me.
If you would prefer to have a regular pudding and not a frozen popsicle, simply pour the pudding into ramekins and chill overnight in the refrigerator. I like the consistency, which is a bit thinner than most puddings. I love the "skin," but if you prefer your pudding without it, just put a layer of plastic wrap on top before chilling.
Getting back to the pudding pops, I use some molds that I've had for ages. They're plastic and very inexpensive. I recommend picking up a set for a few dollars, but you can use small paper cups and wooden popsicle sticks in a pinch. They're a bit harder to eat because of the shape of the cups, but they'll turn out fine.
To release the popsicles, run the molds under warm water for a few seconds. If you use paper cups, you can simply peel it back.


Vanilla Pudding Pops
3 cups milk, divided
1/2 cup sugar
5 tbsp cornstarch
small pinch salt
2 tsp vanilla paste


In a medium sauce pan, heat 2 1/2 cups milk and sugar over medium heat, whisking to dissolve sugar. Bring just to a simmer. You will see steam coming from the milk, but no bubbles.
Meanwhile, whisk together remaining 1/2 cup milk, cornstarch and salt in a small bowl. When the milk/sugar mixture comes to a simmer, whisk in the cornstarch mixture.
Whisking frequently, continue to cook for several minutes, until pudding comes to a simmer and begins to thicken (I generally cook it for about 1 more minute at this point, but it depends on the heat of your stove). It should thickly coat the back of a spoon. Remove from heat and stir in vanilla paste (vanilla extract with beans suspended in it; plain extract is fine).
Pour into clean popsicle molds and transfer to freezer.
Freeze until solid, or overnight.

Makes about 8, depending on the size of popsicle molds.
(This recipe can be halved and any kind of milk can be used, though I typically use low fat.)
This recipe was featured in several newspapers, including the Detroit Free Press, Kansas City Star and LA Daily News.

Tuesday, May 23, 2006

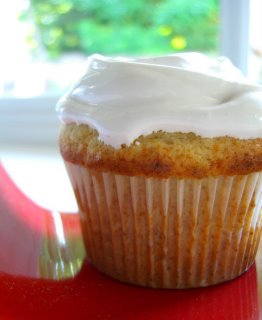
Peanut Butter Banana Cupcakes


I couldn't make up my mind whether to make peanut butter or banana cupcakes. Peanut butter seemed like it might be too heavy on its own, while banana sounded like it might be too sweet. I was looking for something light, wiht a nice flavor, when it occured to be to combine the two. Reflecting back on the decision-making process, it should have taken far less time to come to that conclusion that it did, but that's beside the point now. What matters at the moment is that I have cupcakes.
In this case, the cupcake itself is tender and lighter than I would have expected, with a tight and even crumb, but a very fluffy texture. The batter comes together very easily. There are flavors of both peanut butter and banana, but neither is overly strong and they match each other perfectly. I used regular, creamy peanut butter, which means that there is a fair amount of salt already in it. I took this into account when I added salt to my recipe, but if you use unsalted peanut butter, increase the amount of salt to 1/2 tsp. The resulting cake has a hint of saltiness that perfectly compliments the peanut butter flavor and also allows you to use any kind of frosting without worring that you'll overdo the sweetness.
Speaking of which, I also had a difficult time deciding what type of frosting to use. I ended up using a marshmallow frosting recipe that I love, though I can't say that vanilla was the perfect frosting for these. If you want to really appreciate the peanut butter and banana flavors of the cake, eat them plain with a cup of tea or coffee and a dusting of powdered sugar. To play up the peanut butter, use this peanut butter frosting, and just use your favorite chocolate frosting if you need a chocolate fix and don't mind hiding the other flavors.
Next time - and there will be a next time - I am going to add a touch of peanut butter and banana extracts (yes, those little bottles that you see in the grocery store) to this vanilla marshmallow icing. I mean, can it get any better than peanut butter, banana and marshmallow?
I think not.


Peanut Butter Banana Cupcakes
1 3/4 cups all purpose flour
2 tsp baking powder
1/4 tsp salt
1 cup sugar
1/4 cup butter, very soft
1/4 cup creamy peanut butter
2 large eggs
1 cup ripe banana, mashed (2 large)


Preheat oven to 350F. Line 16 holes of a cupcake tin with muffin liners.
In a small bowl, whisk together flour, baking powder and salt.
In a large bowl, cream together sugar and butter until fluffy. Beat in peanut butter. Add in the eggs one at a time, followed by the bananas.
With the mixer on low speed, beat in the flour mixture until just combined. Evenly distribute batter into 16 muffin cups.
Bake for 16-18 minutes, just until a tester comes out clean. The cupcakes will be very lightly browned.
Cool completely on a wire rack before frosting.
Makes 16 cupcakes.


Marshmallow Frosting
(from Bon Appetit)
1 1/2 cups sugar
2 large egg whites
1/3 cup water
2 teaspoons light corn syrup
1/4 teaspoon cream of tartar
1 teaspoon vanilla extract


Whisk sugar, egg whites, 1/3 cup water, light corn syrup, and cream of tartar in large metal bowl to blend. Set bowl over saucepan of barely simmering water (do not allow bottom of bowl to touch simmering water). Using handheld electric mixer, beat on medium speed until mixture resembles soft marshmallow fluff, about 4 minutes.
Increase mixer speed to high and beat until mixture is very thick, about 3 minutes longer. Remove bowl from over simmering water. Add vanilla extract and continue beating until marshmallow frosting is completely cool, about 5 minutes longer.


Sunday, May 21, 2006

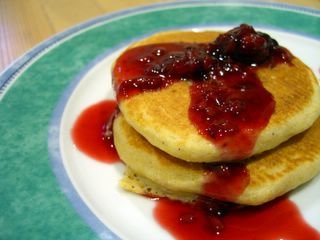
Sunday Brunch: Whole Grain Pancakes with Blackberry Maple Syrup


Sometimes, I get tired of plain or simple buttermilk pancakes. Part of the reason is that I like a lot of variety in my foods and a part of the reason is this blog. Not that I'm begrudging my own blog anything, but posting does keep me from repeating myself too often.
I stumbled upon this pancake recipe on Epicurious when I was looking for a way to use up some blackberries that were sitting on my counter. I like blackberries in things like cobblers and smoothies, but I'm not a huge fan of eating them on their own as, more often than not, they're too tart for me to want to eat a whole handful at a time. A sauce seemed like a good way to sweeten them up and the syrup recipe that went along with the pancakes sounded perfect. Not to mention that it was incredibly simple. Of course, once I was making the syrup, I just had to try out the pancake recipe.
After some heavy "tweaking," I ended up with some delicious and hearty pancakes that are not entirely unlike the original recipe. They have a fair amount of texture from the inclusion of cornmeal and are not very sweet at all when they are eaten on their own, but go fantastically with any kind of syrup. Butter would be a nice touch with these, too, since there is very little fat in the recipe.
The syrup is chunky and rustic, but too thin to be called a compote. The maple syrup pairs surprisingly well with the blackberries. It was much less sweet than plain maple syrup because of the tartness of the not-too-sweet berries. When I tasted it on its own, I thought that it might not be quite sweet enough (I like my syrup sweet!), but it actually went very well with the pancakes.


Whole Grain Pancakes with Blackberry Maple Syrup
1 cup whole wheat flour
1/4 cup all purpose flour
1/4 cup cornmeal
1 tbsp sugar
1 tsp baking powder
1/2 tsp baking soda
1/2 tsp salt
1 1/2 cups buttermilk
1 egg
1 tbsp vegetable oil

In a large bowl, whisk together flours, cornmeal. sugar, baking powder, baking soda and salt. In a small bowl, whisk together buttermilk egg and oil. Pour into dry ingredients and stir until just combined.
Drop by large spoonfuls onto a hot, lightly greased griddle (a drop of water will skitter around the surface when it is hot enough). Turn once when the bottom is an even golden brown.
Serves 4-5


Blackberry Maple Syrup
1 cup blackberries
1/2 cup maple syrup
Combine ingredients in a small saucepan and bring to a boil. Simmer for 3-4 minutes, unblackberries are bright red. Mash gently with the back or a spoon or a fork. Remove from heat and serve over pancakes.

Saturday, May 20, 2006

Oatmeal Molasses Batter Bread


I've talked about batter breads before. Their main advantage is that they are incredibly simple, involving no kneading and still produce an excellent loaf.
It is so simple, in fact, that there is not much to say about it! This recipe makes one loaf with a soft, moist open crumb and a slightly crisp, thin crust. I mixed up the dough in my stand mixer, but you could certainly do it by hand, too. I find that giving it a mixing time of a few minutes is important to help the gluten develop and give the bread a better structure, something which normally happens during the kneading and rising process of other breads.
The loaf has the rich, tangy taste of the molasses, but it is tempered by the honey, so there is no bitterness in the bread. The oatmeal adds a bit of texture, but doesn't detract from the overall softness of the crumb. It's great for cutting into thick slices and eating with soup or slathering with butter. I like it best untoasted because of the lovely soft texture, but toast is always a good serving suggestion for breads.


Oatmeal Molasses Batter Bread
2 1/4 tsp (1 packet) active dry yeast
1 cup warm water (110F)
2 1/2 cups all purpose flour
1/2 cup rolled/quick cooking oats
3 tbsp molasses
2 tbsp honey
1 tsp salt

Combine all ingredients in the bowl of an electric mixer and, using the regular paddle attachment, beat at low speed until combined. Then, continue mixing for about 4 minutes.
Grease an 8x4-inch loaf pan and spread dough into it. Cover with a piece of plastic wrap and let the dough rise until it reaches the top of the pan, about 1 1/2 hours.
Preheat the oven to 375F.
Bake for 35 minutes, until well browned and, hollow-sounding when tapped.
Turn out of pan and cool almost completely on a wire rack before slicing into thick slices with a serrated knife.
Makes one loaf.

Thursday, May 18, 2006

Cooking School: Savory Bread Pudding


While I don't generally like bread puddings all that much, and have mentioned that I far prefer ones that can be sliced, like my Restaurant Style Bread Pudding, to ones that must be scooped, there are a few that aren't too bad. And there are also occasions when it is good to know how to whip one up, since they are versatile, easy and quite popular.
This one falls into the "not too bad" category - by which I mean that it is very good. I'm just not quite willing to come to terms with my enjoyment of this particular bread pudding just yet. I'm sure that once I've made this another time or two, I'll come around.
Bread pudding is chopped up, slightly stale bread that has been soaked in a milk/egg mixture. I usually cut my bread into 3/4-inch ot 1-inch chunks and let it sit out during the day to "stale." I rarely have bread that is stale on its own and I just can't be bothered to toast all those bits of bread. It will dry out sufficiently after sitting out, uncovered, for a few hours. If you're going out, it's a good idea to cut up the bread in the morning, so it will be ready when you get home and want to make your pudding.
The custard is whipped up very, very quickly. I always set out my eggs with the bread so they're at room temperature when I go to work with them, but if you store yours in the fridge until the last minute, you can put them in a bowl of slightly warmed water for about 5 minutes to take the chill off. This will allow them to incorporate more easily into the batter. For a sweet custard, I would add some sugar, but here I simply used salt, pepper and a bit of parmesan cheese - which went a surprisingly long way. Rather than cleaning a bunch of artichokes, I used canned ones that were packed in water (not oil) and diced them, saving time and effort.

Overall, the bread pudding was a hudge success. Aside from tasting cheesy with bits of artichoke, it's difficult to describe the flavor exactly. The flavors of the egg and the whole wheat bread are strongly present, but the whole thing actually blended together very, very well. I'd make it again in a heartbeat for company because, though it looks quite homey, the flavors are very clear and would go well with a whole host of other dishes.


Artichoke and Parmesan Bread Pudding
4-5 cups whole wheat bread, cut into 1-inch chunks
4 eggs
2 cups milk
1/2 tsp salt
1/4 tsp pepper
1/2 cup parmesan cheese (finely shredded)
1 cup chopped artichoke hearts


Preheat oven to 350F.
In a large bowl, whisk together eggs, milk, salt, pepper and parmesan cheese. Stir in bread chunks and artichoke hearts. Let mixture stand, pressing down occasionally, for at least 15-20 minutes so the bread can soak up the milk mixture.
Pour into an 8-inch square baking dish (ungreased) and bake for 40-45 minutes, until a knife comes out fairly clean (but moist) when inserted into the center.
Can be served hot or at room temperature.
Serves 9, as a side, or 6, as a main course.


I'll have a sweet version of this pudding coming up shortly on Slashfood. Here's a sneak preview:


Tuesday, May 16, 2006

Quick Cheddar and Dill Biscuits

While I always enjoy making yeasted rolls and breads, I don't always have time to do so. Sometimes this is out of a sheer lack of motivation, while other times it is because I simply haven’t planned enough time to get bread out with the rest of the meal. That is why it is nice to be able to put together something very quick, like these biscuits.
Drop biscuits are much like scones, with butter cut into a flour mixture and held together with milk or cream. To make these savory, I only added a tiny bit of sugar, to help with browning, and added some sharp cheddar cheese. The type of cheese that goes into these biscuits is important because, while any type of firm cheese can really be used (cheddar, jack, etc), you will probably want to increase the salt by 1/4 teaspoon if your cheese is very mild. Otherwise, the biscuits will be pleasant, but a bit bland. I mean, Monterey jack is a lovely cheese, but it doesn't exactly the most interesting flavor profile. The dill adds a subtle flavor to these biscuits, but compliments the cheese nicely. If you don't have fresh dill, you can substitute 1 1/2 tsp dried dill.
I opted to make these in the food processor instead of by hand, just for the sake on convenience. Try not to over-blend the butter into the flour and use the "pulse" function to combine the ingredients.
I don't think these need any butter for serving, but feel free to add some. They're great with salads.


Quick Cheddar and Dill Biscuits
1 cup all purpose flour
1 tsp baking powder
1/4 tsp salt (see note, above)
2 tbsp fresh dill
2 1/2 tbsp butter, cold and cut into 4 pieces
1/3 cup sharp cheddar cheese, plus a bit more for topping, shredded
5-6 tbsp milk


Preheat oven to 400F.
In the bowl of a food processor, combine flour, baking powder, salt and dill. Whizz to combine and to chop the dill somewhat. Add in butter and pluse 6-8 times, making large crumbs. Add in cheese and pluse again to evenly distribute. Add 5 tbsp of milk and pulse until the mixture comes together, adding an additional tablespoon of milk, if necessary.
Divide dough into four and place onto a parchment-lined baking sheet. Top each with a bit (1 tsp or so) of cheese.
Bake for 16-18 minutes, until golden.
Cool on a wire rack.
Makes 4.

Sunday, May 14, 2006

Sunday Brunch: Chocolate Waffles


Usually, I'm more of a pancake girl than a waffle one, but I do enjoy the lovely crispness that waffles have - not to mention the delicious way that they soak up syrup. So, every once in a while, I like to do the waffle thing.
These waffles have been lurking in the back of my mind since I first saw McAuliflower do them at Brownie Points last year. Now, her waffles seem to use an actual cake batter as their base, where as I have choc-ified some waffle batter. Both options are good. Especially if you like chocolate.
The waffles, just coming off the iron, are hot and crispy, with a moist and light interior. They taste chocolaty, of course, but not in the same, rich way as a piece of cake would. I can't really see wanting to eat something that chocolaty for breakfast, anyway, so it's really just as well. These are definitely a nice, decadent change from normal waffles and are fantastic topped with fruit.
I'm actually a bit torn as to whether syrup is a good choice on these or not. On one hand, syrup is a good choice on most waffles, while on the other, chocolate seems to demand something either more decadent or much simpler, like a scoop of ice cream or a simple dusting of powdered sugar. I'll recommend that you go with berries and, if you like it, a bit of whipped cream. I'll admit that it's actually Cool Whip in my photo. I'm not proud, but there you have it.
In my defense, it tasted good anyway.


Chocolate Waffles
1 1/2 cups all purpose flour
1/2 cup cocoa powder
1/4 cup sugar
1 tsp baking powder
1/2 tsp baking soda
3/4 tsp salt
2 eggs
2 cups buttermilk
1/4 cup butter, melted and cooled
1 tsp vanilla extract


In a large bowl, combine flour, cocoa, sugar, baking powder, baking soda and salt.
In a medium bowl, or a large measuring cup, thoroughly whisk together eggs, buttermilk, melted butter and vanilla extract. Add to flour mixture and whisk until just smooth.
Preheat waffle iron and make according to directions.
Serve immediately.
Makes 6 waffles.

Friday, May 12, 2006

Banana Oatmeal Cookies

I have tried several times in the past to incorporate bananas into cookies, simply because there are not all that many banana flavored cookies out there. Is banana a less popular flavor than I previously imagined? Perhaps not. The reason that I have never posted a banana cookie recipe before is that they haven't turned out so well. They have been cakey and, in some cases, too moist. A few tasted not enough like banana.
No so with these.
These cookies taste like banana bread, but feel like a cookie. The banana flavor is present, accentuated by notes of vanilla, and the edges of the cookie have that crispness that almost every cookie should have.
I made them with and without chocolate chips. The non-chocolate version tasted more strongly of banana, but only because the chocolate there to take center stage. And it did take center stage because I put in almost a whole cup full of chocolate chips, which is quite a lot when your recipe only makes two dozen cookies. Is anyone going to complain about a cookie with too many chips? Unlikely.
These are easy to put together and, because the recipe is both low-fat and fairly small, you don't have to have any guilt about keeping them around the house. They'll stay fresh for several days when stored in an air-tight container.


Banana Oatmeal Cookies
1 cup all purpose flour
1/2 tsp baking powder
1/2 tsp baking soda
1/4 tsp salt
2 tbsp butter, very soft
1/2 cup sugar
1/2 cup brown sugar
1/4 cup mashed banana (1 small/medium)
1 egg
1 tsp vanilla extract
1 1/2 cups oats
1 cup chocolate chips


Preheat oven to 350F and line a baking sheet with parchment paper.
In a small bowl, whisk together flour, baking powder, baking sodaand salt.
In a large bowl, cream together the butter and the sugars. Beat in egg and banana, followed by the vanilla extract. Gradually, on low speed or by hand, add in the flour mixture. Stir in the oats (either whole rolled oats or "quick cooking") and chocolate chips.
Drop dough by tablespoonfuls onto prepared baking sheet.
Bake for 11-14 minutes at 350F, until set and lightly browned.
Let cookies cool for about 5 minutes on the pan before transfering them to a wire rack to cool completely.
Makes 2 dozen cookies.

Thursday, May 11, 2006

Cooking School: Chiffon Pie


The first time that I ever had a chiffon pie was when I made a strawberry chiffon pie from Retro Desserts. It was delicious and very impressive looking, piled high and pink in its crust. It was described as being a fruit mousse piled into a pie crust, which is exactly what it is. Come to think of it, Wayne Harley Brachman actually has a recipe for Lemon Chiffon Pie in his cookbook. I probably should have used his recipe as I'm sure it would have been fantastic. It is, however, a bit more complex that the recipe I chose to use, which is simply taken from Allrecipes.
A chiffon pie will always be incredibly light in texture due to at least one of two factors: it will either have whipped cream/Cool Whip folded into it, or it will be supported by a meringue made of egg whites. Either way, it is likely to have gelatin in it to give it stability, too. The easiest way to think about it, if you have never had one, is to imagine a lemon meringue pie where the lemon curd and the meringue have been folded together.
This pie is smooth and sweet, but has a good lemon flavor. There is enough sugar in the recipe that the pie doesn't need any whipped cream during serving to tame the bite. In fact, if you want it to be tarter, simply reduce the amount of sugar beaten into the egg whites by 1/4 cup. It tastes best on the day that it is made, when the mousse is at its fluffiest and the crust is nice a crisp, providing a great textural contrast.
It's a very easy pie to make, in all honesty, and a good choice for beginners. It is impressive looking and tasty, but doesn't involve making a double crust from scratch or trying to pick out just the right kind of fruit. Another selling point (beyond the flavor) is that it has some retro appeal, having been at its height of popularity in the '40s, '50s and '60s. Vintage is in right now, isn't it?


Lemon Chiffon Pie
1 (.25 ounce) package unflavored gelatin
1/4 cup cold water
4 egg yolks
4 egg whites
1 cup white sugar
1/2 cup fresh lemon juice, strained
1 tbsp lemon zest
1/2 teaspoon salt
1 pre-baked graham cracker crust (I recommend this recipe)


Soften gelatin in 1/4 cup water for aboout 10 minutes, while you prepare the yolks.
In a large glass bowl, beat egg yolks with 1/2 cup of the sugar and the salt until combined. Gradually pour in the lemon juice and salt. Place bowl on top of a pan of simmering water (a double boiler) and cook whisking frequently, until the mixture has thickened, 10-15 minutes. Add lemon zest and gelatin and stir thoroughly until gelatin has dissolved. Transfer to a clean bowl and refrigerate until it begins to set up but is not totally firm (as bad as it sounds, "gloppy" is a good texture to shoot for here). Timing will vary, but check on it and give it a stir every 20-30 minutes for about 1 1/2 hours.
When the gelatin mixture is thick and cool, beat the egg whites in a large bowl until soft peaks form, gradually pouring in the remaining 1/2 cup of sugar once the egg whites are foamy.
Once you have soft peaks, beat 1/4 of the whites into the gelatin mixture with the electric mixer, which will lighten it and smooth out the consistency. Using a spatula, fold the rest of the whites into the lemon mixture.
Pour filling into the prepared crust and refrigerate for at least 2 hours before serving.

Serves 8.

Tuesday, May 09, 2006

Blink of an Eye Rhubarb Cobbler


Whew! Blogger was giving me some issues this morning, but everything looks to be up and running again.
I take a little bit of an issue with the name of this dish. The original name is "blink of an eye rhubarb pie." The "blink of an eye" part is accurate, because it does come together in about 2 minutes, but the "pie" part is a problem. Granted, the dessert is baked in a pie dish, but it's not really a pie at all. I would describe it as sort of a soft, cakey, meringue-y dish. I would also describe it as delicious. I 'm guessing that the name came about because of the cute rhyme between "eye" and "pie." So, even though it disrupts the flow of the name, I would rather call it a cobbler because it is definitely not pie.
The dish is really light and adaptable, because you can use baking apples instead of rhubarb, if you'd prefer. The cobbler comes together in seconds, all in one bowl. I almost couldn't believe how easy it was! The rhubarb gets soft and sweet as it cooks and the cobbler part stays moist and soft, rather like the cakey part of a pudding cake. Unlike pudding cakes, however, the top of this dish is sweet and crackly, like a meringue.
I'm getting hung up on names here, so let me give you the bottom line: it's dead easy and it tasted great. It's the perfect thing to whip up on a weeknight. Serve it warm, shortly after it comes out of the oven, for the best flavor and texture, although it's not bad at all for breakfast the next day. Don't refrigerate it, or you'll lose the crispness of the top.


Blink of an Eye Rhubarb Cobbler
1- 1 1/2 cups diced rhubarb (doesn't need to be exact)
1/2 cup all purpose flour
1 tsp baking powder
1/4 tsp salt
3/4 cup sugar
1 tsp vanilla
1 large egg


Preheat the oven to 350F. Lightly grease a 9-inch pie plate.
In a large bowl, combine rhubarb, flour, baking powder, salt and sugar. Stir in the egg and the vanilla. Spread mixture into the pie plate.
Bake at 350F for 30-35 minutes, until golden brown and set.
Let cool for a few minutes before serving, but serve warm.
Serves 6.

Sunday, May 07, 2006

Sunday Brunch: Cornmeal Waffles


I love my new belgian waffle maker. As a brief product plug, it's the Villaware Classic Belgian Waffle Iron. The waffles come out in a great shape, you can adjust the darkness (like a toaster) and I have had no problems at all with sticking, which is definitely a plus for a waffle-maker. The other thing I like about it is that it has an alarm that beeps when the waffle is done. Sure, it's annoying, but it also means that I can go off and do other things while my waffle cooks. Like drink coffee. Or blog.
Getting back to the waffles, these were great. I adapted them from the Lark Creek Inn's (in Northern California) recipe for Blue Corn Waffles with Lavender Cream. I'm not a big fan of floral flavors, nor cream on my waffles, so I omitted the cream entirely and opted for regular cornmeal instead of blue. Since I had gone yellow with the color of the waffles, I decided to add some lemon zest to the batter as well.
Initially, I assumed that maple syrup would not be a good pairing for these waffles because of the lemon flavor. I thought that they might be best with just sugar, or perhaps butter. I was completely wrong. They were fantastic with maplye syrup. The waffles were crisp on the outside and moist within, with a great texture from the cornmeal. They were filling, but not heavy in the least. The lemon flavor was able to cut through the maple syrup and, instead of clashing with it, brighted the entire dish. I really, really liked them.
If you're interested, the waffles are also excellent plain and can be refreshed in the toaster if made in advance.


Cornmeal Waffles with a Hint of Lemon
3/4 cup cornmeal
3/4 cup all purpose flour
2 1/2 tsp baking powder
1/4 tsp salt
3 tbsp sugar
2 large eggs
1 cup buttermilk
2 tbsp butter, melted and cooled slightly
zest of 1 lemon (2-3 tsp)


In a large bowl, whisk together cornmeal, flour, baking powder and salt. In a medium bowl, whisk together sugar, eggs, buttermilk, butter and lemon zest. Pour into cornmeal mixture.
Heat your waffle iron and cook according to directions.
Serve immediately, with maple syrup, or cool completely and freeze for future breakfasts.
Serves 4.


Note: The serving is approximate, as it depends on the size of your waffle maker. I was also fairly lax in measuring the butter that I used, so it is more likely I used about 4 or 5 teaspoonfuls as opposed to a full 2 tablespoons. It's nice to know that the recipe is a bit flexible if you want to cut out a few extra grams of fat!

Saturday, May 06, 2006

Cheater's Frozen Yogurt

This is much less of a recipe than it is an idea. It is, however, an idea that I use all the time. It's the perfect thing when I want a really quick and easy snack or a light dessert. It is particularly practical during the summer, since it is so simple and much lighter than any ice cream.
What am I taking about? It's a dish that I've dubbed Cheater's Frozen Yogurt.
All it is is frozen berries mixed with some plain yogurt and a bit of sugar sprinkled on top. The berries freeze the yogurt when the two come into contact! The trick to getting this just right is in the proportions. Now, I don't measure this and I don't really recommend expending the extra effort to do so. Use 2 parts of frozen berries and 1 part yogurt. Put the yogurt into a bowl with a pinch or two of sugar two sweeten it, then add the berries and stir to combine. After about 30 seconds or so, the yogurt will be slightly frozen and you can enjoy it!
Blueberries are the best for this because of their small size, making them very easy to stir into the yogurt. If you use other fruit, you may want to consider chopping it up a bit first.

Thursday, May 04, 2006

Cooking School: Slice N' Bake Cookies


Slice-and-bake cookies may not seem as "high class" as other types of cookies, nor do they seem quite as homey as big drop cookies. I still cannot quite figure out precisely why this is, but I generally attribute it to the uniform shape of the resulting cookies. Any home-made cookie is homey, in my opinion, no matter what it looks like. And you simply can't tell me that these cookies can't be classy - have you seen the most recent Maida slice-and-bakes on Cathy's blog? They're very impressive.
Slice and bake cookies get their name from the fact that you simply slice the cookies off a pre-formed (and usually frozen) log of dough before baking. The supermarket cookies come packaged this way, but it's really nothing that shouldn't be done at home. You can make the dough well in advance, wrap it up into a log and keep it in the freezer for several weeks before baking. This has several advantages. First, you will have cookie dough on hand any time you want fresh cookies and, second, you have a lot of portion control. Only want one cookie? Only slice one off.
I highly recommend using parchment or wax paper to wrap the cookies. Plastic wrap tends to stick to the dough and, when frozen, can tear away in pieces instead of as a neat sheet. There is nothing worse than plastic stuck in a cookie.
These cookies are full of coconut, but have the texture of a butter cookie. Many people who aren't fans of the texture of coconut will still like these cookies, but if they don't like the flavor, it probably isn't for them. The cookies are delicious, buttery and coconuty. They are also quite tender. If you bake them for an extra minute or two, they get quite crispy, but otherwise retain a nice softness, just like a plain butter cookie, in the middle. Adding a little bit of vanilla gave them a deeper flavor, but only served to enhance the the coconut, not to distract from it.


Coconut Cookies
(based on a recipe I saw in Sunset)
1 1/2 cups all purpose flour
1 tsp baking powder
1/2 tsp salt
2/3 cup butter, soft
3/4 cup sugar
1 large egg
1 tbsp milk
1/2 tsp vanilla extract
3/4 cup sweetened, shredded coconut


Whisk together flour, paking powder and salt in a small bowl.
In a large bowl, cream together butter and sugar, then add in the egg and vanilla. Beat until light and well combined, then beat in the coconut. With the mixer on low speed, gradually add the flour mixture.
Once all the flour has been mixed in, divide the dough into two parts, shape into logs (2-inches in diameter) and wrap tightly in parchment or wax paper. Freeze for at least 1-2 hours.

Preheat oven to 350F.
Line a baking sheet with parchment paper.
Slice cookies off the frozen logs with a sharp knife, making each cookie no more than 1/4-inch thick. Place on baking sheet and bake for 12-15 minutes, until the edges are just lightly browned.
Transfer to a wire rack to cool.

Makes about 2 dozen.

Tuesday, May 02, 2006

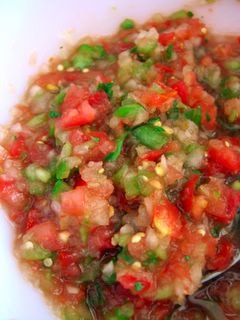
Salsa Fresca


I love salsa. It's one of my favorite foods, though I suppose that it is actually classified as a condiment. The difference between a condiment and an actual "food" is that a condiment is rarely eaten on it's own. Consider that ketchup - the condiment displaced by salsa as America's most eaten - is never eaten by the spoonful unless by 7 year olds who think they have found a clever way to "beat the system" and eat their veggies. Salsa, in my opinion, can actually be eaten on its own, if you were so inclined. Isn't it really a form of gazpacho?
All that said, I do generally eat salsa with something else. My current favorite way to eat it is on salads, with a bit of sour cream, corn and black beans mixed in. I also like to top tacos with salsa, which I did with this batch, as a matter of fact. The best way to eat salsa is really with tortilla chips, though.
This salsa is fresh and flavorful, with a refreshing tang from the tomatillos and some spice from the habanero peppers. The heat level is very easy to adjust. For mild, as I've indicated below, you can use a green chili. If you like it hot, like I do, then increase the heat by using habanero pepper instead. You'll have to guess about the heat level the first time you make this. I suggest starting with about tablespoon of habanero pepper. Remember that you can always increase the tomato and onion if it gets too hot for you. The worst thing that can happen is that you'll end up with a lot of salsa.
Also, before you get to thinking that I'm being too vague with my "medium" directions, keep in mind that salsa is proportional and not an exact science. There's no wrong way and you can never have too much.


Salsa Fresca
3 medium sized ripe tomatoes
2 medium sized tomatillos
1/2 medium sized white onion
3 tbsp fresh cilantro
1 large green chili for mild/medium or habanero pepper to taste
pinch coriander
1-2 tbsp lime juice
salt and pepper


Dice tomatoes, tomatillos, onion and cilantro coarsely. Finely dice chili or habanero pepper. Combine all ingredients with a pinch of coriander, the juice of 1/2 fresh lime (1-2 tbsp) and a bit of salt and pepper in a food processor and pulse several times until combined, but still a bit chunky. Add more salt and pepper and adjust the heat level, if necessary.
Store in the frigde.
Serve with chips.
Makes 1 1/2 - 2 cups.

Monday, May 01, 2006

Blue Corn Blueberry Muffins


Blue cornmeal is just like yellow cornmeal, except (of course) that it is made from blue corn. What I really mean to say is that it tastes pretty much the same. The main benefit of using it is that is lends an interesting and unusual color to baked goods and other cornmeal-coated foods.
This inspiration for these muffins came when I had a version at a restaurant a while back. In fact, it was when I went out to lunch with Jessica, of Su Good Eats. The ones I had at the restaurant were just ok and a bit on the dry side despite being chock full of berries. I loved both the idea of blue muffins and the flavor, so I knew that I would eventually try a batch at home.
I started with fairly standard cornbread proportions, so my muffins had a coarse, but not too coarse texture. They ended up with a fair amount of crunch to them, but still retained the moisture and softness that I like to have in cornbread. The berries tasted fantastic in the muffins and they looked great in the blue background.
These work a bit better for breakfast or a snack than as a side for dinner because of the sweetness of the berries, so eat them plain, toasted or with a bit of jam and use something else to mop of the remainder of your chili.


Blue Corn Blueberry Muffins
1 cup all purpose flour
1 cup blue cornmeal
2 tsp baking powder
1/4 tsp baking soda
1/2 tsp salt
1/4 cup sugar
1 egg
1 egg white
2 tsp vegetable oil
3/4 cup buttermilk
1 1/4 - 1 1/2 cups blueberries (fresh or frozen)


Preheat oven to 400F. Grease a 12-cup muffin tin.
In a large mixing bowl, whisk together flour, cornmeal, baking powder, baking soda, salt and sugar. In a small bowl, whisk together egg, egg white, vegetable oil and buttermilk. Pour into flour mixture and mix until almost combined. Add the blueberries and stir to distribute.
Evenly divide the batter into the prepared muffin tin
Bake at 400F for 14-16 minutes, until a tester comes out clean and the muffin springs back when gently pressed.
Cook completely on a wire rack.
Makes 12.