Sunday, January 30, 2005

Sunday Brunch: Buttermilk Pancakes

Another lovely Sunday brunch.
Pancakes are always a good option for breakfast. It only takes a few minutes to whip up the batter and a few more before they're done. I love baked goods, too - muffins, scones, etc - but prefer not to have the wait for them to be ready early in the morning. I like to eat breakfast first thing and am definately one of those people who will not skip it if I can help it.
As it so happened, I had some buttermilk in the fridge this morning and wanted to put it to good use. My first thought was to make some muffins, but, as I said above I would basically prefer to have muffins for a snack. Pancakes were the order of the day.
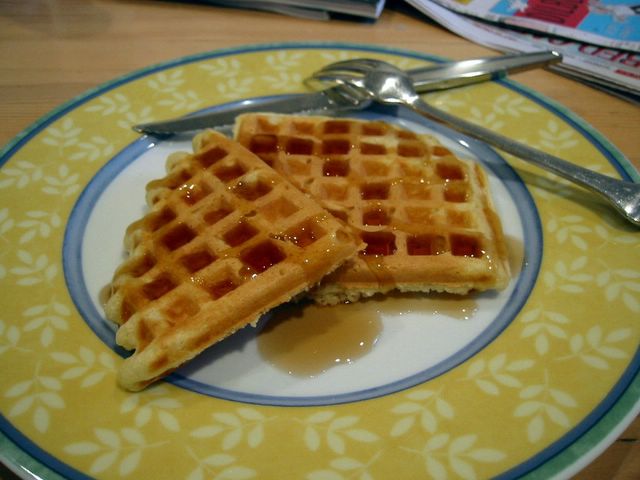
I think I actually prefered these to the buttermilk waffles that I made a few weeks ago, but only because I am somewhat more partial to pancakes than waffles. They were delightfully soft and light. Oh, and did I mention easy? I added some (skim) milk in addition to the buttermilk to thin out the batter a bit; thick pancake batters force you to cook the pancakes longer and make a tougher "skin". No one wants that.

Quick Buttermilk Pancakes
1 cup buttermilk
1 egg
2 tbsp milk
1 cup flour
2 tbsp sugar
1 tsp baking powder
1/2 tsp baking soda
1/2 tsp salt
In a 4 cup measuring cup - to take advantage of the spout for easy pouring - whisk together buttermilk, egg and milk. Dump in dry ingredients and whisk until thoroughly combined. Heat a nonstick griddle until drops of water sizzle when sprinkled on to the surface.
Pour batter onto griddle in whatever size or shape takes your fancy. When bubbles form and edges look slightly dry, use a spatula to flip the pancake and cook for another 30-60 seconds, until second side is evenly browned.
This made about 12 4-inch pancakes.
Any remaining batter can be refridgerated overnight and the recipe can easily be doubled.

Friday, January 28, 2005

Roasted Red Pepper and Tomato Soup

This is the perfect soup for a chilly, rainy day. Or a snowy day. Any day when you may want some soup, as a matter of fact. It has a nice spice to it and it so easy to make. I had it with some leftover baguette slices.

Roasted Red Pepper and Tomato Soup
2 large red peppers
2 cans of fire roasted tomatoes*
3 cups chicken broth
2 shallots, chopped
2 large garlic cloves, crushed
1 tsp ground sage
salt and pepper to taste

1. Roast peppers in a 400F oven until skin is blackened. Let rest in a sealed paper bag for 15 minutes, then peel off the skin.
2. Briefly sautee (5 minutes) shallots and garlic in a medium pot. Add tomatoes (with juice)and chopped peppers and cook on high for 15 minutes, until tender.
3. Add chicken stock and spices. Feel free to add some chili powder if you're in the mood for something really spicy. Bring to a boil, then simmer for 15 minutes. Use an immersion blender to puree the soup to desired consistency. Be careful to crack the lid if you're pureeing in a regular blender!

* If you can't find the easy, cheater's pre-roasted variety, just roast canned tomatoes (reserving the juices) in the oven with the peppers.

Thursday, January 27, 2005

Basic Baguettes


Isn't this baguette pretty? I really enjoy baking bread, but I don't get to do it too much. These loaves were my first try at making baguettes.
I have to admit that I am intimidated by recipes that call for making a sponge days in advance - and don't get me started on how terrifying saking sourdough from scratch is. I tend to stick with recipes that involve one or two non-scary rises. I searched through the recipes at AllRecipes until I found this one for French Bread. It sounded easy and got good reviews. It turned out to be chewy with a nice, though not terribly thick, crisp crust. It only took 5 cups of flour, and I substituted one cup of ap flour for one cup of white, whole wheat flour, and I couldn't even taste the change.

Easy French Bread

5 cups ap flour
1 package active dry yeast
1 1/2 teaspoons salt
2 cups warm water (110 degrees F/45 degrees C)
1 tablespoon cornmeal
1 egg white
1 tablespoon water

1. Put yeast in 1/4 cup of the water (with a pinch of sugar) for 5-10 minutes, until foamy. In a large bowl, combine 2 cups flour and salt. Stir in remaining 1 3/4 cups warm water, and beat until well blended using a stand mixer with a dough hook attachment. Add in as much of the remaining flour as you can.
2. On a lightly floured surface, knead in enough flour to make a stiff dough that is smooth and elastic. Knead for about 8 to 10 minutes total. Shape into a ball. Place dough in a greased bowl, and turn once. Cover with plastic wrap and let rise in a warm place until doubled.
3 Punch dough down and divide in half. Turn out onto a lightly floured surface. Cover and let rest for 10 minutes. Roll each half into large rectangle. Roll up tightly, starting from a long side. Moisten edge with water and seal. Taper ends.
4. Line a large baking sheet with parchment paper. Sprinkle with cornmeal. Place loaves, seam side down, on the prepared baking sheet. Lightly beat the egg white with 1 tablespoon of water and brush on loaves. Cover with a damp cloth. Let rise until nearly doubled, 35 to 40 minutes.
5. With a very sharp knife, make 3 or 4 diagonal cuts about 1/4 inch deep across top of each loaf. Bake in a preheated 375 degrees F (190 degrees C) oven for 20 minutes. Brush again with egg white mixture. Bake for an additional 15 to 20 minutes, or until bread is golden brown and crusty.


Looks good, doesn't it?

Maybe I'll have to try that sourdough bread someday...

Monday, January 24, 2005

Wickedly Perfect Turkey Apple Sausage

If you happen to live in the US and own a television, perhaps you have seen the new reality show on CBS, Wickedly Perfect. Say what you will about reality television, but I think that this is a pretty fun show. The premise is to have a bunch of Martha-Stewarts-in-training compete for a book deal and several TV spots. Yeah, the requisite whining and moaning takes place, but instead of breaking that up with bug eating contests, Wickedly Perfect uses cooking, construction and interior decorating.
My favorite contestant, Mychael, a professional chef from San Francisco, was voted off last week. The other people seemed to be threatened by her because she was an excellent chef. I did not personally sample the food she prepared on the show, of course, but her dishes looked great and there were certainly no detractors when it came to compliments.
Bearing this in mind, I took advantage of the fact that CBS posts a "how-to" for every project on the show and undertook to make Michael's Wickedly Perfect Turkey Apple Sausages (click the link for the recipe). And here are the photos of my endeavor:

I decided to make several smaller sausages, instead of Mychael's two giant ones, but followed her recipe to a T. After mixing the sausage, I wrapped them in foil very tightly in preparation for poaching. It was not difficult to wrap them, but I recommend using big sheets, just in case.

After poaching them, I let them cool for a bit and unwrapped them.

At this point, I wrapped half of them in saran wrap and froze them for later. The rest of the sausages were put under the broiler, turning every couple of minutes to prevent burning.

The finished sausages were served with buttered noodles and green beans.

The sausages were really good and the method was very simple. I intend to try using this method to make other types of sausages in the future - I can hardly wait for the summer grilling season!

Twice the Twice Baked Potato

I have learned that not everyone is a fan of sweet potatoes. These sorts of people often cannot offer a solid explanation as to why they don't like these sweetly delicious veggies. My personal theory is that they were scarred at a young age by being forced to consume some great-aunt's marshmallow and brown sugar saturated sweet-potato-from-a-can casserole. One of those dishes where you love the parts, but just can't stomach the whole.
I, however, love sweet potatoes, particularly because they are equally good in sweet and savory situations. I actually have it in mind to make a sort of mole flavored sweet potato salad in the near future.... But that is not what this post is about.
In an effort to win over some non-fans of sweet potatos, I made twice baked potatoes using a combination of sweet and regular potatoes. The presence of regular potatoes took a hint of sweetness off and these were thoroughly enjoyed by all.

Twice the Twice Baked Potatoes
1 large potato
1 large sweet potato
1/2 cup cottage cheese
1 tablespoon parmesan cheese, plus more tor topping
chopped or dried chives to taste
Prick both potatoes with a fork and bake for 1 hour in 400F oven.
Cut potatoes in half and scoop out interior into a large bowl. Add cottage cheese, parmesan and chives and mash until potato is smooth.
Spoon filling into enpty potato skins or ramekins and sprinkle with parmesan.
Place back into oven until top is browned, 10-15 minutes.

Note: You may notice that in the picture above two of the servings are in glass ramekins. Sweet potato skins are not terribly sturdy, so either use ramekins or bake a sacrificial regular potato and skin it.

Saturday, January 22, 2005

IMBB #11: Beans, beans... you know the rest


I spent a lot of time thinking about this month's IMBB, hosted by Cathy over at my little kitchen. Typically when I eat beans, they are of them plain or refried with hot dogs variety. It wasn't until I reached into my fridge, looking for a snack, and pulled out some hummus that it hit me: chickpeas.
My first thought was to make hummus. I figured that with a theme like Beans, other people might be making hummus, too. I opted for falafel instead - besides, I already had pitas.

I love falafel, but they're not the healthiest things. The ingredients are super healthy, but they're traditionally fried. This makes them nice and crispy, but I wanted something less greasy so I decided to oven "fry" mine. You might also notice that they're a bit greenish, which is a result of using fresh parsley and cilantro in the recipe rather then dried. I won't discriminate against falafels of different colors as long as they all taste good.

This recipe originated on Food 911 and made about 24 golf-ball sized falafel patties. I served them on pita bread with cucumbers, tomato, lettuce and a combination of hummus, tahini and sweet chili sauce. They froze really well and heated up in the microwave in just a minute. I would definately make them again in a heartbeat.

Oven Baked Falafels
2 cups dried chickpeas, soaked 18-24 hours
1 tsp baking powder
1 onion, chopped
4 garlic cloves, smashed
2 tbsp cumin
1 tbsp coriander
1/4 tsp red pepper flakes
2 handfuls fresh parsley
1 handful fresh cilantro
salt and pepper
Soak dried chickpeas 18-24 hours, covered, in 4 cups of water.
Preheat oven to 375F.
Drain and rinse chickpeas and combine all ingredients in a food processor. Pulse until smooth and well-combined.
Spray foil-lined baking sheet with cooking spray.
Shape into large, round tablespoonfuls and place on baking sheet. Bake for 15-20 minutes, or until dry and a bit firm to the touch.

Note: Be generous with the salt and pepper as you're making them. The first batch I made was underseasoned.
If you want them to be golden all over, I recommend flipping them halfway through baking or switching your oven to broil for the last minute. I tried spraying them all over with cooking spray and it had very little effect. My tasters actually prefered the ones that I hadn't sprayed a second time.

I'm already looking forward to the next IMBB. Fortunately, I have the next Sugar High Friday to keep me occupied. You're not participating yet? How can you not love puff pastry? Plan your entry together soon, entries are due on February 11th.

Thursday, January 20, 2005

Chai Spiced Oatmeal


In this month's issue of EatingWell - which is, by the way, a wonderful foodie magazine to check out - there was an article on mangos. Gorgeous, versatile, tasty and in season. The article was accompanied by several recipes offering suggestions on how to showcase this fruit in various dishes. One recipe in particular caught my eye: Chai Spiced Bread Pudding with Mango.
I've been thinking about making this since I first saw the recipe and so I was delighted to find my mango ripe this morning. Chai spices are delicious and the mango offers a smooth, cooling taste to counter their spiciness. Unfortunately, morning is not a great time for dessert. Let me qualify that statement: I'm all for eating leftover dessert in the morning, but I just can't justify cooking a dessert before 8am with the intention to consume it for breakfast.
So what could I do? I made oatmeal.
And put chai spices into it.
And topped it with mango.
And it was great.

I'm not giving specific amounts for the spices, as I doubt anyone wants to measure a handful of spices into their oatmeal in the morning. Here's how I made my (one serving) of:
Chai Spiced Oatmeal with Mango
oatmeal
1/2 tsp vanilla
dash of salt
dash of cinnamon
dash of ginger
1/2 dash of cloves
1/2 dash cardamom
sprinkle of black pepper
1/3- 1/2 mango, in small chunks
Measure oatmeal into a microwave safe bowl and add appropriate amount of water. Add salt and spices.
Microwave according to oatmeal instructions.
Top with mango chunks and stir. Let stand for a minute or two; mango will become tender and juicy.
Sprinkle with a bit of sugar and top with milk, if desired.

Wednesday, January 19, 2005

Clotilde's Broccoli Cornmeal Upside Down Cake

Tonight I baked this fabulous Broccoli and Cornmeal Upside Down cake from Clotilde to serve with some leftover bbq ribs. It was really delicious, with a very satisfying crisp crunch to the cornbread. I would make it again in a heartbeat - tasty, easy and oh so photogenic.

Tuesday, January 18, 2005

A Tale of Two Cakes... and Curd

It was the best of times, it was the worst of times. But that is a gross exaggeration.
In the picture above, you can see two slices of angel food cake and a lovely dollop of homemade lemon curd. The slices are from different recipes for cake. One cake, I made with egg whites and the other I used meringue powder. Why bake two cakes, you ask?
I couldn't see making an entire tube angel food cake, so I halved the traditional recipe and baked it in a loaf pan. The problem was that the pan I grabbed was an insulated loaf pan. Big mistake. The cake needed about 25% more time in the oven than a non-insulated pan would've required and the cake was still somewhat underdone. It tasted ok, but you can tell an angel food cake has too much moisture if it collapses a bit when you're cooling it. And, yes, I was cooling it upside down!
I had already made the lemon curd and started to worry that the cake wouldn't be a suitable accompaniment for it. I didn't have enough eggs to make another cake, but I did have meringue powder. I've never used meringue powder to make an angelfood cake before, but it turned out very well. The biggest difference between it an a typical angel food cake is that it didn't rise as much - the top of the loaf was much flatter. My tasters prefered the meringue powder cake to the egg one, but I know it already had the advantage because it wasn't underdone.
The lemon curd, however, was problem free and delicious.

Lemon Curd
1 tablespoon lemon zest
1/2 cup lemon juice
3 egg yolks
1/2 cup sugar
5 tablespoons butter, cut into small pieces
Combine lemon zest, juice, eggs and sugar in saucepan and whisk to combine. Continue whisking over medium heat until sugar is dissolved. Add butter.
Keep whisking until mixture starts to bubble and thicken. Transfer to a bowl and store in the fridge.


Sunday, January 16, 2005

Sunday Brunch: Buttermilk Waffles

This morning I made brunch for my parents using the waffle iron my mother got for Christmas. I believe their old waffle iron was at least ten years old. It worked, but had a variety of problems including the lack of an indicator light of any sort. It was difficult to tell how long it needed to heat up and when the waffle was finished cooking. I have vivid memories of waffle-making attempts when I was in school: opening the iron too soon, resulting in half the waffle stuck to the top or the iron and half to the bottom.
I used an approximation of the America's Test Kitchen recipe for Buttermilk Waffles. I was originially going to make the waffles from my Fannie Farmer cookbook, but decided to make the switch after finding some buttermilk in the fridge. I say approximation because the ATK recipe called for 1 tablespoon of cornmeal to give the waffles a bit of extra crunch, but I cut it to 1 teaspoon because my mother isn't a fan of cornmeal and I was worried about the waffles taking on its flavor. I also cut the butter slightly. The waffles turned out very well. ATK states that the best waffles will result from a thick batter (the Fannie Farmer recipe is thick as well), but I think I might try a thinner batter next time just to see how the waffles turn out as a point of comparison.
Here's the recipe I used this morning. Remember to up the cornmeal and double the butter to 2 tablespoons for their original recipe.
Buttermilk Waffles
1 egg, separated
1 cup flour
1 teaspoon cornmeal
1/2 teaspoon baking soda
1/2 teaspoon salt
7/8 cup buttermilk
1 tablespoon butter, melted
Preheat your waffle iron.
Combine egg yolk, buttermilk and butter in a bowl.
Combine flour, cornmeal, soda and salt in another.
Beat egg white to stiff peaks.
Add wet ingredients to dry mixture and whisk together. Fold in egg whites.
Spread batter on your waffle maker and cook according to its instructions.
Serve on a warm plate, freshly made.

Friday, January 14, 2005

Homemade Pita Bread

I love pita bread. I use it instead of regular sliced bread frequently. You just can't beat the convenience of holding a little pocket and eliminating the possibility of the filling escaping out the back of your snack.
I actually had no idea how easy it was to make this myself. I have no problem with the vast majority of store bought pitas, but I have found them to be a bit rubbery, or a bit brittle, on occasion.
I got this recipe from Tyler Florence on Food 911, though I slightly modified it to account for the ingredients that I had in the house. He's definately a favorite of mine in terms of the food network chefs. Not because I dislike the others, but I find T.F. to be very likeable and excellent at explaining all the steps to his recipes. They're uncomplicated and delicious. I would definately jump at the chance to meet Tyler or to be on Food 911 - and not just because I'd love to blog about it afterwards, either.

Pita Bread
1 packet active dry yeast
1 1/2 cups warm (105-115F) water
1 teaspoon sugar
1 teaspoon salt
3 1/2 cups ap flour
Combine sugar, water and yeast. Let stand for 15 minutes, until foaming.
Stir in salt and flour until fully incorporated. Turn out onto a lightly floured surface and knead until smooth, about 5 minutes.
Allow to rise in a lightly oiled bowl until doubled in size, 1 1/2 hours.
Turn on your broiler and lightly oil a baking sheet.
Punch the dough down, divide it into 10 pieces, and gather each piece into a ball; keeping all of them lightly floured and covered while you work. Allow the balls of dough to rest, covered, for 15 minutes so they will be easier to roll out.
Roll out until balls form circles about 1/8 - 1/4 inch thick.
Place on baking sheet and broil for 3 minutes, until lightly browned. Flip over and broil again for 1 1/2 - 2 minutes. You just have to keep an eye on these guys depending on how hot your broiler gets.
Remove from oven and cool between kitchen towels to keep the pitas moist.
Store in an airtight container.

Wednesday, January 12, 2005

Milk and Cookies


Sometimes nothing can satisfy like a glass of milk and a couple of chocolate chip cookies warm from the oven. Today was one of those days.

I have to mention here that I am not a fan of those huge, chewy, buttery bakery style chocolate chip cookies. I personally prefer my cookies to be a bit crisper, with just a touch of chewiness in the center. Butter is all well and good, but I don't like a cookie that leaves a puddle of grease in its wake.
Consequently, I didn't put too much butter into this recipe and I added a little bit of honey for some extra moistness. The honey will also keep the cookies moist after they've baked. The batter is thick and easy to work with, so you shouldn't need to refrigerate them before baking unless it's a very hot day. I also like using mini chocolate chips because they are more evenly distributed through the batter then regular chips. Unless you are using a lot of nuts and chips in all your cookies recipes, I'm sure that you have had cookies with almost no chips and cookies with a lot all in the same batch. No problems with that here!

If you prefer a chewy cookie, just reduce the baking time by about a minute and take the cookies out after they have turned a very light brown color.

Nicole's Chocolate Chip Cookies
1 1/4 cup ap flour
1 tsp baking soda
1/2 tsp salt
1/4 cup white sugar
1/2 cup brown sugar
1/4 cup butter, slightly softened
1 egg
1 tsp vanilla
2 tsp honey
1/2 cup mini chocolate chips
Preheat oven to 375F.
Combine flour, soda and salt and mix with a fork.
Cream together butter and sugars. Add egg and beat until fully incorporated. Stir in vanilla and honey.
Add dry ingredients to the sugar mixture in two additions. Stir in chocolate chips.
Drop by heaping teaspoonfuls onto a parchment lined baking sheet. Bake for 10 minutes, or until cookies all golden all over.
Cool for 2 minutes on baking sheet, then transfer to a rack.
Makes 36 2-inch cookies

Tuesday, January 11, 2005

Tyler Florence's Blood Orange Sorbetto


I think that this is one of the most beautiful desserts I have ever seen. The photo doesn't do it justice, but the color of the sorbetto was just wonderful.
Fresh out of the ice cream maker, it was very, very smooth, much like a sorbet. The next day, after freezing overnight, it should be allowed to thaw somewhat before serving, or it will be a bit like granita. It was just sweet enough and incredibly refreshing.
Perfect.

Tyler Florence's Blood Orange Sorbetto
1 cup water
1/2 cup sugar
2 cups blood orange juice (about 5-6 oranges)
1 tbsp orange zest
Combine water and sugar in a small saucepan and bring to a boil. Let cool for about 15 minutes, until nearly room temperature, then add to orange juice and zest and stir.
Pour into ice cream maker and follow your machine's directions.


Serves 6-8

Monday, January 10, 2005

Low fat Orange Oatmeal Crisps

My second venture in Healthy Homestyle Desserts is Orange Oatmeal Crisps. I chose these to go with some Blood Orange Sorbetto that I made (which will get its very own post once I serve it).
The finished cookie tasted very much like a crispy oatmeal cookie, but the cooking process was not free from complications and my notes follow my revised recipe given below.

Low Fat Orange Oatmeal Crisps
1 cup quick oats
1/3 cup + 2 tbsp light corn syrup
1 tbsp canola oil
2 eggwhites
1/3 cup sugar
1/8 tsp salt
1 tsp vanilla
2 tbsp ap flour
1 tsp baking powder
1 tsp orange zest
Preheat the oven to 375F.
Combine oats, corn syrup and oil in a small bowl and mix well. Combine flour, baking powder and zest in a large bowl.
Beat together egg whites, sugar and salt until frothy, about 2 minutes with an electric mixer. Add vanilla and beat until fully incorporated.
Add egg mixure to flour mixture and stir to combine. Add oats to flour mixture and mix well.
Drop teaspoonfuls onto parchment lined baking sheets and bake for 10 minutes, or until cookies are golden all over.

Notes:
The first two batches I baked were WAY underdone because the original recipe called for only 4 minutes of baking time. Keep baking these guys until they are golden brown all over.
I also recommend using parchment paper and not a Silpat to promote even baking. These just aren't the kind of cookie to hold up if its chewy. Yes, I did bin all the ones that were under done.
I would also recommend adding more orange zest if you want a more orangey cookie. These weren't terribly orangey, but it didn't bother me too much since I'm serving them with orange sorbet.

Saturday, January 08, 2005

Home again, home again


Sydney is a fantastic town, no doubt about it. I've been there before and have no doubt I'll be there again, but I love coming home, too.
I wish I could have blogged a bit more while I was in Sydney, but maybe next time. Where did I go? Lots of cafe's that may or may not have had signs. Also bills, Bar Coluzzi in Darlinghurst, Paris Salad's and Sandwich's (sic) on Oxford St (fantastic fruit salad), checked out the David Jones Food Hall, had decent indian food in Paddington, and good eats in both Kings Cross and at Bondi. I also did the usual sightseeing and watched the New Year's Eve fireworks (hence the photo) from Rose Bay.
Now I'm looking forward to IMBB 11: Beans, beans the musical fruit hosted by Cathy at my little kitchen and to trying out my recipe of the month, courtesy of a desser-recipe-a-month calendar that I got for Christmas. Up first is blueberry and lemon clafoutis, though I'll have more info on that later.
2005 is off to a good start. Happy New Year Everyone!

Friday, January 07, 2005

SHF #4: Lemon Squares with Walnut Crust


I'm going nuts! Actually, everyone is. I made some low fat lemon squares for Sugar High Friday #4: Let's Go Nuts!
These lemon squares are from a book called Healthy Homestyle Desserts by Evelyn Tribloe that I picked up at a secondhand book store for $4 and chose not only beacuse the title was appealing, but the book is filled with great pictures. I made these over the holidays as a somewhat lighter alternative to chocolate and cookies. I hope my picture will tempt you to try these.
There is no butter in the crust, instead a buttermilk and oil are added. The recipe also called for using egg substitute, but I used egg whites and one whole egg instead. I also lightly toasted my chopped walnuts. I've included the nutritional information from the cookbook, but there is probablya bit more fat from that egg yolk (though probably a negligible amount as the information is per bar).
The great thing (besides the taste) about this recipe is that it takes an hour from start to finish, though your unburned taste buds will probably thank you if you wait for them to cool before digging in!

Lemon Squares with Walnut Crust (low fat)
Crust:
1 cup ap flour
1/4 cup sugar
1 tsp lemon zest
1/4 cup finely chopped walnuts (toasted or not)
1/3 cup buttermilk
1 tbsp canola oil

Preheat oven to 350F. Lightly spray an 8x8 baking dish with nonstick cooking spray.

In a medium bowl, combine the flour, sugar, lemon zest and the walnuts. In a small bowl, whisk together the buttermilk and oil, then drizzle it into the flour mixture. Cut in using a fork until combined, then press the dough into the bottom of the pan. Bake for 15 minutes or until light brown on the edges.
While that is baking, prepare the topping.
Lemon Topping:
2 egg whites and 1 whole egg
2 tbsp flour
3/4 cup sugar
1 tbsp lemon zest
3 tbsp lemon juice (one medium/large lemon)
1/4 tsp baking powder
Combine all ingredients in order listed and beat on high for 2 minutes with an electric mixer, until throughly combined. Pour over the baked layer and put the whole thing in the oven for an additional 20 minutes, until the center of the lemon topping is set.
Let it cool in the pan.
Slice into bars (recipe suggests 20, but I made 25 slightly smaller ones) and top with a sprinkle of confectioners sugar.

Nutritional information per bar: 86 calories, 2 grams fat (19% calories from fat); keep in mind that just about all the fat is healthy fat, from vegetable oil and walnuts. Now that is something to get nuts over.

Wednesday, January 05, 2005

Sydney Eats: Bodhi Yum Cha

I wish I had thought to take my camera yesterday when we went to have yum cha for lunch at Bodhi at Philip+Cook Park, near St. Mary's Cathedral. Yum cha must be one of the most attractive lunches you can have.
I will keep this brief, as I will freely admit that I only know what about half of our food was. The ones I can describe with a relative degree of clarity are: spring rolls, pumpkin dumplings, sweet corn bao, bbq bao and a couple of veggie noodle things. The noodles literally melted in your mouth, though the sweet corn bao was probably my favorite. We also had some fried sesame coconut balls for dessert, which were not too sweet and a good ending for the meal.
Go there. Really.

Bodhi in the Park
Lower level, Cook & Phillip Park, 2-4 College St
tel 9360 2523

And if anyone is aware of a vegetarian/vegan yum cha place in California - let me know!