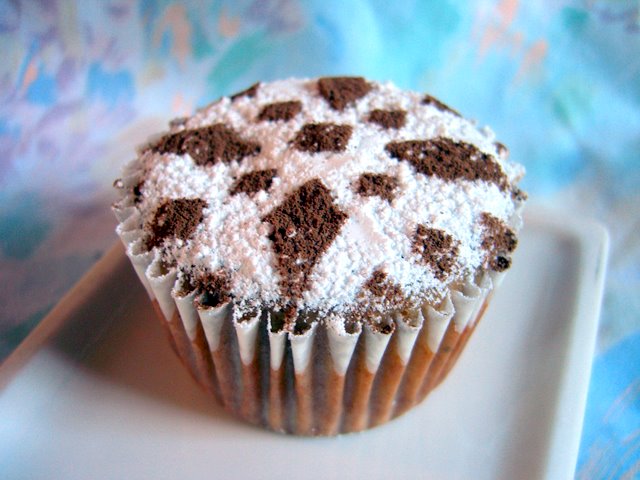
Tuesday, January 30, 2007

Chai Latte Muffins


I usually have a small jar of pumpkin pie spice sitting around. It's easy to make, but in the morning it is very convenient to have some ready to go when I want to spice up my oatmeal on a chilly morning. A few weeks ago, I picked up a jar at Trader Joe's and was very surprised to discover that it tasted nothing like the classic pumpkin pie spice mix that I know and love. I also discovered that it's not necessarily the greatest thing to blindside your tastebuds shortly after waking up. Their version of pumpkin pie spice included lots of cardamom, ginger, cloves, pepper and cinnamon. Call me traditional, but that's not what I want my pumpkin pie spice to taste like.
The point of this little story is that when I was deciding what recipe I wanted to try from Vegan Cupcakes Take Over the World, I realized that the spice combination in the Chai Latte Cupcakes was very similar to my non-pumpkin pie spice mix. I made the cakes and used it instead of the original recipe's combination with great results. The flavor was very spicy and chai-like, but not too aggressive.
The only complaint that I have is that I don't think these are actually cupcakes. They have a less refined, more muffin-like texture than I want for a cake. I would have added more sugar if I wanted to try for more cakiness from this recipe. Fortunately, the muffins went beautifully with a cup or tea or coffee and, as they weren't frosted with anything more than a bit of spiced up confectioners' sugar, I didn't feel the least bit guilty about having them for breakfast instead of dessert. And this time I wasn't surprised by the spicing - just pleased by it.
By the way, these turned out just fine with regular yogurt instead of the soy, so don't worry if you need to make a small substitution to make the recipe fit the ingredients that you keep at home.


Chai Latte Muffins
1 cup soy milk (I used vanilla)
4 black/chair teabags
1/4 cup vegetable oil
1/2 cup plain soy yogurt
3/4 cup sugar
1 tsp vanilla extract
1 1/3 cups all purpose flour
1/4 tsp baking soda
1/2 tsp baking powder
1/2 tsp salt
2 tsp ground cinnamon
1 tsp ground cardamom
1/2 tsp ground ginger
1/4 tsp ground cloves
pinch of ground pepper

Prehat oven to 375F and line a muffin tin with paper liners.
Heat milk to almost boiling (in the microwave or a small sauce pan) and steep the tea bags for about 10 minutes, making very strong, milky tea. Don't worry about making the tea bitter (which can happen as a result of oversteeping) because you won't taste it in the end product.
In a large bowl wisk together oil, yogurt, sugar and vanilla.
In a small bowl, whisk together the flour, baking powder, baking soda, salt and spices. Pour half into the yogurt mixture, stirring well, followed by the tea mixture and the rest of the flour. Stir only until just combined, then evenly distribute into prepared muffin tin.
Bake for about 21-23 minutes, until a toothpick inserted into the center comes out clean and the muffin springs back when lightly pressed.
Cool completely on a wire rack.
Makes 12 mufins.

Top with sifted confectioners' sugar when cooled. Mix 2 tbsp cocoa powder with 1 tsp cinnamon and 1/4 tsp ground nutmeg together in a small bowl. Sift lightly over top of the sugar (using a stencil for accuracy, if you want) to add a bit of extra spice.

Thursday, January 25, 2007

Pecan Chocolate Chip Banana Bread


The only problem that I have with loaf cakes/breads is in choosing the pan size. I tend to prefer using my 8x4 inch pan because I like the higher rise, but the 9x5 inch size is slightly more common and I often feel pressured to write my recipes for that particular pan. Pressure or no, however, I usually just go ahead and use the pan I like, simply indicating the size instead of changing the recipe around. All that said, this time I did opt to use the larger, slightly wider pan for my loaf.
This recipe is a twist on my standard recipe for banana bread, with a little bit more butter and loads of chocolate chips and pecans. Normally I'm not one for nuts in my baked goods, but here the pecans add a nice textural contrast with the chocolate chips. The bread is best when it is toasted and topped with butter or cream cheese, but if you prefer to eat it untoasted, you might want to keep it well wrapped overnight to make sure it is at its moistest when you go to eat it.
Because the pan makes the bread thinner than it might ordinarily be, it will cook more quickly and there is a greater chance of the bread overcooking. Make sure to check it with a toothpick and take it out of the oven as soon as it is done. I would check it a couple of minutes early, just in case your oven runs on the hot side.


Pecan Chocolate Chip Banana Bread
1 ½ cups all purpose flour
½ tsp baking powder
½ tsp baking soda
½ tsp salt
1 tsp cinnamon
1/3 cup butter, softened
¾ cup brown sugar
1 egg
2 medium-sized, ripe bananas, mashed (about ¾-1 cup)
1 tsp vanilla extract
½ cup chocolate chips
½ cup chopped pecans


Preheat oven to 350F and lightly grease a 9x5-in loaf pan
In a small bowl, whisk together flour, baking powder, baking soda, salt and cinnamon
In a large bowl, cream together butter and brown sugar. When light and fluffy, beat in egg, followed by mashed banana and vanilla extract. Blend in flour mixture. Stir in chocolate chips and pecans.
Bake for about 45 minutes at 350F, or until a toothpick inserted into the center comes out clean and the top springs back when lightly pressed. Cool on a rack in the pan for 15 minutes, then turn loaf out of pan and let cool completely before slicing.
Serve toasted, with butter and/or cream cheese. Store well in an airtight container (or plastic wrap).
Serve 8-10.

Wednesday, January 24, 2007

Guess who I met?


Want to know what I've been up to for the past couple of days that has kept me away from blogging? I've been at the Winter Fancy Foods Show in San Francisco! Check out this post for a full report.


And, yes, I do have a recipe ready to go for tomorrow.

Tuesday, January 16, 2007

Bailey's Cheesecake Bars with Chocolate Crust


When I got a bottle of the new Bailey's with a hint of Caramel Irish Cream Liqueur, I knew that I wanted to bake something with it even before I tasted it. I had two reasons for this. First, I don't often have a full bottle of Bailey's sitting around, so it seemed to provide ample resources for creativity. Second, while I like the taste of Irish cream, I'm not that interested in having more than a few sips at a time. The creaminess of the liqueur is just too rich for me on its own, even over ice, in large doses.
That being said, the Bailey's Caramel doesn't really taste like your typical Irish cream at all. Without sharing a drink with you (would that I could!), I'll simply say that it tastes very similar to a caramel macchiato from Starbucks, albeit an alcoholic one. Caramel is such a versatile flavor that I couldn't initially decide what to do with it. Brownies came to mind, but somehow I ended up deciding to start with cheesecake.
I have made plain cheesecake bars using my Baker's Edge pan before and they turned out so beautifully that there was no doubt in my mind I would have to use it again. I still think that the unusual design of the pan makes it perfect for anything that is likely to end up with overcooked edges and an undercooked center when baked in a normal pan, like cheesecake bars and brownies, in addition to whatever else you want to put in it.
These bars turned out beautifully. I used quite a bit of Bailey's, so they are rather "grown up" and probably won't be a big hit with the kids, but they should be a big hit with the adults, especially if you like Bailey's to begin with. The cheesecake is creamy, with notes of caramel and Irish cream and the chocolaty crust provides a wonderful, shortbread-like contrast in texture. They're easy enough to make on a weeknight, fancy enough to serve at a dinner party and taste fantastic. What more could you want?


Bailey's Cheesecake Bars with Chocolate Crust
Crust
1/3 cup sugar
1/2 cup butter, softened
1 1/4 cups all-purpose flour
1/4 cup cocoa powder
1/4 tsp salt

Cheesecake
1/2 cup sugar
1/4 cup half & half/light cream
1/2 cup Bailey's Caramel (or regular Bailey's)
2 (8-oz) packages plain cream cheese, room temperature
3 large eggs, room temperature
1 tbsp all-purpose flour
1 tsp vanilla extract


Preheat oven to 350F. Lightly grease a Baker's Edge pan (or 9x13-inch baking pan). Begin by making the crust. In a large or extra-large bowl, cream together sugar and butter, until smooth and fluffy. Sift together flour, cocoa and salt in a small bowl. Working at a low speed, gradually beat in flour mixture. Mixture will be crumbly when all the flour has been incorporated. Press evenly into prepared pan and bake for 15-17 minutes.
While the crust bakes, combine sugar, half & half, Bailey's and cream cheese in the bowl of a food processor and process until smooth. Add in eggs one at a time, waiting until each in incorporated to add the next, followed by flour and vanilla.
Pour the filling over the hot crust when it has finished baking. Return pan to oven and bake for 22-26 minutes, until the filling is set (a 9x13 pan might need an extra couple of minutes, so be sure to test that the cheesecake is set by gently jiggling the pan before removing it from the oven).
Cool completely before slicing (don't worry if the cheesecake appears to deflate as it cools), or refrigerate overnight.
Store in the refrigerator.
Makes 16-20 bars.


Note: Use full-fat cream cheese in this recipe, or substitute Neufchatel cheese to reduce the fat, but do not use whipped or fat free cream cheese.

Friday, January 12, 2007

Peanut Butter Chocolate Brownies


Remember when I pointed out a few weeks ago that cashew butter could be used to make extra-chewy cookies? It turns out that the very same property carries over to brownies, although this time I used peanut butter instead of cashew butter for something a little bit different.
Besides - who doesn't like the combination of peanut butter and chocolate? It wouldn't be such a popular pairing in the candy world if it wasn't well-liked.
These brownies use both peanut butter and cocoa for a tasty twist on a favorite. The texture is wonderful, as they are chewy and rich without being extremely wet or heavy, as some "fudgy" brownies tend to be. They also keep quite nicely and taste just as good on the second day as they did on the first. I can't vouch for the third day because I suspect that they won't last that long.
I really recommend including the chocolate chips in this recipe because the brownies themselves are not super chocolaty and the chips will keep chocoholics content, but if you want to go really peanut-buttery with this one, try using peanut butter chips instead. You can also try using other nut butters, although your results may vary slightly from mine if you use a natural nut butter, since I used a regular brand.


Peanut Butter Chocolate Brownies
1/4 cup butter, room temperature
1/2 cup creamy peanut butter
1 cup brown sugar
2 large eggs
1 tsp vanilla extract
1/3 cup all pupose flour
1/3 cup cocoa powder
1/4 tsp baking powder
1/4 tsp salt
1 cup chocolate chips

Preheat oven to 350F and line a 9x9-in square pan with aluminum foil. Lightly grease the foil with cooking spray.
In a large bowl, cream together butter and peanut butter until smooth, then beat in sugar until light and fluffy. Add in eggs one at a time, followed by the vanilla.
In a small bowl, sift together cocoa, flour, salt and baking powder. Mix in to peanut butter mixture at a low speed, stopping when just combined. Stir in chocolate chips and scrape batter into pan, spreading into an even layer.
Bake for 26-29 minutes, until set. Edges should feel slightly firm and the center should not look wet or jiggly.
Cool on a wire rack and lit brownies out with the foil when ready to slice.
Makes 16 brownies.

Monday, January 08, 2007

Double Chocolate Peppermint Chip Cake


Over the holidays, I found myself with the need to make a dessert for some guests - surprise, surprise, right? I somehow got it into my head that a bundt cake would look good, not to mention that since these guests happened to be family members, I didn't feel the need to go over-the-top and made an especially elaborate dessert. I wanted something that would go well with a bit of cofee.
My first inclination was to make the pear cake yet again, but I ultimately decided that the inclusion of chocolate into my dessert would probably make it more appealing to everyone. So after much deliberation and a few twists, I arrived at a double chocolate peppermint cake. The cake is a black and white swirl bundt that uses melted bittersweet chocolate in the black layer and melted white chocolate in the white layer. I spiked only the white layer with some peppermint extract, which added a lovely flavor without being too overwhelming, since it was tempered by both the plain chocolate cake and the chocolate chips that I stirred in to both batters before baking.
The swirl in the cake was self-made, by which I mean that I simply layered one batter on top of the other. The lower layer, the chocolate batter, rose up around the white batter because of the way the cake cooks in the oven, creating a gorgeous swirl without the need to force the different batters to "marble."
The finished cake was moist and minty, with a good hint of chocolate that could be emphasized even more if you add a chocolate glaze, rather than a simply dusting of powdered sugar. It was substantial, but neither as heavy nor as dense as a pound cake. It went beautifully with coffee and even better with hot chocolate.


Double Chocolate Peppermint Chip Cake
1 cup butter, room temperature
2 cups sugar
4 large eggs
2 cups buttermilk
2 tsp vanilla extract
4 cups all purpose flour
2 tsp baking powder
2 tsp baking soda
1 tsp salt
4 oz bittersweet chocolate (or semisweet), chopped and melted
4 oz white chocolate, chopped and melted
1 tsp peppermint extract
1 1/2 cups chocolate chips

Preheat oven to 325 degrees F and grease a 10-in. bundt pan thoroughly with cooking spray or butter.
In a large bowl, cream together butter and sugar until light. Beat in eggs one at a time until fully incorporated. Set aside.
Combine vanilla and buttermilk in a measuring cup. Set aside.
In a medium bowl, whisk together flour, baking powder, baking soda and salt. Working in three or four additions, alternately add the flour mixture and buttermilk to the butter mixture, mixing only until just incorporated and no flour remains.
Scoop half of the batter back into the medium bowl. Into one bowl, stir in melted bittersweet (or semisweet) chocolate. Into the other half of the batter in the other bowl, stir in melted white chocolate and peppermint extract. Divide chocolate chips and stir half into each bowl.
Pour chocolate batter into prepared bundt pan. Smooth surface. Pour white batter evenly into bundt pan and tap gently to smooth surface. Do not swirl the batter.
Bake cake for 70-75 minutes at 325F, until a tester inserted in the center of the cake comes out clean and the cake springs back when gently touched.
Allow cake to cool in the pan for 20 minutes, then turn out onto a wire rack to cool completely.
Serves 12-14.

Wednesday, January 03, 2007

The Cheeseboard's Currant Scones


It's not really possible to eat low fat all the time, not without missing out on something really tasty every once in a while, so even if your New Year's resolution is to eat healthier, just keep in mind that eating healthier doesn't have to mean excluding everything that could be described as "decadent." It just means eating less of those items. Really good scones usually get that way because of the liberal use of butter and cream, so it is best to eat just one, but do take that one because you'll be missing out if you're never had a really good scone.

This recipe is from the The Cheeseboard in Berkeley, easily one of the best - not to mention one of the most interesting - bakeries in the SF bay area. It is a collective, so all the workers are part owners of the bakery and basically seem like one big family. The Cheeseboard sells everything from baguettes to sticky buns depending on what day of the week and time of day it is, but everything they sell is excellent. This scone, although fairly simple, is one of their best sellers. It was their "original" scone and on a busy Saturday, the tiny shop can sell through over 500 of them.
The scones are moist, flavorful and tender, with a nice, but slight, crispness to the outside. Dried currants are more easily found at natural foods and gourmet stores, but if you cannot find them at all, use small, dark raisins.

Oh, and Happy New Year, everyone!


Currant Scones
(from The Cheese Board: Collective Works)
3-1/2 cups all-purpose flour
1/2 tsp baking soda
1 tbsp baking powder
1/2 tsp kosher salt
3/4 cup sugar
1 cup butter, chilled and cut into 1-inch cubes
1 cup dried currants
3/4 cup heavy cream
3/4 cup buttermilk

coarse sugar, for topping

Preheat oven to 375F and line a baking sheet with parchment paper.
Whisk together flour, baking soda, baking powder, salt and sugar together in a large bowl.
Add in butter, toss to coat, and rub in with your fingers (or a pastry cutter, if you prefer) until only pea-sized chunks remain.
Stir in currants, then add the cream and buttermilk, mixing only until the ingredients just come together into a ball. It is ok if there is a little flour left at the bottom of the bowl.
Divide dough into 12 balls (about 2-in in diameter, although the cheeseboard's seem to be larger in the shop) and dip the top of each in coarse sugar before placing on the prepared baking sheet.
Bake for 25 to 30 minutes, until golden brown.
Cool on a wire rack.
Makes 12.