Monday, October 30, 2006

Pumpkin Pie, Squared


The first thing you might notice about this piece of pumpkin pie is that it does not look like a traditional slice of pie. Instead of using a 9-inch round pie pan, I opted to use an 8-inch square baking pan. I did it partially out of laziness because the square pan was right in front of me and fresh from the dishwasher, and partially because I wanted to do something a bit out of the ordinary.
Before I even get into the pie, I think it turned out beautifully this way and when I am baking another pie that has a crumb crust (graham or otherwise) I will definitely make a square pie again. This is also a good trick for anyone who has limited access to kitchen equipment but owns a square casserole dish.
Back to the pie.
This pumpkin pie is made with canned pumpkin, but was inspired by a recipe from The Good Home Cookbook (read more about it here), rather than the one on the back of the can of pumpkin. I altered the spicing, the amount of liquid, the crust and, of course, the shape of the pie, so it really looks nothing like the original recipe in anything but the baking time, which should be just about the same regardless of whether you make a round or square pie.
The pie itself is delicious: creamy, light and flavorful. One bite makes you think of fall in an instant - and I can attest to the fact that two pieces make you feel even better. I left ginger out of the filling and, instead, used crushed gingersnaps to make the crumb crust.
I think pumpkin pie is one of the easiest you can make - especially since I've eliminated an actual pie plate. Make two and enjoy one yourself, then use the other to impress your family.


Pumpkin Pie, Squared
Crust:
2 1/2 cups gingersnap cookie crumbs
1/4 cup butter, melted
1 tbsp sugar
Filling:
3 large eggs, room temperaure
1 - 15-oz. can pumpkin puree (about 1 1/2 cups)
1 cup brown sugar
1 tsp ground cinnamon
1/2 tsp ground allspice
1/4 tsp ground cloves
1/8 tsp freshly ground nutmeg
1/2 tsp salt
1/2 tsp vanilla extract
2/3 cup milk (any kind)


Preheat oven to 350F.
Combine all crust ingredients into a medium bowl and stir to combine. Press into the bottom of an 8-in square baking pan and bake for 12-14 minutes, until just beginning to brown at the corners.
Set aside to cool completely.

Turn up oven temperature to 425F.
In a large bowl, beat eggs until slightly foamy, about 1 minute. Whisk in all the remaining ingredients, except the milk, and beat until smooth. Then whisk in the milk.
Pour mixture into cooled pie crust and bake for 15 minutes at 425F, then reduce the temperature to 350F and bake for 35-40 more minutes, until the pie jiggles only slightly and a knife inserted into the center comes out clean.
Cool completely on a wire rack before cutting and refrigerate if storing leftovers.

Makes 9 good-sized pieces.

Thursday, October 26, 2006

Cinnamon Chocolate Squares


I was asked by Sara, from i like to cook, if I would be interested in trying a couple of recipes from Dorie Greenspan's new cookbook, Baking: From My Home to Yours, I immediately said yes. My general feeling is that no matter how many recipes or cookbooks I have (a lot is an understatement), I can always have more. Besides, new cookbooks mean new pictures, and I love flipping through books for ideas even if I don't make anything.
To choose my first recipe, I looked at the ones that were illustrated first. I wish that they all could have had pictures, as the photography was excellent, but given that the book was already 500+ pages, it was understandable that they didn't want to make it any longer.
My first choice was for a recipe called Cinnamon Squares, slightly renamed here because I think that Cinnamon Chocolate Squares is a slightly more accurate name. The recipes is for a cake with a cinnamon-coffee-chocolate swirl running through the center of it. It would be a coffee cake, but for the fact that it is topped with a rich chocolate glaze - not usually a feature of coffee cakes.
The cake is dead easy to make and you don't even need to cream the butter, since it goes in melted. The only difficult part is spreading the second half of the batter evenly on top of the cinnamon mixture without disrupting it. Once it is finished, the cake is moist on the inside and very flavorful. The corners of the cake were a tiny bit crisp at the edge, so keep an eye on the baking time. I think that this would be great with a streusel topping, but the chocolate glaze seemed to be a real showstopper - people loved it. Overall, this is a great cake. Make it as dessert and serve it with coffee or add your favorite streusel topping and make it for breakfast.
Incidentally, my only negative comment about the book is that there are only about 5 recipes for yeasted breads, and for a book titled Baking I would have expected all types of baking to be covered, not necessarily just a focus on baked goods. Of course, I love baked goods and the book is still a good one, but it's not necessarily the only cookbook you'll want if you want to bake breads, too.


Cinnamon Chocolate Squares
(from Baking: From My Home to Yours)
Cake:
1 1/4 cups + 2 tbsp sugar
1 tbsp + 2 tsp cinnamon
1 1/2 tsp instant coffee/espresso powder
1 3/4 cups all purpose flour
2 tsp baking powder
1/4 tsp salt
3/4 cup milk (I used nonfat)
2 large eggs
1/2 tsp vanilla
10 tbsp butter, melted and cooled(unsalted)
1/2 cup mini chocolate chips or 3 oz bittersweet chocolate, chopped

Glaze:
6 oz bittersweet chocolate, chopped
2 1/2 tbsp butter, soft


Preheat oven to 350F. Butter an 8-inch square cake pan and line the bottom with parchment paper.
In a small bowl, combine 2 tbsp sugar, 2 tsp cinnamon and the espresso powder. Set aside.
In a large bowl, whisk together flour, sugar, baking powder, the remaining cinnamon and salt.
In a medium bowl, whisk together milk, eggs, vanilla and slightly cooled, but melted, butter. Pour into the flour mixture and stir until just combined.
Pour half of the batter into the prepare pan, spreading it evenly over the bottom. Evenly sprinkle on sugar/espresso mixture and mini chocolate chips, then top with the remaining batter, spreading it evenly.
Bake for 35-40 minutes at 350F, just until a toothpick comes out clean. Let the cake cool in the pan for 15 minutes, then turn out onto a wire rack and remove the parchment. Let cool completely before frosting.

For the glaze, melt together the chocolate and the butter either in a double boiler (or on low power in the microwave, as I did) and stir until smooth. If it is runny, let it stand for a minute or two, but otherwise the chocolate should be thick, smooth, shiny and spreadable. Spread on the top of the cake (the flat bottom side should be facing up, which makes it easy to frost) and allow the frosting to set up before serving.

Makes 12 servings.

Monday, October 23, 2006

Meyer Lemon Scones


Meyer lemons, as I have mentioned before, are a type of lemon that is actually a hybrid between a tangerine or mandarin orange and a lemon. As a result, the fruit is slightly smaller than your average lemon and significantly sweeter, although it still has a very lemony flavor. Tasting a meyer lemon is more like tasting lemonade - albeit tart lemonade - than a regular lemon, as it lacks some of the bitterness that the ordinary lemons have.
Meyer lemons can be used in the same way as regular lemons, but will often impart a greater lemon flavor, since it does not have to be tempered by extra sugar. This is why meyer lemons work perfectly in these scones. They have a nice fresh lemon flavor that is not aggressive, and they are not very sweet, so you can taste the butteriness that makes scones so delicious in the first place.
The technique for scone making is very easy, since everything goes into one bowl. You do need to practice rubbing the butter into the flour, working it into a coarse, sandy mixture, but you can always cheat by pulsing the mixture in the food processor 5 or 6 times.
These scones are crisp on the outside, soft in the midde and not too dry. The lemon "glaze" must be added when the scones are hot out of the oven so it can set up without softening the "crust" on the top of the scone.
I suggest having a couple extra lemons on hand in case you need extra juice, although you could always try adding in a regular lemon if you have to.


Meyer Lemon Scones
2 cups all purpose flour
1 tsp baking powder
1/2 tsp baking soda
1/2 tsp salt
1/4 cup sugar
1/2 cup butter, chilled and cut into 10-12 small pieces
8-10 tbsp fresh meyer lemon juice
1-2 tsp meyer lemon zest

Preheat oven to 400F. Line a baking sheet with parchment paper.
In a medium bowl, whisk together flour, baking powder, salt and sugar. Add butter and toss to coat. Using your finger tips, rub the butter into the flour mixture until it resembles very coarse sand. A few large bits are ok, but most should be smaller than a pea.
Add 5-6 tablespoons of orange juice and zest and stir dought with a fork. Add remaining juice until dough comes together into a not-too-moist ball. Divide dough in to two balls and flatten onto baking sheet to for discs about 1-inch thick. Divide each disc into quarters and separate slightly.
Bake for 20-22 minutes, until scones are a light golden color. A toothpick should come out clean, but color is a reliable indicator for these.
Makes 8.


For the "glaze": Mix together a few tablespoonfuls of white sugar with a tablespoon or two of lemon juice to make a paste. Drizzle on scones when hot out of the oven.
Let scones cool before eating.

Friday, October 20, 2006

Gingerbread Blueberry Muffins


I must say that I felt a bit bad seeing that my front post was not about baking when this blog got a mention in the Guardian the other day, but to make up for that, I promise that this is a really good recipe.
I love gingerbread in just about any form it comes in, from cookies to cakes to pancakes, and usually look forward to cooler weather as a sort of permission to bake anything spicy. Of course, the temperature shot back up into the 80s today, so it wasn't exactly cold outside - but let's overlook that for now, shall we?
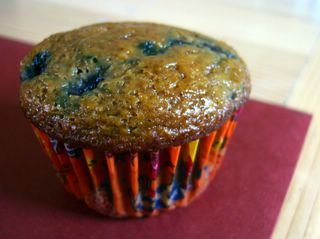
The original recipe for this gingerbread was in an old issue of Cooking Light I happened to flip through the other day. It had all of my favorite ingredients - buttermilk, molasses, blueberries - and was somewhat low in fat, too. I altered the original recipe by turning a cake into muffins and using less egg, since with light baked goods I feel that an extra egg can give the finished product and unpleasantly eggy taste. There only odd thing about the recipe is that it makes an unusual amount of batter. You could make 16 medium-sized muffins with it, or you could do what I did for the muffin pictured above and make 12 large muffins, filling the tins nearly to the top and discarding the small amount of leftover batter. The choice is yours. Both baking times are noted below.
The batter comes together in a flash and the muffins a nice contrast between spicier winter flavors and summer berries. The combination creates a very light, moist muffin that is dangerously addictive, especially if you have some cream cheese to spread on it and a nice hot cup of coffee to wash it down.


Gingerbread Blueberry Muffins
(adapted from a Cooking Light recipe)
2 cups all purpose flour
1 1/2 tsp ground ginger
1 1/2 tsp cinnamon
1 tsp baking powder
1 tsp baking soda
1/2 tsp salt
1/8 tsp ground cloves
1/8 tsp allspice
2 large egg whites
1/2 cup sugar
1/2 cup molasses
3/4 cup buttermilk
1/4 cup milk (skim is fine)
4 tbsp vegetable oil
1 tsp vanilla extract
1 1/2 cups blueberries (fresh or frozen)


Preheat oven to 350F and line a muffin tin with paper liners (12 or 16, see times below).
In a large bowl, whisk together the flour, ginger, cinnamon, baking powder, baking soda, salt, cloves and allspice.
In a medium bowl, whisk together sugar and egg whites until creamy. Beat in molasses, buttermilk, milk, vegetable oil and vanilla. Pour wet ingredents into dry ingredients and whisk until just smooth, with no flour remaining. Stir in blueberries and divide into 12 or 16 muffin cups (if using 16, fill only 3/4 full).
If making 12 large muffins, bake for 17-21 minutes.
If making 16 medium muffins, bake for 15-19 minutes.
In either case, make sure a tester comes out clean before removing them from the oven.
Cool completely on a wire rack and store in an airtight container if not eating on the first day.
Makes 12 or 16 muffins.

Wednesday, October 18, 2006

Hot and Sour Cabbage Soup


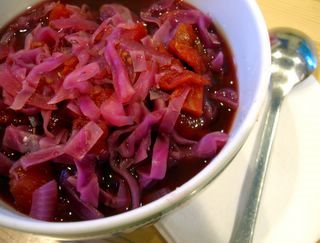
Soups can be beautiful in person, but unlike most solid foodstuffs, they can be extremely difficult to "style" for photographs. Soups that are a solid color and smooth in texture are usually the most photogenic. Soups that have a lot of components, such as lentil soup or chili, tend to look overly busy, like a jumble of random, mushy ingredients. This soup fell into the unphotogenic category the first few times I made it, since the onions and cabbage - its main components - just turned sort of brownish. It tasted good, but I didn't want to take a picture. Then, in a moment of food blogging epiphany, I decided to use red onion and red cabbage. Suddenly, the soup looked as vibrant and delicious as it tasted.
The soup is originally from a Sara Moulton recipe and I think that I first copied it down during one of her shows, back when she was still on the Food Network.
It is very easy to make and involves minimal prep work. For anyone who has ever chopped up a cabbage, you probably know that it is one of the easiest veggies to work with after you cut out the core. The "hot" part of the soup comes from the red pepper flakes and the head level can easily be adjusted by eliminating a quarter teaspoon or so. The "sour" part comes from the balsamic vinegar, which adds a very slightly sweet-sour taste to the soup. Choose a good vinegar, since you'll be able to taste it in the finished dish.


Hot and Sour Cabbage Soup
1-2 tsp vegetable oil
1 large red onion, quartered and thinnly sliced
2 garlic cloves, minced
1/2 - 3/4 tsp red pepper flakes
1/4 cup balsamic vinegar
2 tbsp brown sugar
6 cups finely sliced red cabbage (about 1/2 large cabbage)
1 can (15-oz) plum tomatoes, drained and chopped
6 cups vegetable stock
Salt and pepper, to taste


In a large pot or dutch oven, heat vegetable oil over medium heat and cook the onions until just tender, about 5 minutes. Add in the garlic and red pepper flakes, stirring for and additional minute.
Add all remaining ingredients and cover. Bring to a boil, then reduce the temperature and simmer until cabbage is tender, about 1 hour.
Season with additional salt and pepper before serving.

Serves 6-8

Sunday, October 15, 2006

One-Bowl Buttermilk Chocolate Cupcakes


Occasionally, you'll see a blogger write in that "real" life - in some form - got in the way of blogging and interrupted their flow. I have to say that I, too, recently had that very same conflict and. as a result, my posting schedule was interrupted. I had a busy couple of weeks and, to cap it all off, it was my birthday. I don't apologize for that last bit, but I do apologize to everyone who enjoys visiting my blog as much as I enjoy writing it. I'll try to get back on a more regular posting schedule.

But first, here are some cupcakes that I made in honor of my birthday. Don't worry - I had a "real" cake, too, and I suspect that I may yet have another cake before the week is up. This is just something quick that I through together, taking the very easy eggless chocolate cake and making it a little bit richer by using buttermilk in place of milk and melted butter in place of oil. They're quite chocolaty, but they are also light and moist. I think that the buttermilk and butter make them have a little more depth than the recipe with oil, but they are both excellent. I think that this serves as a good example of how some substitutions can be made in recipes and still produce good results. You do, however, have to take into account the properties of the things you are substituting. In this case, I reduced the amount of vinegar in the mix because the buttermilk is acidic.
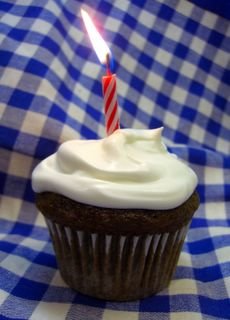
For the cake in the picture, I used lightly sweetened whipped cream as a "frosting."
But my favorite part was blowing out the candle.


One-Bowl Buttermilk Chocolate Cupcakes
1 1/2 cups all purpose flour
1/4 cup cocoa powder
1 cup sugar
1 tsp baking soda
1/2 tsp salt
1 cup buttermilk
1/4 cup butter, melted and cooled
1 tsp apple cider vinegar
1 tsp vanilla extract


Preheat oven to 350F. Line a 12-cup muffin tin with paper liners.
In a large bowl, whisk together flour, sugar, baking soda and salt.
Pour in the rest of the ingredients (it's helpful to have the buttermilk at about room temperature) and stir until just combined.
Divide evenly into the prepared muffin tin and bake for 14-16 minutes at 350F, or until a tester comes out clean.
Cool completely on a wire rack before frosting.

Tuesday, October 10, 2006

Lime Chiffon Cake


Lime and vanilla really is a fantastic flavor combination, although it's not necessarily the first one you might think of when it comes to desserts. Lemon and orange are far more popular when it comes to citrus, but lime deserves a role at least as prominent.
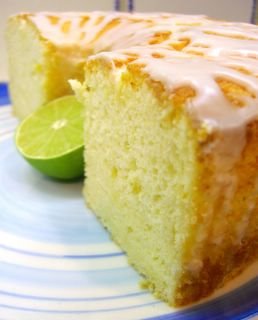
In this chiffon cake, lime really plays a starring role and many will be surprised to find that it isn't overpowering in the least. The cake is sweet with a great citrust tast, and much less tart than other lime desserts, such as key lime pies. I think that the glaze is a nice touch and included simple instructions after the cake recipe, though I should hope that you all will know how to make a simple glaze with powdered sugar after the number of times I've mentioned it here!
This cake is moist, light and very tender. Even though it is an egg-based cake, it doesn't taste overly "eggy," but has that plesant springy texture that sponge cakes have. It goes extremely well with berries, but is equally good on its own if berries aren't available.
You'll note that the recipe calls for sifted cake flour. Simply sift more flour than you think you'll need onto a sheet of parchment paper, then spoon it up to fill the measuring cups to the desired amount. Funnel the rest of the flour back into its box/bag for next time. The flour is so light that the amount (i.e. the weight) will be too much if you sift after measuring, so be sure to do it first!
One other thing to note is that the egg whites should be at room temperature to whip up to their full volume. Eggs are easier to separate when they are cold, so separate the yolks and whites (disposing of the extra yolk) into two small bowls, cover with plastic wrap and let sit out for about an hour or so before beginning.


Lime Chiffon Cake
2 1/4 cups sifted cake flour
1 1/2 cups superfine sugar
1 tbsp baking powder
1/2 teaspoon salt
3/4 cup fresh lime juice
5 tbsp vegetable oil
zest 1 lime (or 2 or 3, if you really want to boost the flavor)
1 1/2 teaspoons vanilla extract
6 large egg yolks
7 large egg whites, at room temperature


Preheat the oven to 325F. Get out a 10-inch tube pan, but do not grease it.
In a large bowl, whisk together the flour, the sugar (reserving 2 tbsp), baking powder and salt. In a medium bowl, stir together in the lime juice, vegetable oil, lime zest, vanilla and egg yolks, then pour into the dry ingredients and stir until smooth.
In another large bowl, beat the egg whites to stiff peaks, adding in the last 2 tablespoonfuls of sugar when the whites begin to get foamy.
Gently stir 1/4 of egg whites into the lime mixture to lighten it. Gently, working in two additions if it is easier, fold the remaining beaten whites into the lime mixture until no streaks remain.
Pour into the ungreased tube pan and bake for 55-60 minutes, until the top springs back when gently touched.
Invert cake over a bottle (or onto a wire rack if your pan has "feet" to hold it up) and let cool completely. When cooled, run a knife around th edges and turn cake out onto a platter.

If desired, drizzle with a mix of powdered sugar, lime juice and vanilla extract (starting with about 2 cups of powdered sugar and adding enough juice to make it drizzle-able)

Makes one cake. Serves 12.


For another chiffon cake, check out the Banana Chiffon Cake I made a few months ago.

Saturday, October 07, 2006

Doubletree Chocolate Chip Cookies


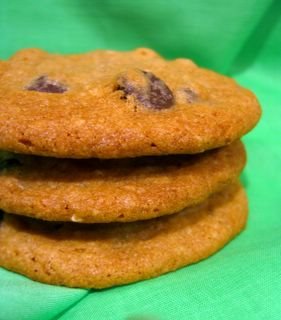
If you have ever stayed at a Doubletree Hotel, you will probably remember only one thing about your visit: they give guests warm chocolate chip cookies at check in, and pretty much any time you feel like wandering down to the main desk to get one. And the cookies are fantastic: warm, chewy, packed with chocolate chips and nuts (yes, even I liked the nuts in these cookies, though I usually omit them at home).
Many recipes claim to be the real Doubletree version, but this recipe is the closest that I have found. It makes cookies that are large, chewy and dangerously addictive. I make them about hald the size that the recipe recommends (2 tbsp instead of 1/4 cup) and only sometimes chill the dough. In either case, they turn out well. The only thing you have to watch is the baking time, because these can go from done to over-done in less than a minute.
The cinnamon is minimal and not really present in the final cookie, it just adds to the depth of flavor. The vinegar adds a lightness to the cookie, really giving the baking soda something to react with.
Now, in all honesty, I can't say that this really is the recipe for Doubletree's chocolate chip cookies and unless I ordered some online and did a side-by-side taste comparison, I can't even guarantee that they will taste exactly the same. What I can guarantee is that these are excellent cookies that are at least as good as the original Doubletrees that inspired this.


Doubletree Chocolate Chip Cookies
1/2 cup rolled oats (oatmeal)
2-1/4 cups all purpose flour
1-1/2 tsp baking soda
1 tsp salt
1/4 tsp cinnamon
1 cup (2 sticks) butter, room temperature
3/4 cup brown sugar
3/4 cup sugar
1-1/2 tsp vanilla
1/2 tsp apple cider vinegar
2 large eggs
3 cups semi-sweet chocolate chips
1-1/2 cups chopped walnuts (optional)


Preheat oven to 350 degrees. Grind oats in a food processor until very fine and almost powdery. Put tthe oats with the flour, baking soda, salt and cinnamon in a medium bowl and stir to combine.
In a large bowl, cream together the butter and sugar. Beat in the vanilla and vinegar, then add the eggs in one at a time. Gradually, on low speed, add in the flour mixture. Stir in the chocolate chips and walnuts by hand.
Divide dough into 2 tbsp balls and place on a parchment-lined baking sheet (dough can also be chilled for a slightly less-spread out cookie), leaving about 2 inches between each ball so the cookies can spread.
Bake for 13-15 minutes, until golden at the edges. Cool for about 4 minutes on the baking sheet, then remove to a wire rack to cool completely.
Store in an airtight container.
Makes about 3-dozen (you'll get a few more if you use the walnuts, which I usually leave out)

Tuesday, October 03, 2006

Almond Chocolate Chip Bars


I wanted to try this recipe for a very long time. Land O' Lakes (yes, the butter company) has a great recipe section on their website and I frequently browse through it when I don't have anything in particular in mind to make. Their pictures are tempting and since this is the very first entry in their Bars and Brownies section, it stared up at me every time I opened the page. This time, I finally made them.
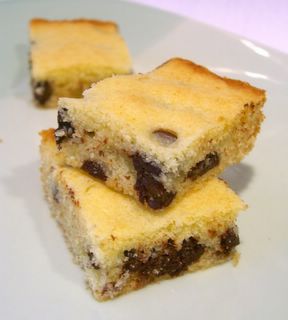
The main reason why these look relatively almond-free for a bar cookie with "almond" in the name is that I left off the slivered almonds that were supposed to be sprinkled on top. By the time they came out of the oven and cooled, I discovered that I no longer felt like bothering with the icing, either. I love the almond flavor, but I generally prefer my cookies nut-free, so it didn't surprise me when I liked these cookies just as I (lazily) made them.
The entry describes them as "a cross between a cookie and a slice of coffeecake," though I would just say that they are fairly cakelike, but slightly dense, cookies. I thought that the texture went well with the almond flavoring (and a cup of coffee), which was strong and would have been far too overpowering in a fudgier sort of bar. The recipe was easy to make and the individual cookies look lovely, though they are on the small side and you might want to make a double batch if you're expecting to share.


Almond Chocolate Chip Bars
1/2 cup sugar
1/2 cup butter, room temperature
2 tsp almond extract
1 large egg
1 cup all purpose flour
1/2 tsp baking powder
1/4 tsp salt
1/2 cup chocolate chips


Preheat oven to 350°F. Grease an 8-inch square baking pan.
Cream together sugar, butter and almond extract in large bowl, then beat in egg. Stir together the flour, baking powder and salt in a small bowl and gradually mix it into the butter mixture at low speed. Stir in chocolate chips.
Bake for 25-30 minutes or until edges are golden brown.
Cool completely on a wire rack.

Once cooled, you can add a glase: Combine 1/2 cup powdered sugar, 1 tbsp very soft butter and 1 tbsp milk and stir well. Spread over the bars and sprinkle with sliced almonds. Allow to set before slicing.

Sunday, October 01, 2006

Sunday Brunch: Apple Spice Vegan Wafffles


I know that I've mentioned before how I don't like breakfast to be a fattening affair. Once in a while? Sure, but because I really enjoy breakfast foods and want to have them more than once in a blue moon, I like to work out ways to have my cake - waffles, in this case - and eat it, too.
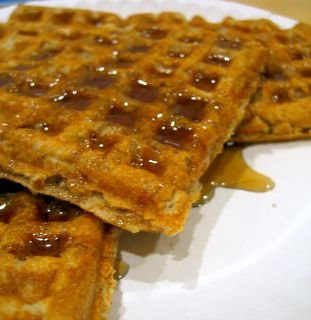
These waffles are based on a recipe that a friend gave to me, so I'm not sure where they originated, but when I first made them I was surprised that they came out as well as they did. After all, waffles are usually generous about the amount of fat that they use, so to see a recipe for a waffle that didn't use butter, oil or eggs, but still turned out to be quite tender and, if you grease the iron well, they will come out crisp, just as you would expect any other waffles to. Greasing the iron is very important with this recipe because they can stick even in a nonstick pan.
The waffles are flavored with a combination of spices that is often used in apple pies and other apple-flavored baked goods. It brings out the subtle sweetness of the applesauce and goes very well with maple syrup.


Apple Spice Vegan Wafffles
1 1/2 cups all purpose flour
1/2 cup rolled oats
2 tsp baking powder
1/4 tsp salt
1/2 tsp cinnamon
1/2 tsp allspice
1/4 tsp nutmeg
1 cup milk (soy, or regular if you aren't vegan)
1 cup apple sauce
1 tsp vanilla extract


Combine all dry ingredients in a large bowl and stir together. Add in milk, apple sauce and vanilla and stir until just smooth.
Preheat waffle iron, grease well with cooking spray (even if it's nonstick) and cook waffles according to the manufacturer's instructions.
Serve immediately, with plenty of syrup.

Makes 2-4 waffles and serves 3-4, depending on the size of your waffle iron.