Friday, December 29, 2006

Margarita Cupcakes


Chocolate and vanilla are classics for a reason, but that doesn't mean that you can't think outside of the box a bit when it comes to cupcakes. And I'm not refering to boxed cake mixes here. I'm talking about using more unusualy flavors, like Cupcake Bakeshop does, to really let cupcakes shine, not just act as pacifiers when we're in the mood for a little nostalgia.
You have probably never had a margarita cupcake before, let alone heard of one. This recipe comes from Vegan Cupcakes Take Over The World, a book that I recently got to try a few recipes from. Not only are they creative, but they taste great. This batch of cupcakes, for example, was served to a group of omnivores and I didn't even mention that they were vegan. They were a huge, huge hit. It could have had something to do with the taste of tequila in the outstanding frosting, but even so, there were no complaints about the texture or the flavor of the cake. And yes, I mean this as a complement because anyone who has tried vegan baking will tell you that the flavor is not the problem, it's the texture. This cupcake has it all - excellent flavor, nice moistness and even crumb, and a great frosting. The lime/tequila flavors really shine.
Because they're modeled after a cocktail, these are kind of "adult" cupcakes. Make them for a party - how about New Year's?

Margarita Cupcakes
(from Vegan Cupcakes Take Over The World)
1/4 cup lime juice
1 1/2 tsp lime zest (1 lime)
1 cup soy milk (plain or vanilla)
1/4 cup vegetable oil
2 tsp tequila
1/2 tsp vanilla extract
1 cup sugar
1 1/3 cup all purpose flour
1/4 tsp baking soda
1/2 tsp baking powder
1/2 tsp salt

Preheat oven to 350F. Fill a 12-cup muffin tin with liners.
In a large bowl, mix together lime juice, lime zest, soy milk, oil , tequila, vanilla and sugar.
In a small bowl, mix together flour, baking soda, baking powder and salt. Add to lime mixture and stir until just combined. Divide evenly into muffin tins.
Bake for 20-24 minutes, until a tester comes out clean and the cakes spring back when lightly pressed.
Turn out onto a wire rack to cool completely before frosting.


Tequila and Lime Frosting
1/4 butter or nonhydrogenated shortening, softened
1 tbsp soymilk
3 tbsp lime juice
1 tbsp tequila
2+ cups confectioners' sugar
coarse sugar for "rims"

Cream together butter/nonhydrogenated shortening (depending on whether you want the frosting vegan or not), soymilk, lime juice, tequila, and 2 cups of confectioners' sugar. Add in more sugar as needed to make frosting stiff, but spreadable.
Spread on cupcakes and roll the edges in a small amount of coarse, colored sugar (poured into a small bowl, so it's easy to direct it.

Tuesday, December 26, 2006

Chocolate Cranberry Pecan Rugelach


I hope that everyone had a wonderful Christmas (Hanukkah, etc.) with their families and friends this year. I know I did.
I feel that I am a bit late with these rugelach because they are a tradititionally Jewish cookie and very popular during Hanukkah, especially at parties. This doesn't preclude them from being eaten the rest of the year, of course, but I must say that these were a huge hit as holiday gifts this year.
This rugelach is made with a lightly sweetened cream cheese dough that is very rich, but very easy to work with. The dough is spread with a filling that can include fruit, spices, preserves, nuts or - as in this case - chocolate, then is cut into thin triangles and rolled into individual crescent shapes. The finished cookies look quite impressive, but they are surprisingly easy to make because the dough is, as I said, very easy to handle.
The pastry is soft and tender without being crunchy, brittle or flaky, unlike shortbread and other types of pastry dough. The filling is has a nice balance of chocolate, fruit and nuts that has been ground almost into a paste. It is lightly sweetened and very flavorful, but not overwhelming to the dough. Like so many other cookies, these go perfectly with a hot cup of tea. If you have never had rugelach, I highly recommend giving them a try.


Cranberry Chocolate Pecan Rugelach
(adapted from Bon Appetit)

For dough:
1 cup unsalted butter, room temperature
8-oz. (1 package) cream cheese, room temperature
1/2 cup sugar
2 3/4 cups all purpose flour
1 tsp salt

For filling:
3/4 cup sugar
1/2 cup dried cranberries
1/2 cup chocolate chips
1/2 cup unsalted pecans (raw or lightly toasted)
1/2 cup unsalted butter, melted and cooled

1 large egg, beaten lightly
coarse sugar, for sprinkling


Make dough:
Beat together butter and cheese in large bowl. then beat in the sugar until light. Gradually mix in flour and salt and when the dough comes together into a smooth ball (you might need to help the mixer with your hands), divide into 2 equal discs and chill for at least 2 hours or overnight. Divide each of the discs into four pieces (for a total of 8) before rolling out.

For filling:
Mix sugar, cranberries, pecans, chocolate chips and butter in the bowl of a food processor and blend until spreadable and fairly smooth.

Assembly:
Preheat oven to 350F. Line a baking sheet with parchmemt paper.
Working with one disk of dough at a time, roll into an 8-inch round on a lightly floured surface. Spread the round of dough with 3-4 tbsp of filling, spreading it in a thin, even layer to the edges of the dough. Use a pizza cutter and cut each round into 8 "slices." Working from the outside edge, roll in towards the point, then place the cookies tip-point-down onto the baking sheet. Curve slightly into crescents. When the whole tray is filled, brush each lightly with the beaten egg and sprinkle with coarse sugar (regular sugar can substitute).
Bake about 20 minutes, until light golden.
Transfer cookies to wire racks to cool completely and repeat with remaining dough.
Store in an airtight container.
Makes 64 cookies.

(Bon Appetit said that these will keep for 1 week in an airtight container and can be frozen for 1 month.)

Friday, December 22, 2006

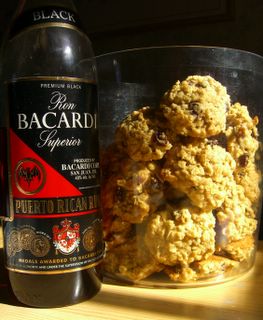
Rum Raisin Oatmeal Cookies


If you haven't noticed by now, I reallly, really like oatmeal cookies. Past favorites include Banana Oatmeal Cookies, Oatmeal Chocolate Chip Cookies, Maple Pecan Oatmeal Cookies, Coconut Oatmeal Cookies, Heart Healthy Oatmeal Chocolate Chip Cookies and Oatmeal Cookie Biscotti - and even with a list of recipes that long, I don't feel the need to stop yet.
This recipe was a spur of the moment idea and is a variation on one of my favorite lowfat oatmeal cookie recipes. I decided to jazz up the regular cookies with a splash of rum to give them some holiday spirit and it worked beautifully. The rum flavor was present, but subtle. You could tell that there was something different about the cookies, but until you knew that there was rum, it was hard to pinpoint the source of that flavor. The result was delicious and slightly adult.
The cookies, although they are low fat, still have a nice chew to them and stay moist when you store them in an airtight container, although they don't have the same light texture that a really buttery cookie will have. Frankly, I don't mind in the least. These still taste great and I'm not going to complain when I can eat an extra cookie or two without feeling guilty.
If you don't want to go with the low-fat cookies, just make the run raisins and use them in this recipe instead!


Rum Raisin Oatmeal Cookies
3/4 cup raisins
2-3 tbsp dark rum
1 cup all purpose flour
1 tsp baking powder
1/2 tsp baking soda
1/2 tsp salt
1/2 tsp ground cinnamon
1/8 tsp ground nutmeg
2 tbsp butter, room temperature
1/4 cup plain apple sauce
1 large egg
1/2 tsp vanilla extract
1/2 cup white sugar
1/2 cup brown sugar
2 cups quick cooking oats

Combine rum and raisins in a small, microwave-safe bowl and heat in the microwave for a few seconds, until just warm. Cover with plastic wrap and let stand at least 30 minutes.

Preheat oven to 375F and line a baking sheet with parchment paper.
In a medium bowl, whisk together flour, baking powder, baking soda and salt. Add cinnamon if using raisins, instead of chocolate chips.
In a large bowl, cream together the butter and the sugars. Beat in the egg, followed by the applesauce and the vanilla extract. Working by hand, stir in the flour mixture and the oats until just combined and no streaks of flour remain. Stir in the rum-raisin mixture.
Drop tablespoonfuls onto the prepared baking sheet, flattening each cookie slightly. Bake for about 9-12 min at 375F. Cookies will be light brown at the edges when done.
Let cool on sheet for 3 or 4 minutes, then transfer to a wire rack to cool completely.
Store in an airtight container.
Makes about 2 dozen cookies.

Tuesday, December 19, 2006

Foolproof Lemon Tart


Meyer lemons, the non-bitter lemon hybrids that are growing in popularity with cooks everywhere by leaps and bounds, are in season right now. It is much easier to find them at stores and markets than it was only a few years ago, and more people are familiar with them as an ingredient. Even if you're not, the only thing you need to know is that they seem sweeter than the average lemon but no less lemony.
I've used them in scones, quickbreads, cakes and risottos, but they can be used in place of lemons in any recipe. With this in mind, I didn't hesitate to substitute them in for the regular lemons in this recipe for a Foolproof Lemon Tart from the LCBO magazine, Food & Drink, which is one of my favorite recipe sources.
The tart is, as promised by the name, pretty foolproof. The "hardest" part is the crust because it needs to be prebaked. Prebaking basically means that you bake the crust after filling it with pie weights or dried beans to prevent the crust from getting soggy once the filling is added and to stop it from puffing up during baking once the filling is added, which could ruin the look of the finished tart. Prebaking a crust like this one is no different from prebaking a graham cracker crust, so there is no need to be intimidated by it in a recipe even if you're a novice baker.
There is a bit of lemon zest in the crust, but the star of the tart is the lemon filling. Not only is it incredibly simple, but it is bright, perfectly balancing sweet and tart flavors so that all you taste is lemon. It is also very smooth and light. The tart would probably be quite refreshing during the summer, but in winter, it is a nice change from heavier, spicier desserts.

Foolproof Lemon Tart
(from Food&Drink)
For the crust:
1 1/2 cups all purpose flour
3 tbsp granulated sugar
1/2 cup butter, chilled and cut in cubes
1 large egg yolk
2 tbsp lemon juice (meyer or regular)
2 tsp lemon zest

For the filling:
3 large eggs
3/4 cup sugar
1/2 cup butter, melted and slightly cooled
1 tbsp lemon zest
1/2 cup lemon juice (meyer or regular)


For the crust:
Preheat oven to 425F
In a food processor, combine flour and sugar and pulse to blend. Add butter and pulse until mixture is coarse and sandy. Add in egg yolk, lemon juice and lemon zest and whizz until dough starts to come together, adding an extra tablespoon of water or lemon juice, if necessary.
Turn dough into bowl and knead gently until it forms a ball.
Place dough on a lightly floured board and roll until it is large enough to fit a 9-in tart pan. Lay dough gently into pan and press (do not stretch) into the corners. Cut excess from the top of the pan.
Prick the crust with a fork and place a sheet of foil on top of it, filling with pie weights or dried beans. Bake for 15 minutes, then remove the foil and beans and bake for 5 more minutes. Set aside to cool slightly while you make the filling.

For the filling:
Reduce oven heat to 350F.
In a medium bowl, whisk together eggs and sugar. Whisking steadily, add in melted butter, lemon rind and juice. Pour into pastry shell.
Bake for 15 to 18 minutes, until the filling is set and jiggles only slightly when the tart pan is pushed.
Cool before serving.

Serves 10.

Thursday, December 14, 2006

Cranberry Orange Cookies


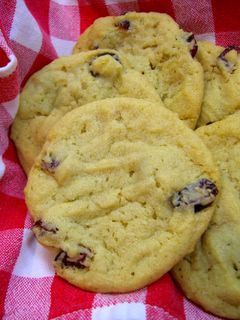
Every year I try to make one "different" cookie recipe around the holidays. I'm not saying that I go for something extreme, like chocolate chip bacon cookies, but I do like to have one thing on the Christmas cookie plate that isn't just chocolate chip oatmeal, gingerbread, shortbread or a sprinkle-laden butter cookie. Bright with orange zest and packed with chewy dried cranberries, these cookies fit the bill perfectly. They're delicious.
The cookies themselves are light, with an excellent texture, and are very buttery tasting. They get crisp at the edges after baking, but are left with a soft chew by the next day. The orange zest is not overwhelming and it gives the cookies a light flavor that makes you reach for another straight away. I think that cranberries are a good match for the orange, but dried blueberries would probably also work out very well if you want something different. And, of course, you can always toss in either white or dark chocolate chips.
Don't overbake these cookies. They should only be ever so slightly colored at the edges when they are done baking. Leave them to set up on the baking sheet for a few minutes before moving them to a wire rack to cool, or you could end up with cookie crumbs, instead of whole cookies.


Cranberry Orange Cookies
2 cups all purpose flour
1 1/2 tsp baking powder
1/4 tsp baking soda
1/2 tsp salt
3/4 cup butter, room temperature
1 cup white sugar
1 large egg
zest of one large orange (about 1 tbsp)
3/4 cup dried cranberries


Preheat oven to 350F and line a couple of baking sheets with parchment paper.
In a medium bowl, whisk together flour, baking powder, baking soda and salt.
In a large bowl, cream together the butter and the sugar, beating with an electric mixer until light. Beat in egg and orange zest. With the mixer on low speed, gradually add in the flour mixture, stirring only until just combined. Stir in the cranberries.
Drop dough by rounded tablespoonfuls (about 1 1/4-inch balls) onto prepared cookie sheets and bake for 9-12 minutes, until edges are very lightly browned. Cool for 3-4 minutes on baking sheet then transfer to a wire rack to cool completely.
Makes about 4 dozen.


By the way - did you know that the 2006 Food Blog Awards are going on right now? It's a low pressure event, but it's nice to go and nominate your favorite bloggers. I'm not thrilled with the way that they have judges pick from all the nominated blogs to see who we will vote on, but hey - that's their system. And the idea behind the event, recognizing everyone's hard work and decication of every reader (who hopefully finds lots of tasty recipes), is definitely agood one.

Tuesday, December 12, 2006

A few holiday gift ideas


I've been working on a lot of gift lists to suit various themes, but I still feel like I haven't hit upon some of the best gifts that are out there. So, I've decided to make up a little list for fans of bakingsheet that has some of the best gifts that I can think of. These are all things that I have, have used, want or otherwise recommend and are pretty much guaranteed to please anyone who is a fan of this blog. Now, you might not want to get them for yourself (buying presents for yourself right before major holidays is a major no-no), but you can forward this post to friends and loved ones to nudge them in the right direction:


The Good Home Cookbook - I was one of the recipe testers for this brilliant collection. My name is even listed in the back of the book - true, it's with all the other testers, but it was exciting for me to see regardless. The recipes are easy, work well and it covers just about everything the home chef might possibly want to make. The pumpkin pie, sweet potato pie, cheese bread and black walnut cake are all great.

I think that Beth Hensperger is a brilliant baker and The Bread Bible is one of my favorites, although all her books are excellent. The range of breads, from Dutch Crunch Bread and Orange Cinnamon Swirl Bread to whole grain breads, tortillas, scones, quick breads and even bread-machine breads, you can find everything in here. Other bread books I highly recommend are Paul Hollywood's 100 Great Breads and Baking with Julia for breads and other things.

For non-breads, I really enjoyed Dorie Greenspan's new cookbook Baking: From My Home to Yours, which has tons of great recipes, great photos and great ideas. Just about every recipe in the book sounded appealing. I already made Chewy, Chunky Blondies and Cinnamon Chocolate Squares and am planning on trying the Cranberry Lime Galette and Apple Cheddar Scones in the not-too-distant future. I also, as always, highly recommend anything by Maida Heatter. Other top authors in my book are Donna Hay, Bill Granger (yes, I know he's not primarily a baker) and David Lebovitz, to name but a few.

Vegetarians, vegans or anyone interested in diversifying their cooking/baking should definitely try Vegan with a Vengeance, Vegan Cupcakes Take Over the World (just tried a couple of recipes from this book and will report back in upcoming posts, but for now I'll just say they turned out great!), Moosewood Restaurant Cooks at Home and Moosewood Restaurant Low-Fat Favorites, both of which are not recent, but still worth having.

Books on my wishlist include Perfect Light Desserts, King Arthur Flour Whole Grain Baking and The Pastry Queen: Royally Good Recipes .

Vegetarian Times and Eating Well are my two favorite food magazines this year. Cooking Light is getting a little bit... heavy for my tastes and if I want a full-fat recipe I'll turn to one of my many, many cookbooks. Both VT and EW have innovative ideas and the recipes almost always turn out wonderfully.

I trust that you can all find your own spatulas, spoons and measuring instruments, but OXO's Good Grips 2-Cup Angled Measuring Cup is a lifesaver for working with liquid ingredients and the Baker's Secret Basics Non-Stick 12-Cup Muffin Tin is pretty much the best that I've ever used. Nothing sticks to it, so cleanup is dead easy, and it cools down completely within minutes after taking it out of the oven! I also really liked the Baker's Edge Pan, partially because I usally like the "edges" on baked goods and partially because I hate ending up with undercooked cakes, etc. There are a lot of recipes that can be used with the pan. My favorites are (obviously), the two I made: Rocky Road Brownies and Cheesecake Bars

As far as larger/more expensive kitchen equipment goes, I adore my Shun Classic 6-1/2-Inch Santoku Knife, which seems like it could cut through just about anything, and my Cuisinart 1-1/2-Quart Automatic Ice Cream Makeer gets a lot of use during the warm summer months and puts out an excellent product.

Ignore the odd reviews of the FrancisFrancis! X3 Espresso Machine (check this one instead). The machine works beautifully and turns out espressos and cappuccinos that will rival, if not surpass, your local coffee house. The only drawback is that it works best if you only want to make a couple of drinks. The heating unit gets noisy if you attempt to use it for serving a crowd. If espresso isn't for you, I can definitely recommend the Capresso MT-500 coffeemaker with thermal carafe, which has never let me down. And, to go with a regular coffee machine, an Aerolatte Frother can whip up some foam in seconds (and is superb for mixing up hot chocolate).


By the way, you can find the recipe for the cookies pictured above here.

Friday, December 08, 2006

Pear Bundt Cake


Speaking as someone who chronically does this, pears are an underutilized fruit when it comes to baking and dessert. This is a shame because they have great flavor, work well with a variety of spices and are easy to bake because they already have a soft texture and you don't have to worry about undercooking them (it can occasionally be a problem with apples, which is why many apple muffin recipes call for them to be shredded, or finely diced).
This is a pear bundt cake, relatively low in fat and made with pear sauce, which I found at Trader Joe's. Applesauce can easily be used instead without sacrificing anything in terms of flavor. The cake has a tender, but firm, crumb of the kind that is ideal for pairing with coffee or tea, when you want to pick up the slice of cake and eat it with your fingers, rather than delicately nibbling off a plate. The pieces of pear are wonderfully moist and blend in with the cake well. You would never know that it was low in fat.

Tempted? I hope so, because I loved the way this cake turned out. Unfortunately, I spilled coffee all over my notes for the recipe and can no longer make out my final version. I'm going to go back through my notes and piece it together again, but I couldn't resist putting the photo up now. I'll bake another cake, if I must (not a big sacrifice, I assure you), to get it right again.

Update: Here is the recipe:


Pear Bundt Cake
3 1/4 cups all purpose flour
2 tsp baking powder
1 tsp baking soda
1 tsp salt
1/4 tsp nutmeg
1 tsp cinnamon
2 cups sugar
1/4 cup butter, softened
2 large eggs
1/2 cup pear sauce (unsweetened apple sauce is fine)
2 tsp vanilla extract
1 1/4 cups milk
1 1/2 - 2 cups peeled, diced pear (1 large or 2 small)


Preheat over to 350F. Grease a 10-inch bundt pan well, brushing it with melted butter or nonstick cooking spray.
In a medium bowl, whisk together flour, baking powder, baking soda, nutmeg and cinnamon.
In a large bowl, using an electric mixer, cream together butter and sugar until fluffy. It will look sandy when well-combined. Beat in eggs, one at a time, followed by pear/apple sauce and vanilla extract.
Working in two or three additions, alternately add flour mixture and milk to the sugar mixture. Stir only until just combined, then gently stir in the diced pears.
Pour into prepared pan and bake for 60 minutes, or until a tester comes out clean and the cake springs back when gently pressed.
Let cake cool in pan for 15 minutes, then turn out onto a wire rack to cool.
Dust with powdered sugar before serving.
Serves 12.

Tuesday, December 05, 2006

A secret to really chewy cookies


I go back and forth, trying to decide whether I prefer chewy cookies or crisp ones. More often than not, I'll take the crispy cookies because most cookies that claim to be chewy don't really end up being exactly what I had in mind. There are exceptions to this general rule, like these Chewy Chocolate Chip Cookies, but there is only one type of cookie that will consistently turn out to have a good chew: peanut butter. If you bake the cookies at a low temperature, they will develop an appealing and addictive chew. The problem here is that they are peanut butter flavored. I finally figured out how to get around that and still achieve the same chew.
The secret? Cashew butter.
I made some homemade cashew butter on Slashfood and used it in a standard peanut butter cookie recipe. I usually make mine crispy, but this time I took a tip about baking time from Elise to try for chewy ones.
The cookies turned out perfectly chewy and, incredibly, you couldn't taste cashew at all. The flavor is so mild, lightly sweet and vaguely buttery, that it just blended into the cookie! Everyone was asking how on earth I ended up with such chewy cookies. Of course, you'll have to diclose your "secret" to anyone with a nut allergy, but otherwise you can try this with chocolate chips, raisins, or any other add-in you like in your cookies.


Really Chewy Cookies with Cranberries
1 1/4 cups all purpose flour
1/2 tsp baking soda
1/4 tsp salt
1/2 cup butter, softened
1/2 cup brown sugar
1/2 cup white sugar
1 egg
1/2 cup cashew butter (homemade or storebought)
1/2 cup dried cranberries (or chocolate chips, etc)

Preheat oven to 300F and line a baking sheet with parchment paper.
Whisk together flour, baking soda and salt in a medium bowl.
In a large bowl, cream together butter and sugars. Beat in egg, followed by the cashew butter, and beat well. Add in dry ingredients with the mixer on low speed, mixing until just combined. Stir in dried cranberries (or chocolate chips).
Shape into 1-inch balls and flatten slightly onto a cookie sheet, leaving enough room for them to spread.
Bake for 14-15 minutes, until just beginning to brown on the edges.
Let the cookies cool on the baking sheet for a few minutes, then remove to a wire rack to cool completely.
Makes about 2 dozen.

Friday, December 01, 2006

Baked Apples


Baked apples are something that I don't make very often because it is just so much easier and faster to eat the apple as it is. Of course, when you do that, you're not getting the warmth and tenderness that a baked apple has, which can be very satisfying on a winter day.
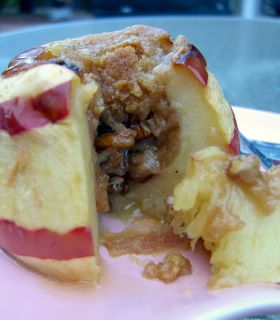
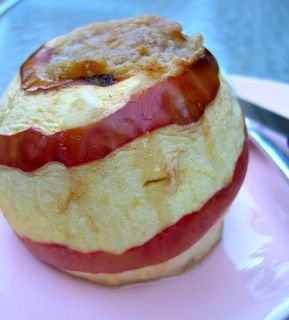
The apples are very easy to make, since they're basically just apples that are baked in the oven until they are very tender. Anything else - fillings, spices, etc - is completely optional. I recommend peeling off most of the skin before baking as it tends to get kind of tough. For the apples I made here, I used a potato peeler to remove a spiral strip, but it would be easier to peel vertical strips and would be equally as effective.
I used some of the streusel topping that I made here to top off the apples after removing the core and stuffing them when chopped pecans and raisins. It's not an exact science, but I like the fact that having some flour in the mixture gives it a crisp top. You can just use sugar and cinnamon, if you prefer. The amount you'll need of everything varies based on how many apples you're going to make, but the baking time should be the same whether you're doing one or a dozen.


Baked Apples
large baking apples
streusel mixture or other suger+spice mix
raisins
pecans


Preheat oven to 400F
Partially peel the apples and use a corer or melon baller to remove the stem and th center core. Do not go all the way through the apple (yes - you'll have to eat around the very bottom bit after its cooked, but it's worth it to keep everything inside the apple).
Place apples in an over-safe casserole dish.
Stuff apples with raisins and chopped pecans. Pack plenty of sugar in and or top of the apples.
Bake for 30-45 minutes (depending on the size of the apple) until tender. Check tenderness by inserting a sharp knife. When it comes out easily, the apples are done.