Thursday, March 31, 2005
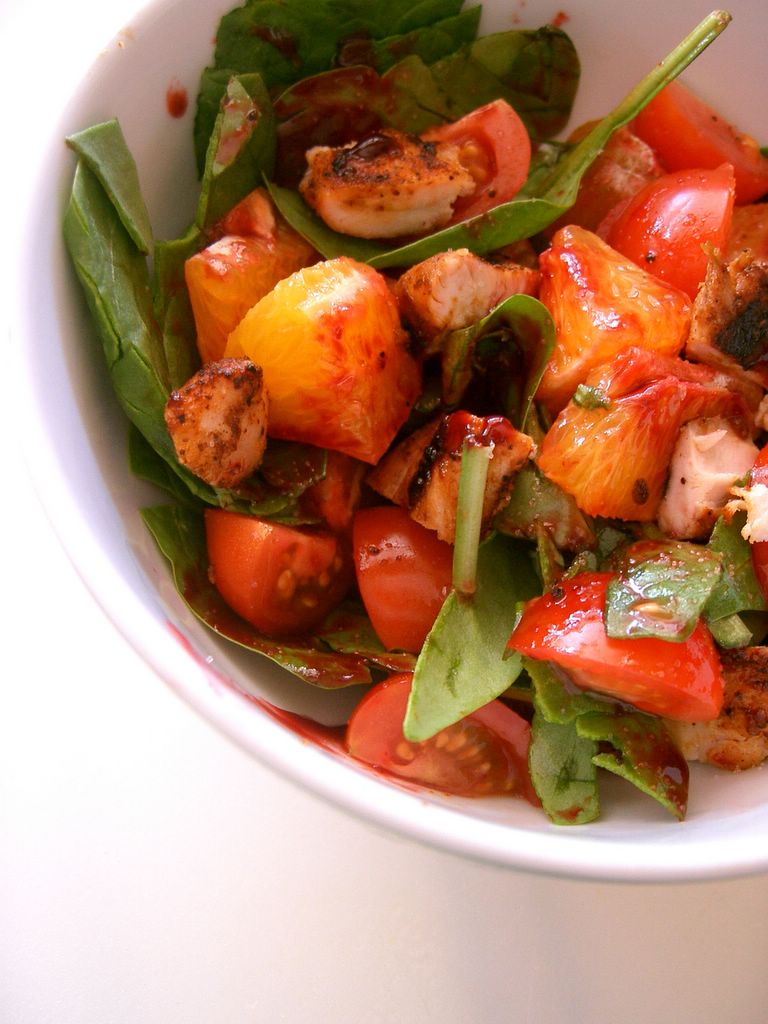
Cooking School: Custards N' Cream
Bakingsheet is now Baking Bites!!!
Head on over to check out the new site!
Today in class, we discussed the various properties of milk (from skim to devonshire cream) and eggs and their uses when preparing custards. Interesting stuff. For example, I didn't know that if you over beat heavy cream you will end up with butter. You will also end up with quite a bit of whey because cream is somewhere from 36-40% fat. The main point of all this discussion was to learn how dairy and eggs can combine in various ways to produce different textures of custard. Once the lecture was over, we worked on preparing a variety of custards.
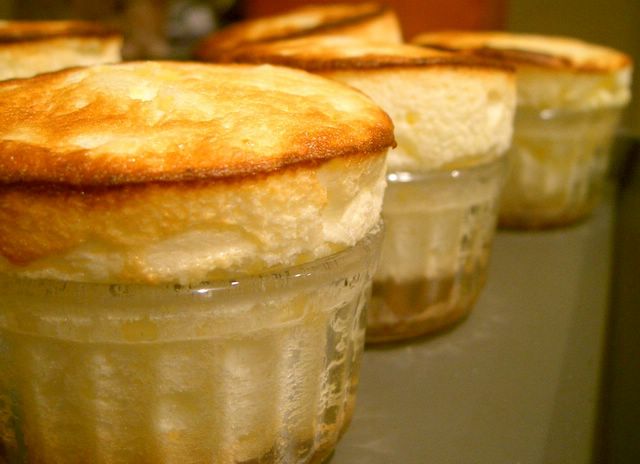
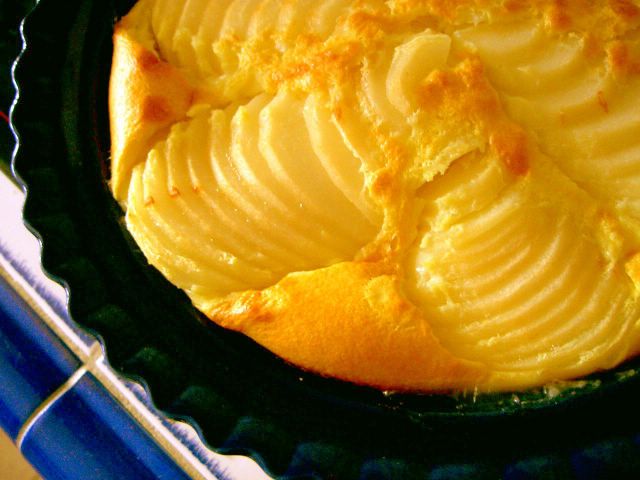
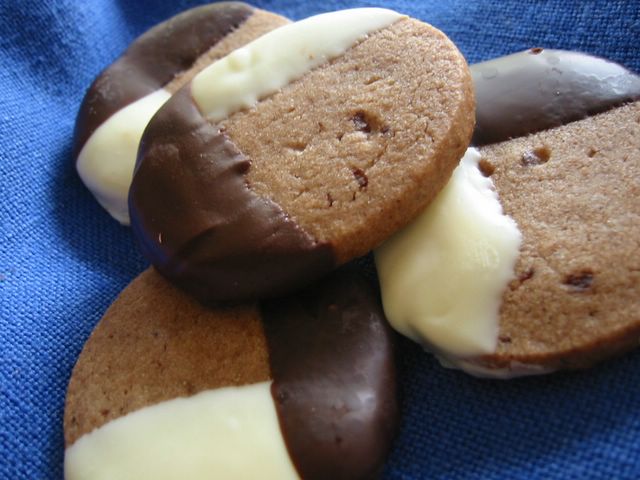
I do not like overly rich or creamy desserts. I particularly dislike the unctuous mouthfeel of the ultracreamy variety of dishes we prepared today. This is not to say that they did not taste good, as they were excellent; I simply have no desire to eat these things unless there is something to cut their texture. We made vanilla bean ice cream, butterscotch pudding, chocolate mousse, bread pudding and, of course, crème brûlée. Essentially, cream, butter and cream, cream, cream and egg yolks and cream.
The ice cream was insanely creamy with an outstanding vanilla flavor from the two whole vanilla beans used in it. The butterscotch pudding was, unsurprisingly, also very creamy and the flavor was excellent. The trick to a smooth pudding is to take the pan off the heat for a few moments if it starts to get lumpy, not to turn the heat down. The chocolate mousse was very, very chocolately and was made with dark chocolate. I probably would have enjoyed it more if it had not been preceded by several other desserts and topped with whipped cream.Crème brûlée is crème brûlée. At least I got to play with a torch.
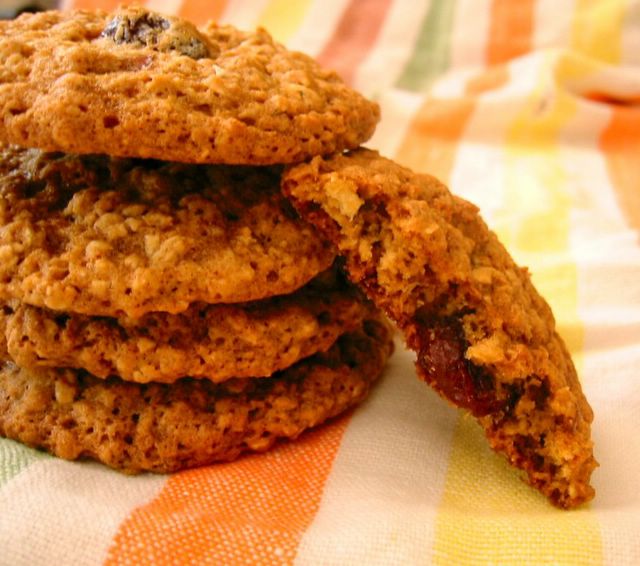
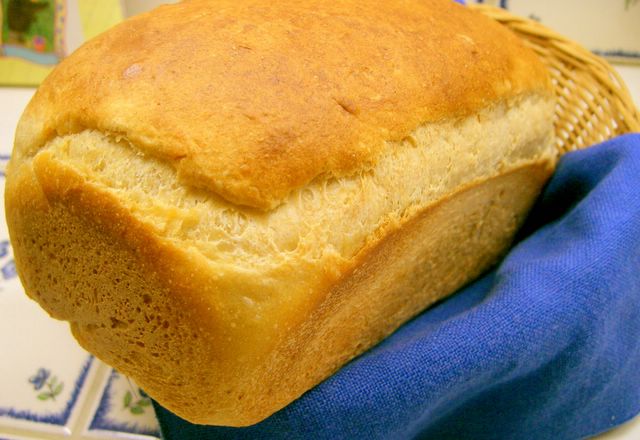
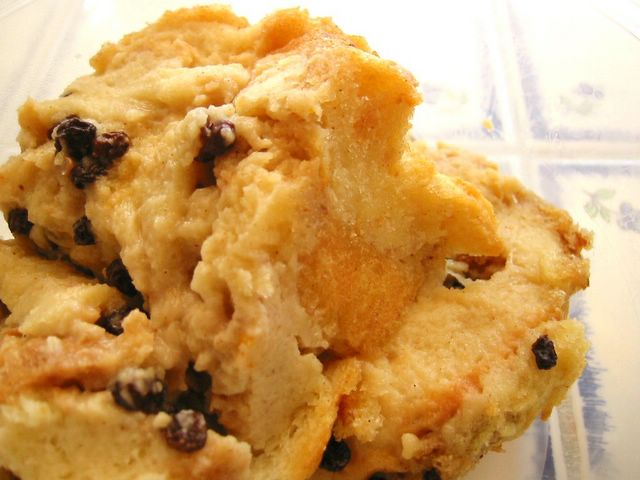
The bread pudding, made with brioche in case the custard wasn't rich enough, is shown above. It is studded with pecans and brandy-soaked currants. It was my favorite of the dishes because it had more textural variation than any of the others but I know it would have improved greatly with a pinch of salt to bring out flavors other than cream. We baked it in a loaf pan, which I thought was unusual until the instructor explained that serving a glop of runny custard doesn't look very impressive in a restaurant. Therefore, we bake it in a loaf and serve it in slices, which are easier to plate and garnish. And what might we use for garnish? Oh yes, how about some more whipped cream.
Wednesday, March 30, 2005
Asparagus and Meyer Lemon Risotto
Bakingsheet is now Baking Bites!!!
Head on over to check out the new site!
I had broccoli in the fridge, but what caught my attention was the bunch of ultra-tender asparagus purchased for Easter that somehow escaped consumption over the weekend. Yum. So I first thought to just substitute asparagus in Anne's recipe, but I noticed I also didn't have honey. I didn't want rice and asparagus. Sure, it would taste fine, but it's not terribly exciting. Meyer lemon was the answer.
Owen did something similar for an IMBB a couple of months ago, but I don't own a rice cooker. I knew I would have to improvise. I checked Epicurious for advice/inspiration and ended up with the below recipe for my final result. Less butter, less cheese, more lemon, more goodness.
Overall, I was very pleased with the dish. The cheese didn't overshadow the lemon, which superbly complimented the asparagus. It was creamy and wonderful.
1 – 1 ½ cups asparagus
3 ½ cups chicken (or vegetable) stock
½ tbsp butter
2 shallots, minced
1 cup Arborio rice
zest of meyer lemon
juice of meyer lemon
salt
pepper
2 tbsp grated parmesan cheese
Blanch asparagus in boiling water for two minutes. Shock with cold water to stop the cooking and drain well. Cut into one inch pieces and set aside.
Bring chicken stock to a boil in a saucepan. Cover and turn heat to low.
In a Dutch oven, sauté shallots in butter over medium heat until light brown, about 4 minutes. Add rice and lemon zest. Stir to coat in butter/shallot mixture for 1-2 minutes. Add 1-1 ½ cups stock and reduce heat to low.
Stirring regularly to make sure rice doesn’t stick to the pan, add stock in ½ cup additions as the rice absorbs liquid. Check the rice before the last addition to see if it is done (rice should be al dente, not mushy). Add lemon juice into the rice with the last addition of stock.
Serves 4 as a side, 3 as main.
Monday, March 28, 2005
It's not a pizza. Really.
Bakingsheet is now Baking Bites!!!
Head on over to check out the new site!
Retrospectively, given that I had never made a galette before, I would say that adding one to the Easter brunch menu on Sunday morning, mere hours before the guests arrived, was necessarily the wisest decision. But I was concerned that there wouldn't be enough food and I wanted to add something savory, as I had the sweet pretty well covered. A galette, I had heard, was easy to make and impressive in its rusticness. I whipped out Baking with Julia, a new acquisition, and flipped through the lovely illustrations until I stopped on her Cheese and Tomato Galette.
I rubbed the butter into a flour and cornmeal mixture to make the dough, nearly panicked because the recipe called for adding rather too much liquid, wrapped it up and stuck it in the fridge. The dough was rolled out, topped with tomatoes, mozzarella and montery jack cheeses (per the recipe) and feta (per me) and slipped into the oven.
It looked flakey and crisp as I sliced it. It disappeared in a matter of seconds from the food table. So why, you may ask, have I not posted the recipe? The reason is simple: I have no idea what it tasted like. It was devoured before I could taste it and, somehow, I didn't get much feedback on the level of flakiness in the crust or their feelings about the ratios of cheese types from people stuffed on what was previously a delightful looking Easter Spread. "Urmm..." and "Good..." were not the responses I was looking for.
Their kids, however, were slightly more useful.
A thirteen year old: "That looks like something from Gelsons!" Gelson's is an upscale market.
A sixteen year old: "Did you buy that?" I asked her if she liked it. "I thought it was going to be pizza. But it was good."
A nine year old, who left the "crust" of one slice untouched: "Did you stuff the crust with cheese?" In a galette, the crust is folded up over part of the filling. Yes, I said. But that's not pizza. "Oh." Did he think it was pizza? "It looked like a pizza." Did you like it? "It was ok. There wasn't any sauce."
I suspect that the galette tasted pretty good. I may have over-mixed the crust a bit, but I'll be making this again. Probably with a different filling. One that doesn't inherently resemble pizza.
Sunday, March 27, 2005
Sunday Brunch: Cinnamon Buns
Bakingsheet is now Baking Bites!!!
Head on over to check out the new site!
Easter brunch is a good occasion for cinnamon buns because they can be served at room temperature. Of course they're best warm, but no one wants to slave over a hot stove making waffles or pancakes when they could be outside enjoying a gorgeous LA morning with friends. At least, I don't.
I was going for a basic recipe to create a bun that was rich enough, but not so rich that you couldn't have two. Though I enjoy kneading bread, it isn't necessary because this recipe uses an electric mixer. I didn't measure the cinnamon or brown sugar, just sprinkled them directly from their containers until the rough was covered. When I sliced the logs, I threw out the end pieces that didn't have much cinnamon and were uneven. If I were better at rolling out the dough, I definately could have gotten a couple more buns out of the recipe.
I really loved these. Sweet, cinnamon-y and just sticky enough to give you something to lick off your fingers. The dough didn't taste quite as rich as a brioche, but still had a feathery crumb and a nice rich taste. This recipe is a keeper! I think that they're best slightly warm.
These can be kept at room temperature, well wrapped, or frozen. Reheat them in the microwave if you prefer your buns warm and slightly sticky.
Coat two 9x13 glass baking dishes with cooking spray or butter.
Saturday, March 26, 2005
Baking School: Quick Breads
Bakingsheet is now Baking Bites!!!
Head on over to check out the new site!
This week I began a baking class at a cooking school here in LA. With all the IMBB excitement, I didn't have a chance to post about it before now. Funnily enough, this week's topic was muffins, quick breads and scones.
I wanted to take a professional-type class at a cooking school because I spend so much time baking as it is. I want to be better. Perhaps someday I would consider working my love of baking into a career. Perhaps I just want to make successful, crusty breads at home. I will freely admit that I don't know what my ultimate goal is - but I'll take aimless baking while I can get it.
The class is very small and everyone gets to make everything on their own, an advantage that not all schools can offer. This week, my first week, we worked on quick breads and talked about the properties of chemical leaveners. It was a good introduction to their kitchen, as I am already quite familiar with quick breads (having had a fear of yeast for some time). I will note that this was not necessarily the case for everyone in class, as the students range in experience from home cooks who don't bake to culinary students with their eyes on a career in cooking.
This week, we made Currant Scones, the kind that involve cream and butter, Carrot Cake and Apple Streusel Muffins. With the scones, it was the first time I've actually rubbed butter into flour with my fingers instead of using a cutter or a fork. I know it's a small step, but I was hoping to try some new techniques at school. With strawberry jam, these scones were delicious. The carrot cake was nothing special in my opinion. I couldn't find the pecans that the recipe called for, so I used walnuts. I'm not a huge fan of nuts in my cake and I would have prefered them to be toasted or not there. The spices came through wonderfully because all the spices we used were fresh ground, while at home I normally only have fresh ground nutmeg.
The Apple Streusel Muffins were my favorite of the day. The general reaction was something along the lines of "These are SO good!" They were fantastic tasting, very moist and had an extremely tender crumb. I accidentally added a bit of extra butter to the streussel topping, but clearly that couldn't have done anything but help the final product. In this case, I think that untoasted walnuts were the way to go on the topping because they provided resistance without a distracting crunch. If you don't want to use walnuts, I would add some flour in to the topping mixture to give it a more substantial crumb.
Apple Streusel Muffins
Topping:
1/3 cup brown sugar
1/2 tsp cinnamon
2 tbsp butter
1/2 cup walnuts
Mix all ingredients to resemble coarse crumbs. Set aside.
Batter:
1 1/2 cups ap flour
1/2 tsp baking soda
1 tsp baking powder
2/3 cup brown sugar
1/3 cup oil
1 egg
1/2 cup buttermilk
1 tsp vanilla
2/3 cup grated apple (2 apples, peeled and grated)
1/2 tsp salt
Preheat oven to 350F. Grease muffin tin or line with paper liners.
Mix together all dry ingredients. Whisk together all wet ingredients. Fold flour mixture into wet ingredients until just combined.
Spoon batter into tins and top with streusel mixture. Bake 20 minutes, until tester comes out clean.
Makes 8 muffins
I filled my tins about 2/3-3/4 full and made 8. Several people attempted to make 6 muffins and so filled their tins to the top, which resulted in their topping melted all over the surface of the muffin tin.
Friday, March 25, 2005
Easter Eggs 101
Bakingsheet is now Baking Bites!!!
Head on over to check out the new site!
My little fantasy had to end the year that he forgot to hide the eggs. When I wanted to out on the egg hunt, my dad told me that the Easter Bunny said he needed help and had asked my father to hide the eggs for him. Dad hadn't quite gotten around to it yet. But all things must come to an end eventually and I still got candy, so I didn't complain.
I still decorate easter eggs every year. I blow out the eggs so they'll last then I dye them using food coloring. I like solid colored eggs, but sometimes I make swirled patterns by adding oil to the dye.
Thursday, March 24, 2005
IMBB #13: Neopolitan Buttermilk Cupcakes
Bakingsheet is now Baking Bites!!!
Head on over to check out the new site!
Ok, enough with the present analogy.
For this month's Is My Blog Burning, hosted by i was just really very hungry, I was pleasantly surprised to see the theme because I can always use an excuse to make dessert. Cupcakes aren't something that I make often because usually I want the whole cake. But you have to love single serving foods sometimes.
Cupcakes seem a little less serious than full-sized cakes, so I had a difficult time narrowing down my ideas. Mainly, I wanted something that looked fun... oh, and taste good, too! I started with a cake from a Cooking Light recipe I had lying around, made it plain and then remade it. Into what? Neopolitan buttermilk cupcakes.
The final product was very moist and had a nice, subtle buttermilk-vanilla flavor. I think the moistness keeps them from getting over mixed when you mix in the strawberry and chocolate flavors, since I didn't detect any toughness at all. In fact, they had a very soft crumb. No egg yolks were used, since I wanted to keep the pink-white-brown color distinction clear. I used a cream cheese frosting, which is always a hit, but I think they would be great with a whipped cream frosting, too. I liked these a lot as a straightforward tasting, but fun looking cupcake. I'm also sure that these would do marvelously well at a bake sale.
Speaking of cupcakes, why don't you check out Cupcake Takes the Cake, a cupcake blog that will enable you to get your fix once the IMBB party has moved on.
Wednesday, March 23, 2005
Sometimes all you want is a salad
Bakingsheet is now Baking Bites!!!
Head on over to check out the new site!
a chicken breast, preferably grilled or bbq'd
tomatoes
an orange
baby spinach
Chop chicken, tomatoes and orange. Toss with salad and leftover bbq sauce from chicken. Season with salt and pepper, if desired.
Tuesday, March 22, 2005
Soufflés Chauds au Citron
Bakingsheet is now Baking Bites!!!
Head on over to check out the new site!
I was never a huge fan of souffles. Often they're too eggy, which is the case with many all-cheese souffles, or too heavy because someone has poured a cup of some sort of sauce into the souffle to mask the poor taste of the dish itself. Why even bother baking a souffle if all you wanted was a chocolate lava cake? I suspected that I must be missing out on something, as people generally seem to like these mile-high desserts, so I signed up and took a cooking class at Sur La Table in Santa Monica on souffles to find out.
The class was interesting. You have to be a little bit assertive with regards to the perparation, since for most of their classes you're required to work in small groups. We made (and ate) Cafe au Lait souffles, Raspberry souffles, Chocolate Banana souffles - which my group was in charge of - and cheese souffles. I confirmed that I don't really care for plain cheese, but I also realised that souffles can actually taste pretty good. They're also easy, since you can prepare the base ahead of time and just whisk and fold the egg whites before popping them into the oven. Many people worry about the souffles falling, but once they're out of the oven they're supposed to fall. Trust me, you won't surprise anyone if your souffle isn't towering 12 feet over the dinner table. Just take your souffles out of the oven and serve them piping hot. Everyone will "Ooh!" and "Aah!" and enjoy - not only because they're tall, but because they taste good.
This recipe is from Epicurious, but I'll reprint it here. I used skim milk instead of whole milk to no ill effect. These souffles were just lemony enough without being either sour or overly sweet. If you happen to want something very sweet, use Meyer lemons instead of regular. Feather-light texture. I loved them.
Using electric mixer, beat egg whites until frothy. Gradually beat in remaining 1/2 cup sugar. Continue beating until stiff but not dry (just a little beyond soft peaks, when the whites don't totally ribbon down from the beaters). Fold 1/4 of whites into lemon mixture. Fold in remaining whites.
Monday, March 21, 2005
Update
Bakingsheet is now Baking Bites!!!
Head on over to check out the new site!
I hope no one else will have any problems viewing the page now.
Kurobuta Pork
Bakingsheet is now Baking Bites!!!
Head on over to check out the new site!
That is a mighty fine pork loin.
This week at Trader Joe's, I spotted a Snake River Farms Kurobuta pork loin. I knew that this was supposed to be some of the finest pork there is. It's cut from Japanese Berkshire black hogs and, according to the producer, is celebrated for it's moistness, tenderness and pork flavor (read: lots of marbled fat).
Actually, I didn't find the meat to be fatty at all beyond the nice thick layer that the loin was situated on. The loin was cooked using the "Maple Glazed Pork Roast" recipe from Cooks Illustrated, which I will not reprint here because I don't think it was the ideal recipe for this pork. Oh, it was very tender and very juicy, but the low cooking temperature prevented any sort of crust from forming. Sometimes it's a shame not to put that fat to use!
So, how was this big slab o' meat? Good. Very good. It tasted like... excellent pork. Could have chosen a better recipe despite the fact that the spicing (garlic, cloves, cayenne, paprika and maple syrup) was excellent. There's always next time, though. And next time may be coming up soon...
And on an unrelated note, is anyone else having trouble viewing my page with non-IE browsers? I'll try to fix my images so people with firefox can view the page without problems, but let me know if you have any technical difficulties!
Sunday, March 20, 2005
Pear Clafoutis
Bakingsheet is now Baking Bites!!!
Head on over to check out the new site!
I asked her for the recipe on an impluse; it was something I hadn't thought about for years. I believe that it is originally from Jacques Pepin, published in a magazine called the Pleasures of Cooking, which had myriad food processor recipes. I think that it may have been published by Cuisinart, which explains this. Every edition had tons of recipes and useful advice on everything from assembling terrines to baking brioche. I quite like looking through the stack of old issues at my parent's house.
The pear clafoutis tastes like a cross between a custard and a dutch baby pancake - light but custardy. The texture really compliments the pear, as the whole thing is soft and slightly chewy, neither crispy nor mushy at all. Just how I remembered it.
The clafoutis will fall a little bit as it cools. I'm sure that this could easily be whisked together by hand. Serve it warm with a drizzle of butterscotch or caramel topping.
Leftovers can be chilled and eaten for breakfast.
Saturday, March 19, 2005
Stylin'
Bakingsheet is now Baking Bites!!!
Head on over to check out the new site!
I wanted to lighten up the page; my pictures were getting swallowed by the dark background.
I used a font called "Brody" (avaliable here - it's free!) from my somewhat massive collection of fonts for the blog title. If you don't have it, or download it, you'll probably see Comic Sans MS or whatever other handwritten style font you have already.
Hopefully I'll be able to work out a little index sometime in the near-ish future.
Update: I changed the side image to some pictures from the site. An improvement?
Friday, March 18, 2005
SHF #6: Stuck on Vanilla Caramel Popcorn
Bakingsheet is now Baking Bites!!!
Head on over to check out the new site!
The inspiration for this recipe was twofold. First, I felt like having some popcorn. Second, I've had caramel on the brain while thinking of all the possibilities for SHF and shopping for Easter goodies. Caramel corn was the logical union of the two. I also wanted something I could ship off to relatives as an Easter goodie, but that was more of an afterthought than inspiration.
I found this to be a bit tricky, given that I have no previous experience with candy making. Fortunately for you, this means that I think I can forwarn you of any problems so that they can be avoided easily.
I used a bag of microwave light butter (94% light, I believe) popcorn. Popped it and poured it out of the bag to cool. I munched on some and measured out between 8 and 10 cups, enough to fill the bottom of a 15x10 baking pan, which I lined with a Silpat. You'll want to use two pans if you don't have one this big. I transferred the popcorn to a large glass bowl, thinking that it would be easy to stir in the caramel this way and went to work on the caramel itself.
I combined the sugar, corn syrup and butter in a medium saucepan and tossed in a bit of molasses for extra flavor. Honey would be equally good. I boiled it to hardball (250F) without incident. I premeasured the salt and baking soda into a little dish, but didn't bother to measure out the vanilla, figuring that I would just pour in a teaspoon with the salt and soda. I didn't realise that the caramel would foam like crazy when I stirred in the baking soda, and I was so startled that I added way more vanilla than I meant to (hence the tablespoon, rather than a teaspoon in the recipe). No biggie, I figured and poured the caramel into the popcorn bowl where it almost immediately hardened. I should have warmed the bowl in the oven first! I managed to extract most of the popcorn onto my baking sheet and popped it in the oven for an hour. The caramel softened nicely and I was able to spread it out again.
After an hour, I took the corn out, let it cool and broke it into pieces.
Tasters said that it was better and crispier than anything they've bought in a store. They also reported that it was very light; no pieces were too hard and there wasn't too much caramel. The entire batch was virtually inhaled, in large part by me.
In two words?
Absolutely fabulous.
Wednesday, March 16, 2005
Roasted Butternut Squash Ravioli
Bakingsheet is now Baking Bites!!!
Head on over to check out the new site!
But I digress.
When I lived in Berkeley, there was a really great little shop that sold fresh pasta in tons of different varieties - from smoked salmon ravioli to meyer lemon linguini - and I would buy pasta there from time to time. It's owned by the guys who started Semifreddi's bakery. Anyway, I hadn't made pasta in quite a long time, so I decided to make pumpkin ravioli. From reading this, you're probably thinking that this was a pretty random decision. It was.
The ravioli were slightly garlicky and creamy on the inside and the pasta had a nice chew to it. The toasted pistachios were a really, really excellent addition. They added some crunchiness and really brought out the slight nuttiness of the whole wheat flour in the pasta. I loved it.
The recipe may look a little long, but it's really easy to make. One of the best things is that you can make all this stuff in advance and keep it in your fridge. Most people haven't seen pasta come from anywhere other than a box (often with an unfortuante fake cheese topping), so imagine how impressed your friends and family will be! You can also mix up the filling with other ingredients or go with all cheese, if you prefer.
1 ½ cups butternut squash(or pumpkin), cubed and roasted (400F oven until tender)
½ cup ricotta or cottage cheese
1 tbsp parmesan cheese
1 clove garlic
Salt and pepper to taste
Pulse in food processor until smooth
Pasta with whole wheat flour
2 ½ c ap flour (3/4 lb)
¾ c Whole wheat flour (1/4 lb)
1 Egg
1 egg white
6-10 tbsp water
Mix flours together. Make a well in the center and add eggs and 6 tbsp water. Mix with a spoon until starting to come together, adding more water as necessary. Pasta dough should be fairly dry. Finish mixing dough by hand, gathering it into a ball. Cover and let rest for 30 minutes before working with it. Dough and pasta can be kept in an airtight container in the refrigerator for several days.
You'll only need about 3/4 of the pasta dough to use up all the filling. Roll dough out very thin (basically as thin as you can manage if you don’t have a hand cranked pasta maker) and cut into strips, depending on how much pasta-to-filling ratio you’d like. Place teaspoonfuls of filling along a strip, cover with a second strip and seal tightly around each ravioli. Be sure to get all the air out of the pocket around the filling. You can wet the pasta strips with a little water around the fillings so they’ll stick together better if your pasta gets dry as you’re working with it. Let ravioli dry on a towel for at least 30 minutes – flip them over to dry both sides - before cooking to avoid clumping. Cook in boiling, salted water for 2-3 minutes.
Top with a sprinkle of parmesan cheese and a handful of toasted pistachios (or pinenuts). Strong sauces will overpower the filling.
Notes: If you choose to use all white flour, you may need to reduce the added water by a few tablespoons.
Tuesday, March 15, 2005
Dried Cherry and Pistachio Cookies
Bakingsheet is now Baking Bites!!!
Head on over to check out the new site!
The cookies were buttery and delicious, as Anne can attest since she beat me to the punch and made them on Sunday. I don't know how much longer they'll last - hopefully longer than this post!
Monday, March 14, 2005
Honey Buttermilk Bread
Bakingsheet is now Baking Bites!!!
Head on over to check out the new site!
I have decided that buttermilk is a great thing to have around the house now. I like using it for breads and things. It gives everything a really good flavor, adding a buttery richness and the tang of sour cream or yogurt. I was inspired to make bread in a loaf pan by Kelli at Culinary Epiphanies. I rarely use a loaf pan for bread, prefering to shaped loaves by hand, but her loaves always look so great. Besides, this is a more conventional size for making sandwiches.
This is such a good bread. It's really basic and has a very soft, light texture. It makes fabulous dinner rolls. It (unsurprisingly) makes a great sandwich bread. I personally like it toasted with jam.
Combine water, sugar and yeast. Let sit until yeast is foamy, about 10 minutes.
Rolls: Place well spaced on a baking sheet. Let rise until almost doubled, 40 minutes. Bake 20 minutes, until well browned.
Let cool for 30 minutes before slicing.
Makes 1 large loaf or 10-12 rolls
On a totally unrelated note, I'm glad that I have been able to post so much lately. I first thought that it was a sign of blogger addiction, but now I realise that it's symptomatic of my cooking addiction combined with my ever- growing desire to photograph my cooking. Frankly, it also saves me the trouble of messing with recipe cards and whatnot when I want to make things again. Yes, my laptop lives in my kitchen now.
I'm not ashamed.
Sunday, March 13, 2005
Sunday Brunch: Sourdough Waffles
Bakingsheet is now Baking Bites!!!
Head on over to check out the new site!
dskbook recommended to me in my post about my first soudough that I try making waffles with my starter. I went to the recipe archives on King Arthur's website and quickly located Sourdough Waffles for Four.
Let me just say that this made more than four waffles. I was able to fill my waffle iron completely 6 times, and it's a large waffle iron. You'd better be hungry if you want four people to eat all those. Hungry and not serving anything else, like bacon or saussage. I just cut the remaining waffles down into toaster sized pieces and froze them.
These were great. Really great. Easy, light, crispy.
I used butter instead of oil and reduced the amount from 1/4 cup to two tablespoons. I'd rather have my butter on top of my waffle then inside it.
Saturday, March 12, 2005
Banana Bread Fluffernutter
Bakingsheet is now Baking Bites!!!
Head on over to check out the new site!
The recipe for the bread is really basic. I've been making this recipe for a long time and it came about as an amalgamation of many other banana and quickbread recipes that I've used. If your bananas are firm, then heat them in the microwave for 30 seconds (unpeeled) to speed up their "ripening". I usually add the extra spices, but often measure them based on how spicy I feel at the moment. A little bit of nutmeg would be nice in this, too. I should also mention that I sometimes substitute applesauce for the butter, which turns out fine and lets you feel nice and virtuous at breakfast.
The fluffernutter variant shown above was very, very delicious. The warm marshmallow made the peanut butter - I used natural creamy for textural consistency - all melty and nice. And I am of the opinion that you can (a) never go wrong with marshmallows and (b) always have more marshmallow. I suppose that the same thing would go for peanut butter, except that you will inevitably have to interrupt peanut butter eating to wash it down with something.
Ok, I'm digressing. Just so you know, I would eat this again. Everyday. Sometimes I would mix it up with chocolate instead of peanut butter. Do I need a reason?
Friday, March 11, 2005
Japanese Chicken Scallion Rice Bowl
Bakingsheet is now Baking Bites!!!
Head on over to check out the new site!
I don't mind cooking it and I certainly don't mind eating it, but I would much rather handle just about any other kind of meat. Forgive me, but it just looks icky.
Nevertheless, I had to touch it to cook tonight's dinner. I used a recipe from this month's EatingWell magazine for the Japanese Chicken-Scallion Rice Bowl. Luckily for me, they also chose to publish this recipe online so I don't have to retype the whole thing. It was simple to make and only took about 30 minutes until I was chowing down. I wasn't wowed by it or anything, but it tasted good, so I'm sure I'll be making it again in the future. My only complaint is that it didn't look like the picture in the magazine, which led me to believe that there would be more broth in the final dish. If you're in a soupy mood, double the broth/soy sauce mixture.
Here's the recipe with my (minor) changes. The link goes to the original.
Combine the rice with 2 1/4 cups cold water in a medium saucepan. Bring to a boil, cover and reduce heat to low. Cook until all the water has been absorbed, 20 minutes. Let rest, covered, for 10 minutes. Chop chicken and scallions while rice is cooking.
Stir egg whites and whole egg in a small bowl until just mixed. Add chicken to the simmering broth. Gently pour in the egg mixture, without stirring. Sprinkle scallions on top. When the egg starts to firm up, after about 3 minutes, stir it with chopsticks or a knife. (The chicken will be cooked by now.) Divide the rice among 4 soup bowls and top with the chicken mixture.
Makes 4 servings, 1 1/2 cups each.
Thursday, March 10, 2005
Cottage Cheese Cheesecake
Bakingsheet is now Baking Bites!!!
Head on over to check out the new site!
I must confess that I am not a huge fan of cheesecake. It's simply too heavy and, more often than not, leaves me with an unpleasant coated feeling in my mouth.
However
I was flipping through a cookbook - the gigantic and exceptionally well illustrated Ultimate Healthy Eating Cookbook, which I acquired some time ago at a used bookshop - when I was struck by the gorgeous photo of this dessert. I decided to go for it because (1) it required few, ordinary ingredients (2) I had blackberries in the freezer and (3) I had time. Besides, I've always wondered if it actually worked to use cottage cheese in a cheesecake.
Well, it does work. The cake was lovely - very light with a texture (mouthfeel) that reminded me a bit of ricotta cheese. It was very easy and is very low in fat, so I think that I'll be making it again to try out some variations. It wasn't a particularly sweet cake, so make sure your berries are sweet. I'm thinking it would be great with an apple topping, like Angela's Apple topped Cheesecake.
I added a pinch of salt to the original recipe. I'm also not sure if I underbaked it or overbaked it, as I have no clue how "set" is "just set". Jiggly all over like jello, though appearing cooked on top? A bit jiggly in the center? My cake wasn't browned like the photo in the cookbook, but I cooked it for the full time.
3/4 cup cottage cheese
2/3 cup low fat plain yogurt
1 tbsp flour
2 tbsp brown sugar
1/4 tsp salt
1 egg
1 egg white
Zest and juice of 1/2 lemon
1 1/2 - 2 cups blackberries (or other fruit)
Grease and line a 7" round cake pan with parchment paper. Preheat oven to 350F.
Whizz cottage cheese in food processor until smooth.
Whisk together cottage cheese, yogurt, flour, sugar, salt and eggs until well combined. Add zest and lemon juice and stir well.
Pour batter into prepared tin and bake 30-40 minutes, until just set.
Let cool at least 30 minutes. Serve hot or chilled.
Serves 5-6.
Wednesday, March 09, 2005
Jam N' Butter
Bakingsheet is now Baking Bites!!!
Head on over to check out the new site!
Due to popular demand <
Sourdough was baked in a very hot oven that had been sprayed with lots of water to make it nice and steamy. Sourdough then took a long, relaxing cool down on state of the art cooling racks. Sourdough was sliced and dressed, in both strawberry preserves and soft butter, before being arranged for the photographer.
Then Sourdough was eaten. And enjoyed.
But for the purists, here's a candid shot of Sourdough in its natural state:
Tuesday, March 08, 2005
Experimenting with Starter: Sourdough Banana Bread
Bakingsheet is now Baking Bites!!!
Head on over to check out the new site!
I mashed up a ripe banana with a large pinch of salt, tablespoon of sugar, a few shakes of cinnamon and a splash of milk. I added the cup of starter and about 1 1/4 additional cups of all purpose flour. I stirred everything together, covered the bowl with plastic wrap and let is rise for 2 hours. I must admit that this mixture definately did not double in size as it sat, possibly because the starter was cold to begin with. Perhaps I should have warmed the milk.
I then "kneaded" the dough (read: prodded it four times) with the back of a spoon before turning it out and pressing it into a greased loaf pan. Again, I let it rise for nearly two hours. Again, I don't think it doubled, but it did rise a bit. I baked it at 450F for 20 minutes.
The final loaf turned out to have a hint of banana and cinnamon flavor. It was surprisingly light and soft, with a very nice, crisp crust of the sides and bottom. I had no expectations and was pleasantly surprised. I would definately try something similar again - especially because I suspect it will make great toast in the morning.
Friday, March 04, 2005
Gifts and Good Advice
Bakingsheet is now Baking Bites!!!
Head on over to check out the new site!
I picked up the neat paper loaf pans shown above at Sur La Table around the holidays, optimistically thinking that I would have lots more time and be baking little (ok, not that little) loaves for everyone. Needless to say, this never really happened. So I used them today to make little zucchini breads for a friend and for my grandfather.
I love these "pans"; they're disposable, cute, light and I don't have to grease them. Indeed, I'm not sure it would be advisable to grease a paper pan.
Speaking of advice, a reader recently sent me some advice in return for my advice on how to return a leftover slice of pizza to it's former glory (read: reheat pizza in the oven). I thought I would post it here:
You know over the years I have used many ovens in many different situations and perhaps you can benefit in some way from my experience. So here I give you my top 5 things to not cook/heat in the oven.
# 5. Plastics is not a good idea. Long lasting unwanted smell.
# 4. Any kind of footwear. From flip flops to motorcycle boots
# 3. Anything basically that warns "Harmful If Swallowed".
Especially anything that could be considered a solvent.
#2. Pelts are real bad if burnt.
# 1. Watermellon. Trust me, do not do this.
By the way, to reheat your pizza and get a crisp crust, take it from the fridge and put it onto a baking sheet into a (preheated, if possible) 375F oven on convection bake. Remove after about 5 minutes, when cheese is melty. If for some reason your pizza slice is frozen, defrost in the microwave first.
Heat your watermelon separately.
Wednesday, March 02, 2005
And then there was Sourdough
Bakingsheet is now Baking Bites!!!
Head on over to check out the new site!
Just days after having received my sourdough starter in the mail, I was able to bake my first sourdough bread.
I followed the recipe that came with my starter, kindly provided by King Arthur Flour. The instructions seemed pretty detailed, and I set off with confidence.
Looks like it worked, doesn't it?
I fed my starter and let it sit out overnight, about 10 hours. In the morning, I removed a cup or starter into a bit bowl, fed the remaining starter and let it bubble at room temperature for about 3 hours before sticking it back in the fridge. Letting the starter bubble at room temperature is the most efficientway to cultivate the yeast.
To the cup of starter, I added 3 cups of flour and 1 1/2 cups warm water. I stirred this well, covered it in plastic wrap and let it sit at room temperature for just over 2 hours. The directions stated that this "sponge" could be left a room temperature for 2-8 hours, where a longer sponge time will increase the sourness of the bread. I didn't have all that much time, so I opted for the shorter time.
To the sponge, after the 2 hours, I added 2 1/2 more cups of flour. I kneaded this in the bowl before turning out onto a floured board because the dough was quite sticky. After about 5-6 minutes, I put the dough ball into a greased, covered bowl for a rise of another 2 hours.
Then, I turned out the dough, shaped it into two balls and let it rise again on a baking sheet sprinkled with cornmeal. During the baking, I realised that I should have either greased the baking sheet or lined it with foil. I used parchment paper and it ended up looking quite singed by the high heat of the oven. I can't imagine that burnt sourdough would be all that great, so next time I'll skip the parchment.
After the loaves doubled in size, which took about 1 1/2 hours, I baked them for 22 minutes at 425F. The King Arthur directions say to bake for 20 minutes at 450F, but I forgot to double check the instructions before baking. Next time I would bake my loaves a bit longer at 425, or raise the temperature to 450 for a darker brown crust.
Overall, my bread was chewy with lovely irregular holes on the inside and had a nice crunchy crust. It was sour, but not overly so. I thought that the flavor was excellent, but I will let the sponge work for more than 2 hours to get a stronger flavor in the future. The crust did soften a bit as the bread cooled, so I think that next time I will try brushing the bread with an egg white before I bake it to see if that helps. I like a bread like this to be very crusty. I can't wait to try another batch!
If you want to hear more about sourdough, Anne's starter is almost ready and I'll bet that if you ask her nicely, she'll post about how her bread turns out!
Tuesday, March 01, 2005
Mocha Rounds
Bakingsheet is now Baking Bites!!!
Head on over to check out the new site!
This week, I knew he had a meeting coming up and asked if he wanted me to make some cookies to take with him. The answer was yes.
But what kind of cookies to make? My immediate thought was to make chocolate chip cookies. But my dad said that they would be too popular. What that means, I'm not exactly sure, but I went about choosing another cookie. I decided to make something easy but a little unusual, and that didn't involve chocolate chips.
After having success with other recipes I've made from Land O'Lakes recommendations, I stumbled across their mocha rounds. They looked impressive, were easy to make (slice and bake) and had three great flavors: chocolate, cinnamon and coffee. Only about half the finished batch made it out the door with my dad to take to his meeting.
I would make these again, but wouldn't necessarily bother with the chocolat dip out of laziness. I think that coloring the chocolate would make very impressive cookies for holidays.
I used Valhrona dark chocolate, though the original recipe called for semi-sweet, and increased the baking powder and salt to half a teaspoon each. I also didn't add any shortening to the chocolate dips I used; I simply used melted chocolate.
I wouldn't change a single thing about they way the cookies came out, so here is the exact recipe I ended up using.


