Thursday, June 30, 2005
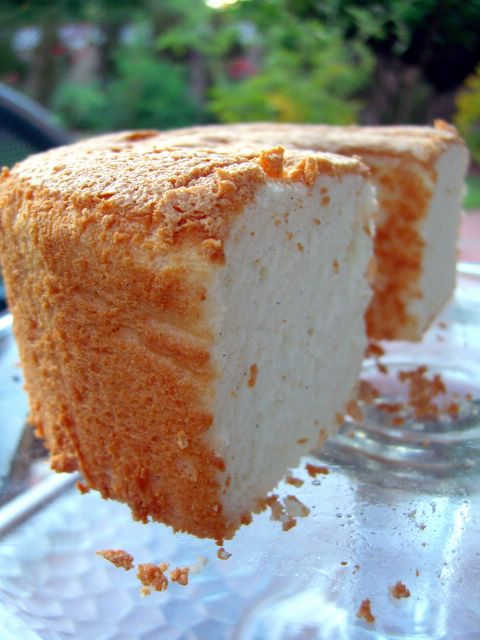
Cooking School: How to Beat Egg Whites
Bakingsheet is now Baking Bites!!!
Head on over to check out the new site!
So today I have decided to talk about egg whites. Their chief purpose, in baking, is to lend structure to baked goods. They also add liquid to a recipe, but I'm not going to deal with that right now. Because of the unique properties of egg whites, they alone can be used to leaven things like cakes without the aid of yeast or chemical leaveners.
When recipes call for egg whites, they typically call for them to be beaten. This causes a lot of confusion for people because recipes ask you to beat the whites "until foamy", "until the batter falls from the beaters in ribbons", "until glossy" or "until soft/stiff peaks form".
Here is a mini tutorial, based on making meringue (which involves beating sugar into the whites as you whip them). The texture of the whites will be similar (though perhaps slightly less glossy) when whipping egg whites alone, so the illustrations can be used as a reference in multiple situations.
Start with room temperature egg whites. I don't use copper bowls. Though it is harder to overbeat your egg whites in one, this is because copper ions migrate into the egg whites. Egg whites beaten in a copper bowl will be slightly yellowish and more stable than ones beaten in other bowls, but I still don't like the idea that copper ions are now in my cake/food. To give extra stabilization to the egg whites in non copper bowls, you can add cream of tartar when you are beating them, if you wish.
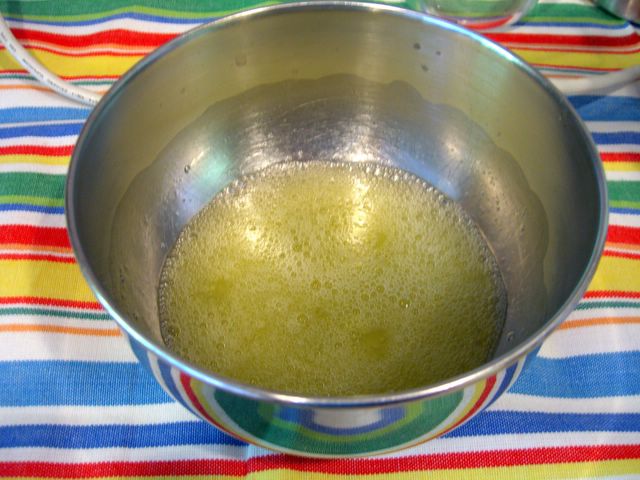
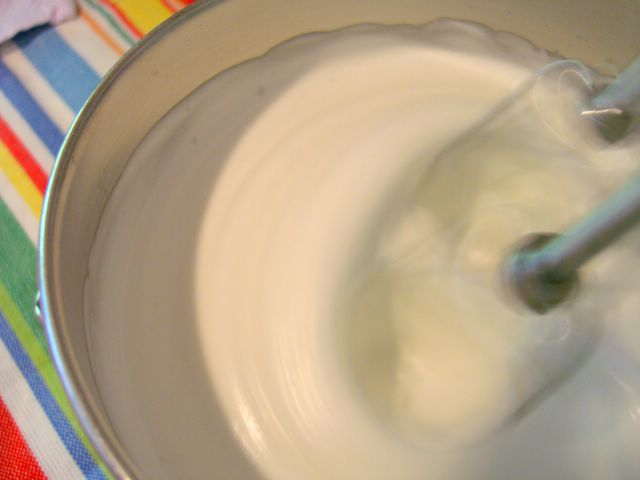
This is the "frothy" stage. It takes 30 seconds to 1 minutes to reach this point. You can add your salt or cream of tartar now.
Once the cream of tartar is fully incorporated, shown below, begin to add your sugar. Add it slowly, either pouring it in a small, steady stream or adding it a tablespoon or two at a time.
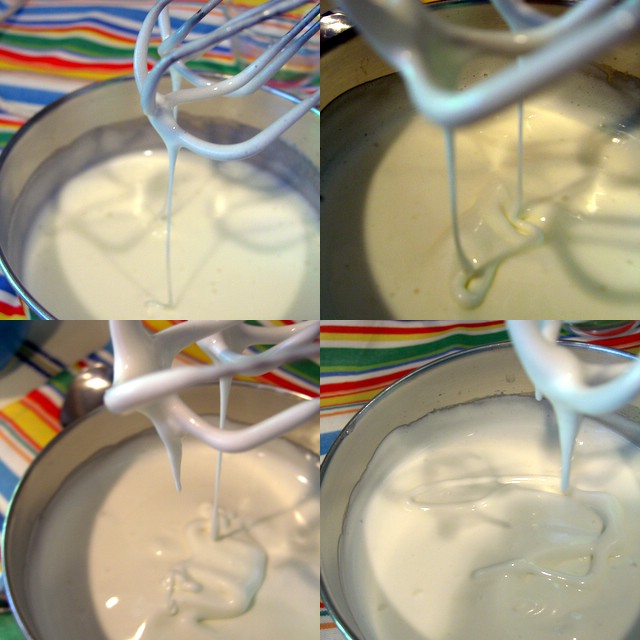
Once all your sugar is fully incorporated, the batter will look somewhat thick and creamy. If you lift the beaters, the batter will stream down off of them, but it will not rest on the surface of the batter. Yet. These are the top two photos below.
Do not be afraid to lift the beaters and examine the batter. After a little more beating, it will fall in ribbons.This basically means that a ribbon-like strip will rest on top of the batter. You can clearly see the ribboning in the bottom two photos, which is not evident in the top photos.
After the ribboning stage, you will be able to see ripples on the surface of the egg whites as you beat them. You could probably see them before, but now they will remain on the surface. You are getting close to the infamous "soft peaks".
"Soft Peaks" and "Glossy" are the same. There is a window from very soft to fairly stiff peaks that all qualify as "soft". This is the softest I would consider using. The batter did not stream down from the beaters as it did before. The peaks fell immediately, but were clearly peaks - which is not entirely evident in the photo. The batter is very thick. I might beat this just a bit longer when aiming for soft peaks.
I have always been taught that even if a recipe calls for "stiff peaks" not to beat the egg whites all the way to stiffness. By stiffness, I mean that peaks in the batter do not fall at all. It is too easy to overbeat egg whites. You know you have when they lose their glossiness as the proteins break down. I would advise you to err on the side of caution. Soft peak egg whites should stick to the sides of the bowl and not look liquidy. Peaks will form and the tips will curl over. I will use this consistency when a recipe calls for "stiff peaks".
There you have it. Now try angel food cake, meringues, pavlova, chiffon cake, souffles or mousses without fear! Actually, I still fear pavlova. But that doesn't mean anyone else has to.
Blogging By Mail Reminder
Bakingsheet is now Baking Bites!!!
Head on over to check out the new site!
Tuesday, June 28, 2005
The Best Angel Food Cake
Bakingsheet is now Baking Bites!!!
Head on over to check out the new site!
It was pointed out in this article, that when Cooks Illustrated standards diverge from your own, you can end up being a bit disappointed with their recipes. I have found this to be a true assessment on several occasions, though the recipes themselves are excellent. There are some types of food where the likelihood of this happening is very low. Cakes are a good example as I have yet to meet someone who wants a dry, non-tender cake. Flavors can easily be altered, but the foundation of the cake is very important and I have found The Best Recipe to be a great resource.
This angel food cake recipe is a great example of a "best recipe". It is moist, tender, not overly sweet and ethereally light. I could have eaten the entire thing in one sitting - which was a shock and all the store bought angelfood cakes I've had taste like sweet styrofoam and even ones I have made before have not turned out this well, though I do like the individual spiced angel food.
I slightly differed from the recipe by using superfine sugar, also known as castor sugar, instead of granulated because I fine it produces smoother meringues. I also did not use lemon juice/extract in the cake. I used vanilla paste - you can spot the beans in the photo if you look very closely - and almond extract to flavor the cake and served it with orange and lemon curds. Lemon curd is always a nice, tart contrast with angel food cake. The orange curd was made by substituting orange for lemon in the same recipe. It tasted marvelously sweet and smooth, rather like a creamsicle. It paired with this angel food even better than the lemon curd did.
I like to make it the night before and take it out of the pan the next day, so this can be prepared a day in advance. Use a serrated knife to slice it. This cake will be making appearances at my table more than once this summer. I'm already thinking about pairing it with balsamic strawberries.
1/4 tsp salt
Monday, June 27, 2005
The Reluctant Vegan
Bakingsheet is now Baking Bites!!!
Head on over to check out the new site!
Let me know what you all think. And suggestions for future topics are welcome.
Sunday, June 26, 2005
Sunday Brunch: Sourdough Crumpets
Bakingsheet is now Baking Bites!!!
Head on over to check out the new site!
All you do is add a bit of sugar, salt and baking soda to the starter and toss it in a dry frying pan to cook like a pancake. The baking soda neutralises the acidity of the starter and, in the process, creates lots of air bubbles, which are perfect for filling with butter, honey or lemon curd. The crumpets are best fresh and crisp off the grill, so eat them as you make them. If you make more than you can eat in one sitting, just pop the leftover crumpets in the toaster to crisp them up again.
KA's recipe is great and super easy. Once you've made these, you won't even need a recipe! It calls for the use of a 4 inch crumpet ring (or other circular, hollow tin), but it works just fine if you don't use one. I don't have a crumpet ring, so I did mine free-form. They're a bit thinner this way, but no less tasty.
Saturday, June 25, 2005
IMBB #16: Hard Cooked Egg Cookies
Bakingsheet is now Baking Bites!!!
Head on over to check out the new site!
Hosted by Viv, this month's Is My Blog Burning theme is Eggs. It was hard for me to decide on a recipe for this IMBB. Clearly we all know by now that I am partial to sweet things. Most baked goods already involve eggs, so I really could have chosen anything I might ordinarily make and post it for this event. But that didn’t really seem to be in the spirit of things. I wanted to do something that was (a) at least a little unusual and (b) featured eggs heavily.
I was flipping an old Joy of Cooking (1946 edition - and note that they don't appear in more current additions) when I spotted Hard Cooked Egg Cookies. My first thought was that they were cookies that would have a dollop of curd or something in the center to resemble hard boiled eggs. They actually involve putting hard boiled eggs through a ricer and into the batter.
I cheated and made the whole dough in the food processor, so I didn't have to rice the eggs in advance. The recipe's baking instructions were limited to "Cook in a slow oven." Not that that is vague, or anything. Despite the fact that the recipes called for dipping the unbaked cookies in egg whites and rolling them in sugar, because there was no leavening in the cookies, I decided that perhaps they should be rolled and cut out like shortbread. I dipped a few teaspoon sized balls in the egg white, rolled them in sugar and baked them before rolling out the rest of the dough to compromise. They were ugly, but I think they had a slightly better crunch to the outside than the rolled cookies. The cutout cookies, which are pictureed above, by the way, were brushed with egg white and sprinkled with coarse sugar. I underbaked the cookies slightly, so they didn't keep well; they were rather mushy the next day. But I got a request for another batch (baked longer this time!), so it definately wasn't all bad.
There was no way that you could guess that there were hard boiled eggs in these cookies. The cookies had a nice, light lemon flavor - which I would slightly increase next time - and a moist, melt-in-your-mouth texture. Here is the recipe, complete with how I would do it again: increase the lemon, increase the baking time, keep the rolling, but dip the but cookies into the egg white before dredging in sugar.
Thursday, June 23, 2005
Cooking School: Crackers and Swedish Hardtack
Bakingsheet is now Baking Bites!!!
Head on over to check out the new site!
On the facing page (shown in right of photo) is a recipe for Swedish Oatmeal Hardtack. I tried to make hardtack once, long ago, when I was under the understanding that it was simply flour and water mixed together and baked until it was hard. Hardtack definately carries the connotation of something unpalatable with such a long shelflife that it was a staple on long voyages and in the army in, and possibly before, the 18th century. Swedish hardtack is not the same type of cracker. It is much richer, using butter, shortening, oatmeal and buttermilk and can be eaten for breakfast as well as with dips.
The wheat crackers were very simple to make. Mix flour, salt and water in a food processor, rest it, roll it out and bake it for a brief period at a high temperature. You can top them with anything sweet or savory. I used garlic and salt on some and coconut and sugar, as per a suggestion in the recipe. Unfortunately, most of them did not get very crispy! The flavor was bland and the slight chew that remained was unplesant. The baking time was way off base - I had to bake mine more than twice the recommended time and they still weren't crisp. The recipe stated to roll out the crackers as thin as possible, but if it was supposed to be thinner than I was able to get them, they must have had someone incredibly strong roll out the dough.
The hardtack, on the other hand, was excellent. It was easy to mix and the dough was easy to roll out with lots of flour. The dough was also very forgiving, so you can patch any tears or move bits of it around to make a perfect rectangle, at will. I have to say that the baking time was, once again, way off base. This would not stop me from making these again, though.
Here's my revised version of the recipe. These have a great inherent balance of sweet and savory. You might like them sprinkled with a bit of salt before baking, if you have a "salt tooth", like me.
Tuesday, June 21, 2005
Home Roasted Kona Coffee
Bakingsheet is now Baking Bites!!!
Head on over to check out the new site!
At Greenwell Farms, where I purchased the coffee, I was able to sample all their roasts. The full city roast was my favorite - smooth and rich, but not too dark. I thought it was the best roast for their coffee and, indeed, it is known as a classic Kona roast. With this as my goal, I began roasting.
Clare recommended using an air popper, which I borrowed from my neighbor. I put 150 grams of green beans in, strapped an empty tin can on top of the opening to allow the beans to expand as they roasted and plugged it in. Green beans are actually rather grey when they are unroasted. They turn a brilliant green as they heat up. Unfortunately, I couldn't enjoy this much because the chaff/skin of the dry beans was flying up out of the roaster. Fortunately, it soon stopped. I watched as the beans turned to darker and darker shades of brown. I listened to the "cracks" of the beans, akin to the sound of popping corn.
As the beans approached my desired color, the popper noticeable began to smoke. I wanted to keep an eye on the beans, but could no longer look over them. After several moments, I flipped off the switch and took the whole thing outside. I cooled the beans in a colander as my kitchen aired out. You can see that I got quite a dark roast. But when I brewed it the next morning, it was wonderful. The dark beans belied the smoothness of the taste.
My second and third roasts were much less eventful, as I did them outside. I hit the Full City roast on the third try.
By the way, Greenwell's chocolate covered peaberry coffee beans are the best I have ever had. I'm not a huge fan of peaberry coffee, but their natural chocolatiness makes the perfect accompaniment to the very high quality chocolate they're covered with. They're amazing. I highly recommend trying some.
Monday, June 20, 2005
Cherry Pie for Father's Day
Bakingsheet is now Baking Bites!!!
Head on over to check out the new site!
First, my crust was incredibly flakey and browned very well with an egg-white wash and generous sprinkling of coarse sugar.
Second, frozen cherries work very well when you don't have time to pit 2 pounds of fresh cherries. I used sweet cherries and reduced the sugar called for by most recipes from 1 cup to 1/2 cup. I wouldn't have wanted it any sweeter because that might have overwhelmed the pie, not to mention the lovely hint of almond contributed by 1/2 teaspoon of almond extract.
Third, I believe I now know why it is recommended that you use tapioca starch as a thickener in berry fillings. I used 3 tablespoons of cornstarch, which did a fairly good job of creating structure in the pie. I would have perfered the slightly stronger thickening power of tapioca, though. I don't want to spoon excess juice out of the leftover slices of my pie to make sure the crust stays flakey. Of coure, I also don't want to have an artificial gel to the pie filling, so I'll take the extra juice in favor of flavor and texture when it comes down to it.
I also learned that I like cherry pie much more than I ever remembered.
Sunday, June 19, 2005
Sugar Cookies and Blogging By Mail
Bakingsheet is now Baking Bites!!!
Head on over to check out the new site!
These cookies were sent off in a cookie jar as a house-warming gift to one of my best friends. Do you think she liked them?
Everyone likes to get something in the mail. A magazine is nice, a letter is nicer and a package is just about as good as it gets. After doing a little food exchange with Jessica, as I mentioned before, it dawned on me that it would be a good idea to see if any other bloggers (or readers) were interested in doing a little foodie exchange. I'm calling it Blogging By Mail.
Within a certain time frame, send a homemade treat or a favorite food item to another participant. We're not talking about anything big here: a jar of jam, a few homemade cookies, a local or regional specialty.... On the scheduled date, post about your experience and I'll do a little roundup here.
To participate, e-mail me with your mailing address (subject: Blogging By Mail) by July 1st. On that date, I'll send you someone's address and you can ship them off your package. Post about your experience on July 31st and I'll do a roundup shortly thereafter. I know it's a big time frame, but we have to allow for mailing, cooking and orgazational time. It'll be worth it: new friends, new foods and mail that isn't a bill!
As requested (and as it's an excellent point!), be sure to mention anything that you're deathly alergic to in your e-mail that way I can pass on the information.
These cookies are neither etremely chewy nor extremely crunchy. They have a nice melt-in-your-mouth type texture that lasts for days, which is why I chose to mail them up to my friend. The shortening gives them their puff and the butter gives them more flavor and moisture. If you use all butter the cookies will be chewier.
I used vanilla sugar, so you can see some of the vanilla beans in my cookies above. The flavor will still be great with just vanilla extract because the little bit of almond really gives it a boost!
1 tsp baking powder
½ tsp salt
10 tbsp butter, room temperature
4 tbsp shortening, room temperature
1 cup sugar
1 large egg
2 tsp vanilla extract
¼ tsp almond extract
Friday, June 17, 2005
SHF #9: Tempting Bread Tart
Bakingsheet is now Baking Bites!!!
Head on over to check out the new site!
The idea for this tart came straight out of Baking with Julia. In it, Nancy Silverton offers up a wonderful looking Brioche Tart. Hers is rich dough, filled with a creme fraiche and egg custard and baked. It is then topped with a creamy white wine sauce and poached fruit.
My tart is nowhere near as rich as hers, in no small part because I couldn't be bothered to make a brioche dough. Instead, I used a half batch of my classic white bread and a cream filling. It turned out rather like a custard pizza, but once the fruit compote was added and the juices absorbed, it was very nice. I definately like the idea of using a bread base for a tart because it makes the tart seem so much more substantial. It would be easy to take this type of dessert to a picnic as well. Next time, I think I will slice some apples or stone fruits and lay them in the custard to bake with the tart. A cream cheese filling would go very well here, too. If you're making your own filling, cut down on the sugar. This recipe adds more sugar before baking.
Use something at least as rich as the white bread as a base. I finally updated my brioche recipe and a half batch of the would be perfect.
After the second rise, use your finger tips to dimple the bottom of the tart like a focaccia. Spread the cream filling over the center of the tart. Brush the crust with the lightly beaten egg white and sprinkle the whole thing with sugar. You should use approximately 1 tbsp for the crust and ¼-1/3 cup for sprinkling the pastry cream. The cream will absorb sugar as you sprinkle it, so, if necessary, add a bit more sugar until it ceases to be absorbed by the cream.
Bake in a 375F oven for 35-40 minutes (for white bread)
½ vanilla bean
6 plums, unpeeled, pitted and cut in sixths
½ cup dried cherries
¼ cup water
1 tsp lemon juice
Combine ingredients in a medium saucepan over medium heat. Cover and cook for about 15 minutes, until plums are tender. Remove vanilla bean and serve with tart or over ice cream.
Thursday, June 16, 2005
Cooking School: Classic White Bread
Bakingsheet is now Baking Bites!!!
Head on over to check out the new site!
I am not that great a shaping bread. I am getting better at shaping round loaves, but most of the time my breads don't hold their shape as well as I would like. I think that in the back of my mind I always thought that, to produce a loaf shape, you could simply plop dough into a loaf pan, let it rise and bake it. Not so. Shaping is the key to this loaf.
The bread itself came together very easily. The recipe suggested that I make it with my mixer, but I did it by hand. This entailed rather more kneading to work in the butter, but it was enjoyable work.
After the first rise, I divided the dough in half. I rolled it out into a 9 inch wide x 12 inch high/long rectangle. Fold one third of the dough down, then fold it down again. Pinch the bottom seam to seal. Your rectangle should be approximately 9x4 now. Turn the seam side up. Fold each end over about 1/2 inch, tuck in any loose ends and pinch to seal. Place the loaf seam side down into a greased 8x4 inch loaf pan. The seams sealed easily, so don't use too much flour as you need. The dough should be neither sticky nor dry.
Low and behold, the loaf looked just like a store bought loaf when it came out of the oven! To my mind, this meant that I had shaped it properly. Fortunately, it tasted nothing like a store bought loaf. It was soft, buttery and had a nice even crumb that made it very easy to slice. And it made crispy, perfect toast.
Combine 1/2 cup water, yeast and sugar in a large bowl and let stand until foamy - about 10 minutes. Add remaining water, flour and salt to yeast mixture and mix with a wooden spoon (or in a mixer) until dough cleanly away from the sides of the bowl. Knead in butter until dough is smooth and not sticky. Turn dough out onto a lightly floured surface and continue kneading for an additional minute or two. Shape dough into a ball and place in a lightly oiled bowl to rise until doubled, about 1- 1 1/2 hours.
The book recommends storing the bread in a brown paper bag at room temperature for up to two days, or freezing the loaves. Storeage was not an issue here.
Tuesday, June 14, 2005
Easy Chocolate Fudge
Bakingsheet is now Baking Bites!!!
Head on over to check out the new site!
Some men, for reasons I do not fully understand, insist on denouncing chocolate in all its forms. Perhaps they were once told that only women should love chocolate. I'm sure that this myth is founded on the (incorrect) assumption that all women will eat any kind of 5-cents-per-pound "chocolate" sold at the neighborhood drug store in boxes that look as though they've been around since the Eisenhower administration. Talk about insulting! Fortunately, even here in the states, general appreciation of quality chocolate is spreading like wildfire. Hopefully we'll get this myth stamped out in short order. This myth is relevant here because I made this fudge for a friend who has, on occasion, espoused the belief that real men don't eat chocolate. He does like fudge and brownies, though....
Fudge is a dense, creamy, semi-soft confection that melts in your mouth and is most often chocolate flavored. It has been around since the late 19th century. It's origins, however, are shrouded in mystery. Some people attribute it to American college women using candy making as an excuse to stay up late. This sounds like a crazy theory to me. Doing homework? Studying? Valid reasons. Making candy? Delicious, sure, but perhaps not the best excuse.
However it came about, it is a popular treat. It can be made in a wide variety of flavors, ships well and tastes great. This fudge recipe must be one of the easiest there is. Based on this recipe, courtesy of Hersheys, I used different chocolate but followed the same procedure. The nice thing here is that you do not need a candy thermometer - just watch the clock when you're cooking. It is important to stir constantly to prevent scorching your candy. It will start to set when you pour it into your pan, so just tap the bottom and sides a few times to smooth it out instead of trying to use a spatula or a knife to get a level top.
If you're travelling with these, make sure to layer them with wax or parchment paper or they'll stick together.
Easy Chocolate Fudge
1 1/2 cups sugar
5 oz. condensed milk
7 oz marshmallow fluff (1 jar)
4 tbsp butter, softened
12 oz chocolate (56% or semisweet), chopped
1 tsp vanilla
1/2 cup walnuts or pecans, chopped (optional)
Line a 8x8 inch baking pan with foil or plastic wrap and butter it.
In a medium sauce pan, combine sugar, milk, marshmallow and butter. Bring mixture to a boil, stirring often. Continue to cook over medium heat for 5 minutes, stirring constantly. Use a heat resistant spatula to scrape down the sides of the pan.
Remove from heat and stir in chocolate and vanilla until mixture is smooth. Pour immediately into prepared pan. Let set for 1 hour in the refrigerator before slicing.
Store in an airtight container in the fridge.
Makes 3 dozen squares.
Let me also take this opportunity to note not to use store bought Australian marshmallows as a substitute unless you can get jet puffed ones. I never saw American-style marshmallows when I was in Aus., but the ones I usually snacked on were chewy/crumbly and dry (I liked them, though!) and would not be appropriate for this recipe. It needs to be creamy. I'm sure it would work with homemade marshmallow fluff, though...
Monday, June 13, 2005
Leek and Artichoke Risotto
Bakingsheet is now Baking Bites!!!
Head on over to check out the new site!
I cannot recall why I originally bought leeks, but inspiration struch when I peered into my refrigerator and wondered what to make for dinner. Risotto was my first thought. I added canned artichoke hearts because they have a nice, slightly lemony flavor and involved no additional cooking. You could certainly use fresh artichokes, but cook them first. The only change I might make to this is to add a bit of lemon juice, with the artichokes, to brighten the final flavor. This is not a necessary change, though.
Instead of adding butter, cream or cheese to this, I folded in a bit of mascarpone before serving. In all honesty, the amount given below is an estimate. It never takes much to enhance the already creamy texture of risotto, but feel free to add as much or as little as you like. If you want a totally vegetarian dish, leave it out entirely. You won't be disappointed with this one.
Saturday, June 11, 2005
L'Artiste Patisserie
Bakingsheet is now Baking Bites!!!
Head on over to check out the new site!
The second thing, and most important, is that the pastries I tasted were great. Everything else looked equally good.
L'Artiste Patisserie opened fairly recently and yesterday was the first day I stopped in there. It had gotten a mention on Chowhound, which is how I learned about it. I went around lunch time and there were about 8-10 people seated in the patio area eating sandwiches and other lunch offerings. Inside, there were two pastry cases: one with breads and morning pastries and one with cookies and desserts. I decided that I would go back for bread another time and treated myself to a few macarons and an espresso chocolate chip cookie.
The macaroons, from back to front in the photo above, are: lemon, lavender, cinnamon-orange, vanilla and pistachio. The lemon and cinnamon-orange were my favorites. I think the lemon may have been filled with lemon curd, or perhaps a lemon curd buttercreme. It was really, really excellent. The cinnamon-orange, a close second, was filled with marmalade.
The pistachio and lavender had excellent flavors, though the lavender was not as crisp as the others. I suspect that some of the locals might be intimidated by a lavender cookie, as mine was clearly the only one sold from that variety. It just didn't seem quite as fresh. At first I didn't think that the vanilla had much flavor, but after taking a break from the other flavors to cleanse my palate, I found the flavor to be very nice. There were also coffee, chocolate, hazelnut and raspberry flavors available.
The espresso chocolate chip cookie was praised on the Chowhound boards and it, too, was excellent. It was very rich and chewy, a brownie held together in cookie shape. It didn't have a coffee flavor, but the intensity of chocolate that has coffee added to it.
I'm going back soon to try the breads and other offerings which include brioche, baguettes, scones, muffins, monkey bread, cinnamon rolls, coconut cake, florentine bars and fruit tarts. They also serve breakfast and lunch, but I'm not sure if they're open for dinner. I am so pleased to find a nice french bakery/cafe nearby! And with macarons!
C'mon LA food bloggers (and non-bloggers, too, of course!) - try it and let me know what you think!
L'Artiste Patisserie
17312-A Ventura Boulevard
Encino, California 91316
(818) 386-0061
Friday, June 10, 2005
Strawberry-Black Pepper Sorbet
Bakingsheet is now Baking Bites!!!
Head on over to check out the new site!
I trotted off to the market and picked up two pounds of strawberries. Though the ones I got were organic, small, dark and sweet, it crossed my mind that this might not be the best strawberry season here in California due to the unusual amount of rain this past winter. Sorbet is a great use for less than wonderful strawberries, as well as wonderful ones. I rinsed and roughly chopped them, making 6 cups of strawberries. I probably lost 1/2 cup of the original 2 pounds while chopping due to sampling.
The recipe called for two tablespoons of black peppercorns to be ground with a mortal and pestal. Fortunately for me, my pepper grinder is full of whole black peppercorns. I ground only 1 tablespoon on the theory that 2 tablespoons of whole peppercorns, once ground, would lose some volume. I prepared the sorbet base and chilled it overnight, as I have found that a cold base will produce the best results in my ice cream maker.
And the results? Sweet, refreshing and with a kick of peppery aftertaste. Unusual and lovely.
from Cooking Light, June 2005
1 cup sugar
1 cup water
1 tbsp ground black pepper (fresh, if possible)
2 pounds strawberries, rinsed and roughly chopped (6 cups)
2 tbsp lemon juice
Heat sugar and water in a small sauce pan until sugar dissolves. Stir in pepper.
Place strawberries, sugar syrup and lemon juice into a food processor and process until smooth, about 2 minutes. Do this in two batches, if necessary. Pour into large bowl and chill for several hours or overnight in the fridge.
Pour into prepared ice cream maker and freeze according to the directions (30 minutes in my Cuisinart).
Transfer to a freezer-safe container and freeze until ready to serve. It should be firm after approximately 2 hours in the freezer.
Thursday, June 09, 2005
Cooking School: Linzer Cookies
Bakingsheet is now Baking Bites!!!
Head on over to check out the new site!
Our final class dealt with cookies. While our instructor baked some fabulous looking chocolate chip cookies for her son, we baked butterscotch cookies and linzer cookies.
The linzer cookies are shown above and were proclaimed by many to be the best cookies they have ever eaten. For me, it's a toss up between these and the palmiers.
These linzer cookies are easy to make because the whole dough can be prepared in the food processor. Start well in advance because the dough will need to chill for at least 6 hours before you roll it out. You can freeze the unrolled dough for a couple of weeks, too, so this is great to prepare in advance of a party. The cookies are fantastic!
The dough for these linzer cookies is quite sticky, so you will have to flour your worksurface liberally and chill the dough. I found it helpful to divide the dough as I rolled it and keep all extra pieces in the fridge or freezer for a few minutes. A spatula or a bench scraper will help you move the dough from your worksurface to your baking sheet. You can see that I took the time to create small lattice tops for my cookies, but it is easier to simply use a smaller round cutter and create a hole in the center of each round. You can reroll the scraps several times, so you don't have to waste any of the dough, either.
Linzer Cookies
1 1/2 cups ap flour
1 1/4 cups hazelnuts (toasted and peeled is optimal, but you can use Hazelnut Meal, too)
1 cup sugar
1 tbsp dutch process cocoal powder
Zest of 1 lemon (1 tbsp)
1/2 tsp ground cinnamon
1/8 tsp ground cloves
1/4 tsp salt
14 tablespoons butter, softened
2 large egg yolks
1 tbsp lemon juice
Filling: 1/2-3/4 cup good raspberry preserves
In a food processor, process flour and hazelnuts into a fine powder. Add sugar, cocoal, lemon zest, cinnamon, cloves and salt. Pulse to combine. Add butter and pulse until mixture is crumbly.
In a small bowl, stir together yolks and lemon juice. Add to flour mixture and pulse until dough comes together. Divide dough into two discs, cover well with plastic wrap, and refrigerate for at least 6 hours or overnight (or freeze 1-2 hours, until firm).
Preheat oven to 350F and line baking sheets with parchment paper.
Working with 1/4 or 1/2 of the dough at a time, roll out on a well-floured surface, dusting the top of the dough with flour, until it is 1/4 inch thick. Using a 2 inch round cookie cutter, cut out rounds and arrange on your baking sheet. Cookies will not spread much. Using a smaller round cutter, remove a circle from 1/2 of your cookie rounds (these will provide the cookie tops). Combine scraps and reroll until all dough is used.
Bake for approximately 12 minutes, until cookies are just starting to brown at the edges (you may need an additional minute or two depending on the thickness of your cookies). Cool completely on baking sheets.
When cookies are completely cool, spread an uncut round with preserves and top with a cut round. Store in an airtight container and dust with powdered sugar before serving, if desired.
Makes 2 1/2 - 3 dozen.
Tuesday, June 07, 2005
Nutella Biscotti
Bakingsheet is now Baking Bites!!!
Head on over to check out the new site!
You see, I sent Jessica some of my homemade marshmallows – chocolate peanut-butter flavored ones, at that – because we decided to have a little blogger food exchange. It was a lot of fun to exchange goodies with someone I only really know through blogging, not to mention that I got some good feedback on my goodies and was able to try one of her favorites, as well. Would anyone else be interested in doing a food-blogger goodie exchange? We could send small packages of shippable homemade treats or a local favorite food item. I’d be happy to host and arrange the event in the next month or so, so leave feedback in my comments with suggestions and perhaps we'll get something started!
Back to the biscotti, though. The final cookie is crisp and quite a bit tenderer than you might expect. It has a lovely, nutty aroma to compliment the chocolate flavors. I have, in the past, made a very similar version with peanut butter. They were very good – particularly when dipped in chocolate – but I must say that I prefer these slightly.
You may omit the second baking for a softer cookie. I personally like them crunchy. I did not include hazelnuts in my cookies, but I listed them as optional because I think they would be a nice addition.
2 ¼ cups all purpose flour
2 tbsp cocoa
½ tsp baking powder
½ tsp baking soda
½ tsp salt
3 large eggs
1 cup sugar
½ cup nutella
½ cup chocolate chips
½ cup hazelnuts (optional)
Preheat oven to 350F.
Sift together flour, cocoa, baking powder, baking soda and salt in a medium bowl. Using an electric mixer, beat eggs in a large bowl until frothy. Add sugar and continue beating on high setting for 2 minutes. Beat in nutella. Add flour mixture to egg mixture and stir until well combined. Stir in chocolate chips and hazelnuts, if using.
Divide dough into 2 or 3 logs with well floured hands and arrange on a parchment lined baking sheet. Press logs into rectangles roughly ½ inch thick.
Bake at 350F for 20 minutes. Remove logs from oven.
Turn oven down to 300F.
Using a serrated knife, cut logs into 1/3-1/2 inch slices. Arrange on baking sheet and return to oven.
Bake for 10-12 minutes, turn biscotti over and bake an additional 10-12 minutes (depending upon the thickness of your slices). Remove to a wire rack to cool. Store in an airtight container.
Makes 3-4 dozen cookies.
Monday, June 06, 2005
Rhubarb and Ginger Loaf Cake
Bakingsheet is now Baking Bites!!!
Head on over to check out the new site!
But I digress.
I chopped up some rhubarb and tasted a piece. It tasted like a tart, slightly lemony apple. But what to do with it? I recalled that chika made a recipe for rhubarb ginger bread, but was unimpressed with the results. Maki also recently made up some muffins. I decided that I wanted a sweet loaf that would be more of a cake than a light bread. I also wanted the cake to be as light as possible to play up the beautiful color of the rhubarb, so I used only egg whites. I added some lemon zest to boost the flavor a bit, too.
The final result is a sweet, white, moist loaf cake that has lots of candied ginger and rhubarb sprinkled throughout. It's nice toasted for breakfast and plain with tea in the afternoon or after dinner. The lemon flavor stands out slightly more on the second day, but it is very subtle overall. Well wrapped, the loaf will keep for several days. Since there is little fat in the recipe, it makes a good, everyday sort of cake. A very good everyday sort of cake, actually.
Preheat oven to 350F. Grease a loaf pan.
Sunday, June 05, 2005
Sunday Brunch: Lemon Scented Popovers
Bakingsheet is now Baking Bites!!!
Head on over to check out the new site!
I used this recipe from Epicurious and added 1 tbsp of lemon zest and 1 tsp vanilla. I think the lemon flavor would have been more pronounced with a tablespoon of lemon juice, or a bit of lemon oil, added as well. I will definately do this in the future.
Be sure to butter the muffin pan really well, because popovers stick like crazy. Also, if you poke a knife or skewer into the top of each popover halfway through baking, some of the steam will be released and you'll end up with a crisper shell and a popover that won't deflate.
Saturday, June 04, 2005
Back to Reality
Bakingsheet is now Baking Bites!!!
Head on over to check out the new site!
Is any vacation ever really long enough? I think not. Nevertheless, I am glad to be home.
I had an amazing time in Hawaii, though. I did so much that the trip seems shorter than it was.
The highlight of the trip was a 4.5 hour hike (roundtrip) out to the active lava flows on the south end of the island. We got up at 2:30am and started hiking around 3:30am so we could see the hillside glowing and get out to the coast in time for the sunrise. It was a tough hike out on a practically unmarked "trail" in the dark, especially since we had to keep our flashlights and eyes trained at the ground and it was very hot out near the lava, but well worth it. In the photo above, you can see how close I got to the actual lava: about 5-10 feet from a small cauldera! The steam in the background is where the lava is flowing into the sea.
I'll post more about my visit to Greenwell Farms, where I learned about the coffee making process, had some great coffee, and purchased green Kona beans to roast at home, when I try to roast the beans myself. I also had the best chocolate covered coffee beans I've ever tasted there. My tour guide there picked papaya, avocado and mango fresh off the trees for me - best avocado can remember.
I also saw endangered green sea turtles, took a ride through a century old sugar plantation's irrigation system, hiked through a lava tube and out over a lake of lava, visited several holy/historic temples (heiaus), saw a few waterfalls, went to a luau and tasted poi, took the best horseback ride I've ever had on a vacation and, of course, relaxed!
My favorite meal was the Mahogany Glazed Tofu at Brown's Beach House. The tofu was incredibly creamy. I wish I would have had time to go back and do their veggie tasting menu, but that just means I'll have to take another trip out there. My favorite appetiser was the Hummus and Pita at the Kona Brewing Company, which was great. Their portions are huge, so don't get overambitious in ordering. Their bread is made from spent grain used during the brewing process. I also had some very good pizza at Cafe Pesto. I would definately recommend all three of these places. Heck, I'll recommend the whole island!
The photos, from top to bottom, are: active lava, recently cooled lava, sunning sea turtle, Thurston Lava Tube, Kiluea Iki lava lake, a waterfall in Hilo, a delicious coconut-mango slice (that I will have to attempt to recreate sometime), luau torches, the horse I rode (Lihua), carvings at the Place of Refuge and the sunset, with the island of Maui in the background.


